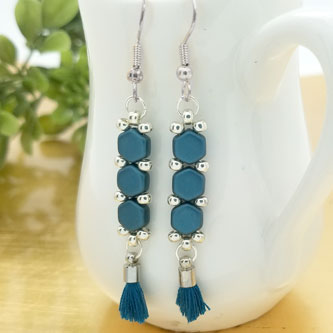
Were you able to make it to the Twin Cities Bead Bazaar this past weekend? We had so much fun! We’re sharing this fun tutorial that So Vang taught as a Make & Take class. Made with honeycomb beads, 8/0 Miyuki seed beads and silver findings, this easy pair of earrings are easy to wear and to make for your girlfriends!
These are items you will need to make these lovely pair of earrings:
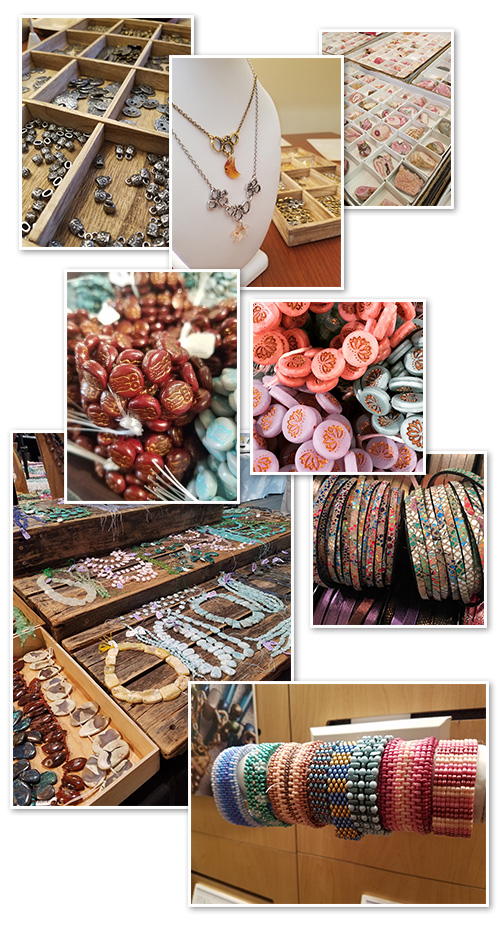
We are back from the Gem Show in Tucson, Arizona. We’ve brought back a bunch of new products and new ideas. AND made lots of NEW friends. Take a look at this quick video and images from our trip.
There were beautiful Czech beads, charms, links, leather, gemstones, beaded jewelry and so much more. Did you go to the Gem Show? What did you see? What was your favorite?
NEW Swarovski® 2-Hole Spike Beads
We are in love with these new Swarovski spike beads with 2-holes. Check out how we use these punk-rock inspired spike beads!
These Spike beads comes in three different shapes: hexagon, square and round. While they do come in a one-hole version, we stocked our inventory with the 2-hole version. We find more versatility and stability in its design and shape. Plus these five metallic colors are stunning!
Rose Gold Stud Leather Bracelet
One of our favorite DIY jewelry is the Chan Luu-inspired leather wrap bracelets. You can find our tutorial here to learn how to bead stitch and apply it to make this DIY jewelry.
Here’s an easy DIY using the round spike beads. Using post earrings, we use a small dot of super new glue and placed the round spike beads on. Let glue dry before wearing them!
This pair of earrings is made using two 8″ 24-gauge wire and stringing an 11/0 metal bead between each of the spike beads. Slide all the beads to the middle of your two wire and bring all four ends together to create a loop. With all four wire ends, make a wrapped loop and coil once around the base of the loop. Take your earwires and you will grasp the loop of the earwire with your flat nose pliers and twist the loop 90 degrees so that the loop of the earwire faces you. Open the earwire loop, slide on the hoop spike beads and close loop.
We are still in love with our Groovy Bead Frames and could not wait to share this easy tutorial with you. Shown in our January 2017 Color of the Year, are these easy-to-make seed bead teardrop earrings with the pewter drop groovy bead frames. Follow our easy illustrated instructions and a tutorial video.
You can pick up this pdf file tutorial with illustrated instructions. OR watch our tutorial video to see how simple it is to create.
A Quick Note: The holes of the Groovy Bead Frames might not have a clear opening. I suggest using a bead reamer (A002370) or something sharp and pointy to poke the holes first to ensure a clear opening before stitching.
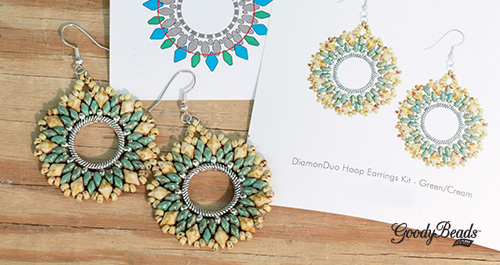
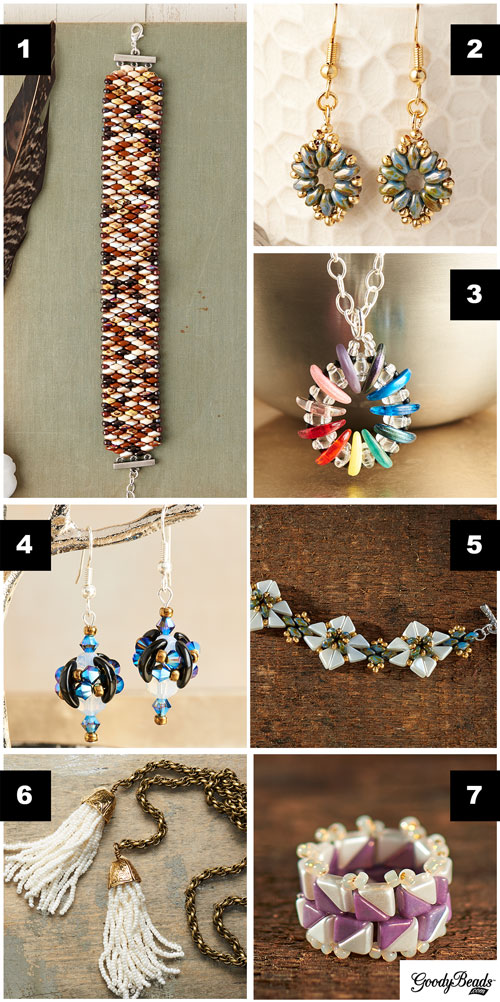
One of our October 2017 Trend is all about two-hole beads and we love the versatility it brings to bead stitching. Check out what we made with SuperDuos, DiamonDuos, Honeycomb beads, and Tango. Plus, two BRAND NEW patterns for you to try out, created from our designer So Vang.
SuperDuo Fan Earrings
SuperDuos are certainly a must-have when square stitching. These SuperDuo Fan Earrings takes minutes to make and think of all the different color combinations you can use. Get your downloadable Pattern Tutorial here.
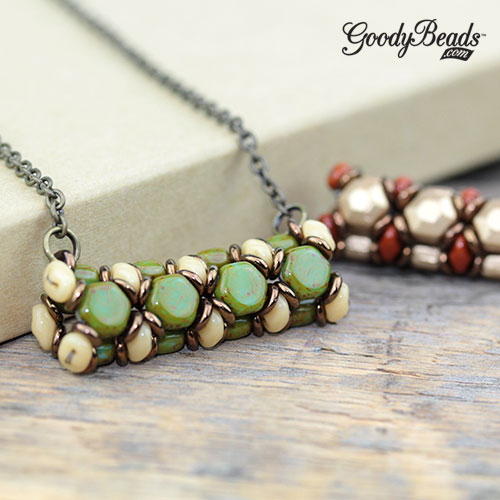
Honeycomb Beaded Tube Necklace
You’ve seen So use Czech Honeycomb in many of her designs. Here is an easy downloadable pattern you can follow. Use this pattern to make a focal necklace piece, add this tube on a bead pen or make earring by sliding it on a headpin, sandwiched between bicone crystals. What will you make?
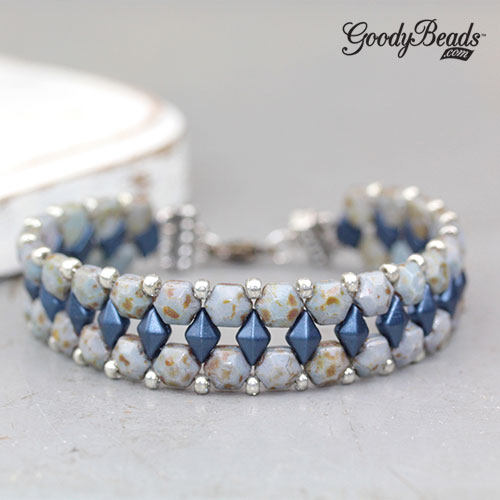
Honeycomb Jewel and DiamonDuo Bracelet
You’ve seen this popular bracelet before in our Czech Honeycomb Jewel Bead blog post. Check this blog post and learn how to make this bracelet with our other two-hole favorites: Honeycomb and DiamonDuo.
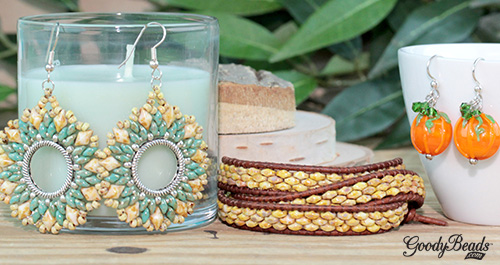
New Kits for Fall
GoodyBead’s newest addition to DIY kits are here! From our friend at The Bead Life, we’ve selected bracelet and earring kits to match the fall hues. Check out our NEW favorite collection of DIY kits on our Trends We Love!
Each DIY kits comes with all the beading components and detail instructions how to create each DIY jewelry. Plus, our bead-stitching kits will have illustrated tutorials! Tools are not provided, so make sure to get some on our Tool section.
Looking to add a new tool and beading technique? BeadSmith introduces the Endless Loom by Deb Moffet-Hall. Learn what this purposeful tool can do and help with your bead-stitching skills.
The Endless Loom (TL00275) comes with components to customize your loom and colorful illustrated instructions on how to assemble your loom. It has sizing rods to customize the bracelet let you desire, end bars, tension rods and elastic bands. Watch the video to learn how to assemble the Endless Loom and what kinds of bracelets you can create!
GoodyBeads Inspiration: Bead Weaving Ideas
Bead weaving and/or stitching can be a challenging, yet fun and fulfilling to create. Check out our selections of bead weaving ideas from hand-selected kits to easy and free beading tutorials.
GoodyBeads Inspiration: Swarovski® Crystals and Pearls
Swarovski crystals and pearls adds a shimmering and glistening effect to any jewelry project. Here are a few GoodyBeads jewelry pieces that can inspire your next jewelry piece!
Pantone® Color of the Year for 2017 goes to Greenery. This yellow-green hue is “nature’s neutral.” While it resembles the awakening of spring and the new life the season brings, it also plays a part to represent “the reconnection we seek with nature, one another and a larger purpose.”
Colors that can be used to closely resemble the Greenery colors are lime green, peridot and chartreuse. Find out how we transform this color into jewelry pieces for 2017.
We used this lime green cabochon (A016880) and adhered it to a Kabela filigree circle center (Z007181). We even pulled this beaded chain (CH00288) that mimics the hues of Greenery.
We’ve offset the bright green color with earthly bronze and brown beads (A017137) to show-off the vibrancy of the green (A005377) in this stretch bracelet.
The sheen in this green miracle bead (A014932) is paired with the new cross tribe crystal pendant from Swarovski® (SW01518) for a long drop pair of earrings.
These chartreuse seed beads (SB00078) are sewn with size 11/0 galvanized silver seed beads (SB00422) around a drop groovy bead frame (Z019397) to create these simple pair of earrings.
How will you show off Pantone’s 2017 Color of the Year, Greenery?
Czech SuperDuo Duets™
From BeadSmith® comes a new wave of SuperDuos beads: Duets. SuperDuo Duets features a two-toned color that shimmers, and different hues on each side of the bead. These unique beads are perfect for defining lines and beading accent color around borders.
BeadSmith has an inspiring video featuring these new SuperDuo Duets.
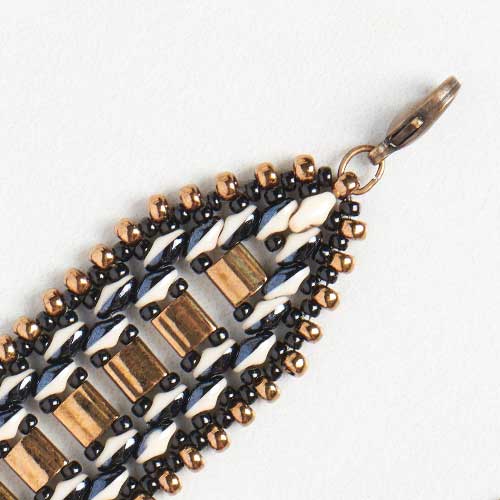
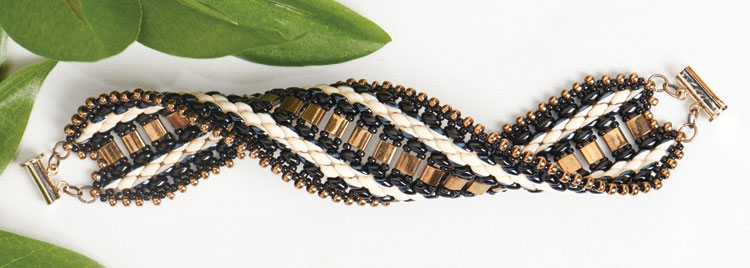
Color Shifting Bracelet from BeadSmith w/ Tutorial
We love the simplicity of this bracelet pattern from BeadSmith. We used the Black/Red Luster SuperDuo Duets (SB03501) with Orange Luster on Chalk SuperDuo (SB02110).
Here, we took the same pattern from the Color Shifting Bracelet and redesigned it by substituting the middle SuperDuos with a size 11/0 Miyuki seed bead, a Miyuki Tila and another size 11/0 Miyuki seed bead. We used Black/White Beige Luster SuperDuo Duet (SB03491) and layered the black sides of the duet together on the edges for an interesting stripe effect.
We also used 8/0 Miyuki Dark Bronze seed bead for the outer edges instead of alternating between a size 11/0 and 8/0 seed bead. Plus, check out the image below on how we’ve sewn our ends. We had sewn in a size 8/0 seed beads at the end to loop in a jump ring and lobster clasp on one end and chain link on the other.
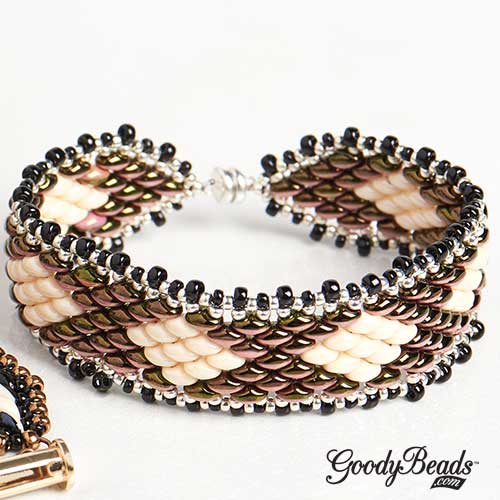
We amped up the pattern and adding more rows of SuperDuos and SuperDuo Duets to the previous bracelet. This bracelet pattern will create a band width just under 1.5” with a cream and black stripe effect and bronze border.
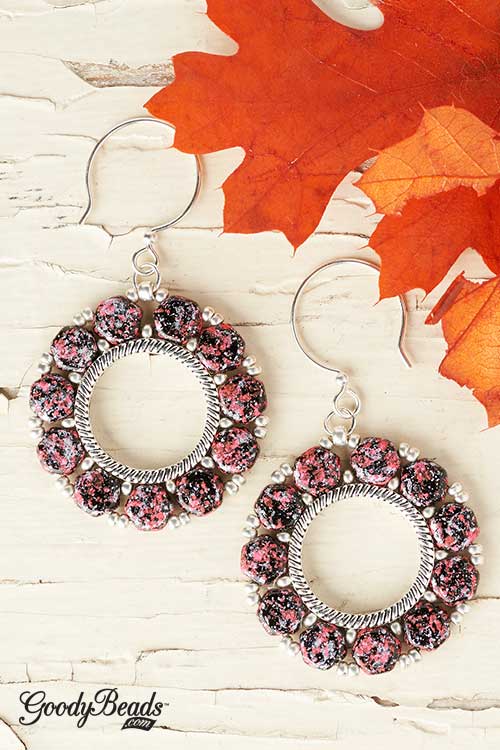
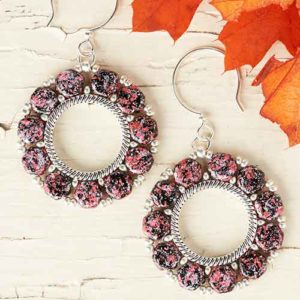
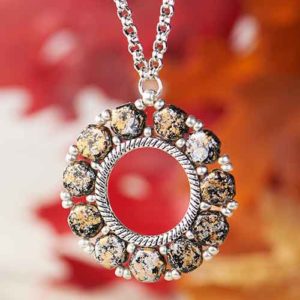
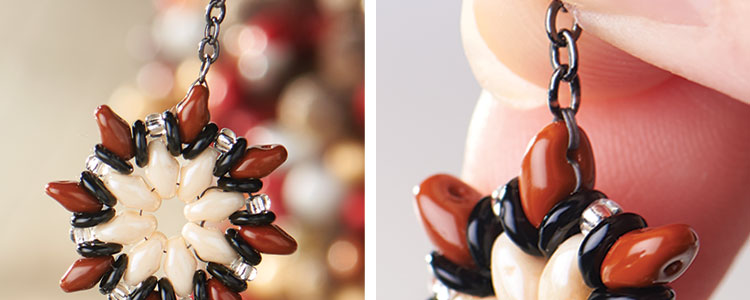
Czech Honeycomb Pendant with Groovy Bead Frame – FREE Tutorial
Here’s a unique way to use popular Czech Honeycomb beads. We have sewn them into a stunning pattern using a Groovy Bead Frame. Groovy Bead Frames are designed to string and decorate from different angles. This easy tutorial will create the perfect focal pendant on a necklace or dangled on a pair of earrings.
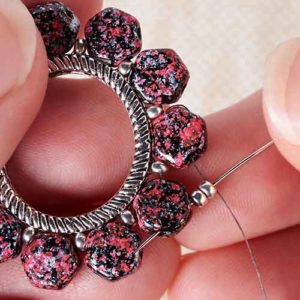
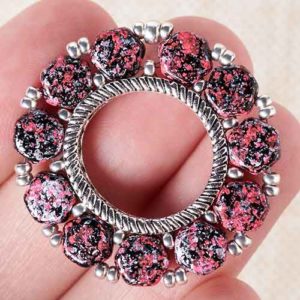
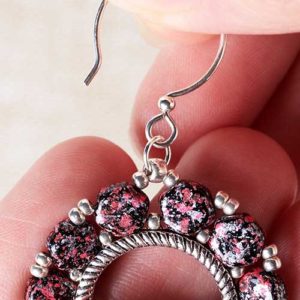
Honeycomb Necklace and Earrings
New to GoodyBeads are Tweedy Honeycomb beads that have a two-tone, splattered color finish.
Mia Mosaic Honeycomb Necklace – Golden
Designed by So Vang
Mia Mosaic Honeycomb Earrings – Fuchsia
Designed by So Vang
Czech Honeycomb Pendant with Groovy Bead Frame Tutorial
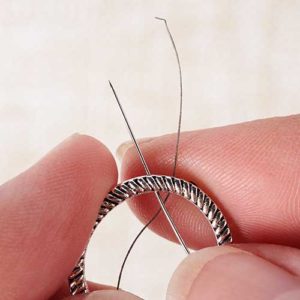
Step 1: Gather your materials. You will find that the Groovy Bead Frame is designed with 22 holes.
Step 2: Add 5’ of beading thread to your needle. Sew down one hole of the ring and up through the hole next to the first. Make a knot with the strands to anchor your thread.
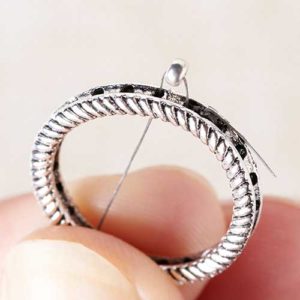
Step 3: Sew up and down through the two holes to secure thread. Sew up and out of the ring. Pick up a size 11/0 seed bead and sew down through the next hole.
Step 4: Sew up through the hole, pick up a size 11/0 seed bead and down the next hole. Repeat until you’ve finished your way around the frame. You would have added 11 seed beads.
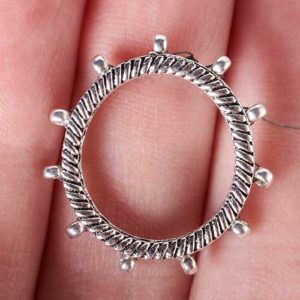
Step 5: Sew up and out one of the holes and through a seed bead. Pick up a honeycomb bead and sew through next seed bead.
Step 6: Repeat by adding a Honeycomb between each seed bead. You will have added 11 honeycomb beads. Tie an overhand knot to secure and tighten your beaded layers.
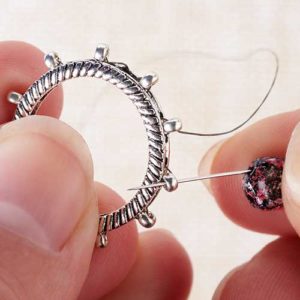
Step 7: Sew through a honeycomb bead and loop up to the outer hole of the honeycomb bead. Pick up two size 11/0 seed bead and sew through next honeycomb bead. Repeat nine more times. Make sure to keep your threads tight.
Step 8: In the last section, you will pick up one 11/0, one 8/0 and one 11/0 seed bead. Sew through last honeycomb bead.
Step 9: Tie off your thread ends and sew through a few beads before cutting excess thread.
Step 10: Open a size 4mm jump ring and slide through the size 8/0 seed bead and the loop of your ear wire. Close jump ring.
Step 11: Repeat all steps for other earring.
Step 12: For a necklace pendant; at step 10, slide the two ends off a 30” piece of chain link through jump ring. Close jump ring for a complete Czech Honeycomb ring pendant necklace.
(1) TCZ0096 – Sterling Silver Hoop Earring Wires with Loop by Tierracast®
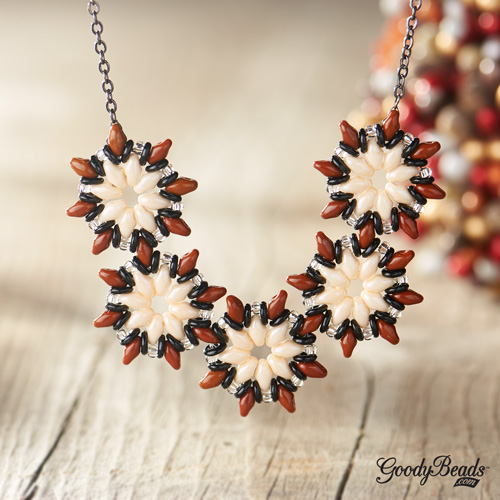
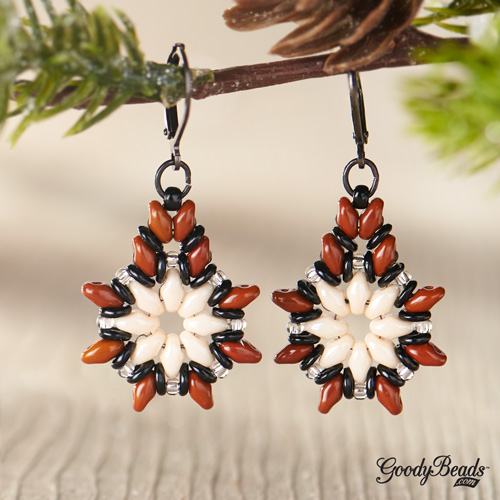
Czech SuperDuo Star Blooms Necklace and Earrings with FREE Tutorial
We have the perfect holiday jewelry set for the fun and stylish fashionista.. Try this free tutorial on how to make these star blooms necklace and earrings using SuperDuos, o-beads and size 10/0 round czech beads. Make it just in time for the holidays!
SuperDuo Star Blooms Poinsettia Necklace and Earrings
Designed by So Vang
Designed by So Vang
Tutorial and Components
Created by our in-house designer So Vang, you can make this holiday theme, star blooms necklace and earrings set with this FREE illustrated tutorial.
Necklace Extra Tip
When you have finished stringing together your five components, we have two options on how to attach your 24” chain.
First, you can sew the chain at the end of the SuperDuo as shown in our photo below. Refer to the illustrated tutorial or image to see that you connect the chain end to the SuperDuo across from the connected SuperDuo of your side poinsettia component.
Or, secondly you can use a small gauge jump ring to slide through theSuperDuo like how we’ve shown here. However, not all SuperDuo holes are large enough for the jump ring to slide through. If it does not, going with the first option will be best to adding your chain.
SuperDuo Southwestern Star Bloom Style
Designed by So Vang
Don’t think you are limited to just a holiday-hued necklace. Try out different combinations of colors and make it your own. We’ve used turquoise and deep coral to create ours above.
NEW Festive GoodyBeads Holiday Kits
Start checking off your list of gifts to buy with these new GoodyBeads holiday kits. Designed by our in-house designers Tory Vezina, Harper Gray and So Vang, celebrate the festive holidays with 23 kit selections to choose from.
These new GoodyBeads Holiday kits are in a clear pillowcase box, which is convenient to slap a bow on top and place it under the tree for your beading friend! Or make them to wear to your next gift exchange.
So Vang Holiday Kits
Inspired by vintage ornaments, get these retro-inspired kits to bring some holiday cheer!
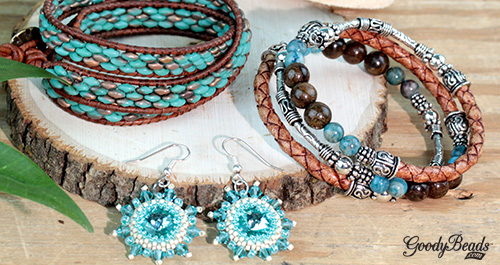
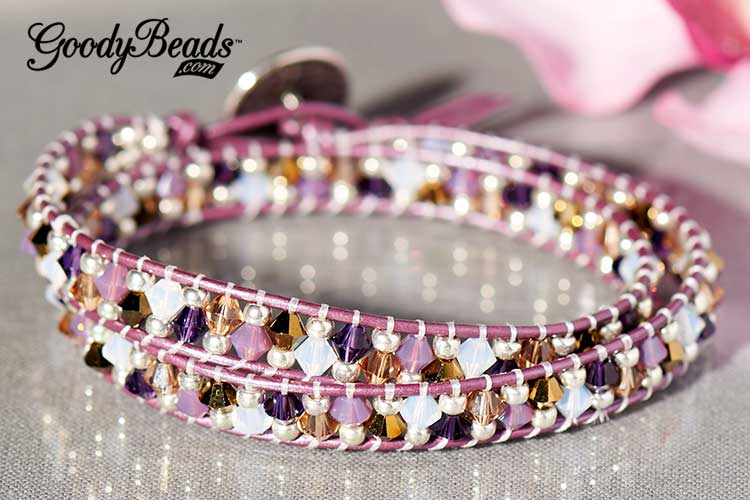
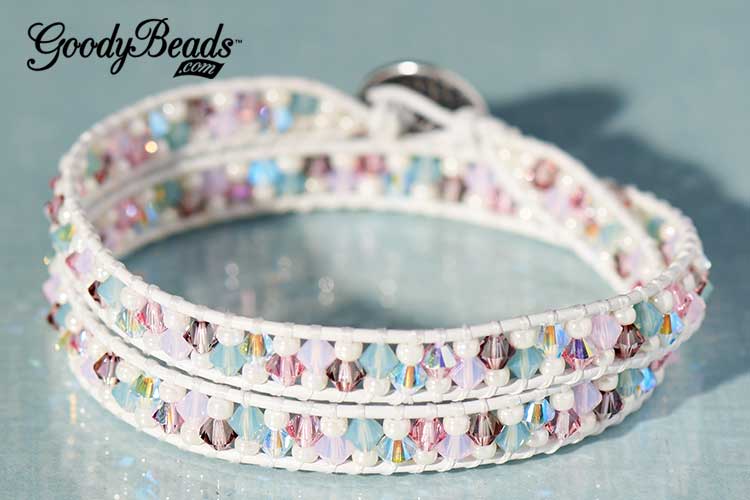
GoodyBeads’ Master Mixes with Swarovski® Crystals and Wrap Bracelets
Introducing all-new Master Mixes, hand-picked by our GoodyBeads’ in-house designers. Check out these new additions to GoodyBeads and how we use these mixes in making a leather wrap bracelet.
Swarovski 4mm Crystal Mixes
We did all the hard work for you in mixing and matching Swarovski crystals for any themed jewelry project. These selections of 4mm bicone crystals comes with a five or six color combination consisting of up to 150 crystals total. Each mix comes in a non-spill, poly-bag inside a gorgeously viewable tin.
Leather Wrap Bracelet with Swarovski Mixes
Be inspired with what you can make with these mixes. A favorite of ours is making wrap bracelets. Here are two examples:
Grapevine Bracelet by So Vang
Designed by So Vang
For this fall-theme bracelet, we used So’s Grapevine mix (MX00012), 1mm metallic berry leather cord (A022064), Crystal Fireline (A006587), size 8/0 galvanized silver seed beads (SB00106) and TierraCast® Button (TC01954).
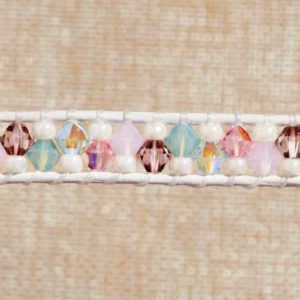
Victorian Rose Bracelet by So Vang
Designed by So Vang
Or, for a lovely pastel combo, we used the Victorian Rose mix (MX00004), 1mm white leather cord (A022071), Crystal Fireline (A006585), size 8/0 ivory ceylon seed beads (SB00098) and TierraCast® Button (TC01954).
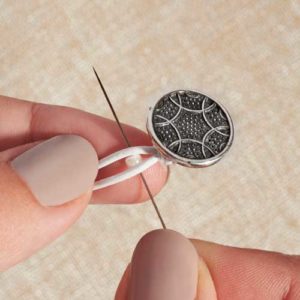
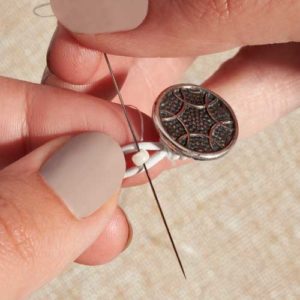
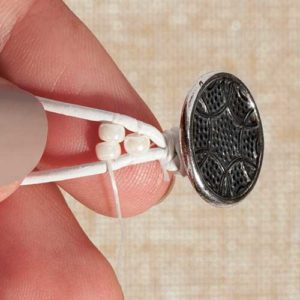
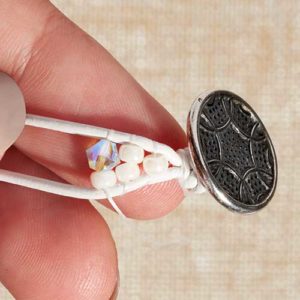
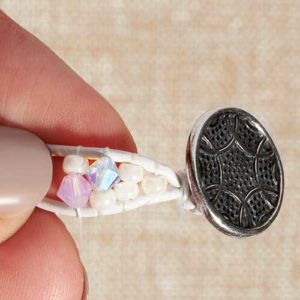
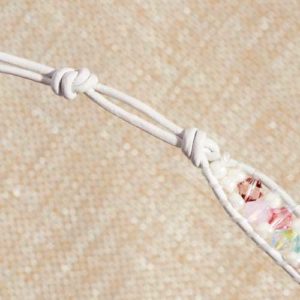
Leather Wrap Bracelet with Swarovski Master Mixes
Here is a quick tutorial on how to make these Swarovski mix leather wrap bracelets. You may want to check out our leather wrap DIY blog post to give you a refresher on how to make a leather wrap bracelet.
Step One: Slide button to the middle of your 1mm leather cord. Make a knot.
Step Two: Make a knot with your beading thread close to your leather knot. Pick up one 8/0 seed bead and lay in between and behind the leather cords. Pull your needle and thread through.
Step Three: Bring needle over leather cords and sew through seed bead.
Step Four: Repeat steps two and three with two seed beads in this row.
Step Five: For this row, you will pick up one seed bead and one bicone crystal from your mix, sewing under and then over the leather cords.
Step Six: For this row, you will pick up bicone crystal, then one seed bead. Sew under and then over the leather cords.
Step Seven: Repeat steps five and six until you’ve reached a comfortable length to wrap around your wrist two times.
Step Eight: End with a row of two seed bead and the last row with one seed bead. Tie off beading thread and cut off excess. You can add a small dab of glue to secure the knot. Make a knot with the leather cords close to the seed bead. Make a second knot with a gap wide enough for your button to pass through. Cut excess leather cord end.