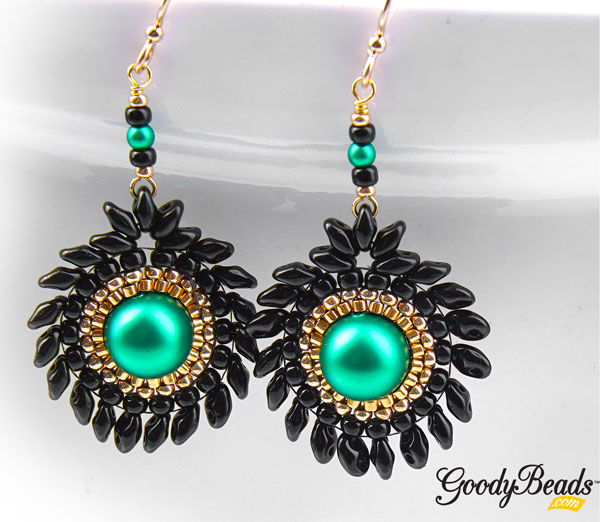
Peacock Eden Green Pearl Earrings – Pattern Tutorial
We are back with a new pattern tutorial using the new Eden Green Pearl from Swarovski®. Make yourself a pair of these earrings to your next spring outing!
Shown on our previous Facebook LIVE video, So Vang and Tory Vezina took on the challenge of designing with the new pearl from Swarovski. As the pearl itself is a vibrant hue and luster of green, So Vang had designed it with black and gold, to highlight and frame the pearl, creating what almost resembles a peacock feather. Get this FREE Pattern today here!
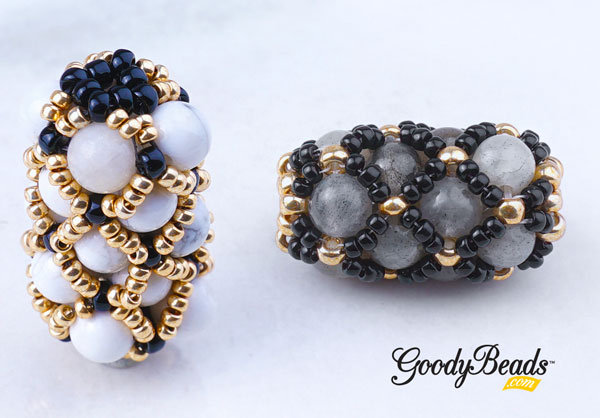
We’ve got a fun lattice beaded bead pattern tutorial for you using 6mm round gemstones. Can’t you image the possibilities!
As a request from our viewers, So Vang is sharing her pattern to making a lattice beaded bead using 6mm round gemstones. You don’t have to use 6mm gemstones. You can use 6mm bicone beads or 6mm round Chinese Crystals or Pearls. You can decide on the colors, that’s the fun of taking a tutorial and making it your own!
This pattern is also an altered version to the 2mm Pearl blog.
Sometimes, when designing your lattice beaded bead, you will find that the tutorial pattern won’t work as well and you’ll need to adjust the pattern. In this example, we have the 6mm Labradorite round beads. These beads are a slight smaller than the white Howlite, so in Step 6 I had adjusted to using THREE 11/0 seed beads instead of FOUR. This way, the lacing of the seed beads will hug the round gemstones.
What will you design today! We would love to see them. Make sure to tag us on Social Media so we can see your lovely creations!
Easy SuperDuo Bracelet – Tutorial
Czech SuperDuos are a versatile two-hole bead that can be easily made into a simple stitched bracelet. Check out this super simple tutorial using only Czech SuperDuos, size 11/0 Miyuki seed beads and beading thread.
If you know So Vang, you know that SuperDuos are her favorite two-hole bead to use when bead stitching. It creates fun angles and combines easily with her other favorites like Czech Honeycomb beads and DiamonDuos. But a simple basic way to make a bracelet using SuperDuos is combining it with size 11/0 and warping the strands around for this easy DIY bracelet.
You can make a one wrap bracelet with this tutorial or make a multi-wrap. To make this bracelet, start out with your bracelet length (in this case we did 7 inches), multiply that by the amount of wraps we wanted and add another foot. This length will be the amount of beading thread you will need. In this case, we used about 4 feet. We strung 4 sections of 4 different color ways to make this bracelet. Each section measures 7 inches in length.
A quick tip, when you are finished sewing all the necessary beads, lay your piece straight and smooth out the piece so that everything lays flat before you tie off your ends.
Sample Color ways
Test out different colors to play with. Here we have four samples of various color ways you can make your bracelet.
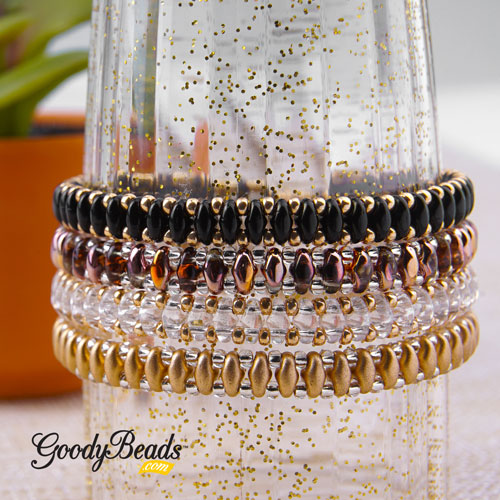
New from the 2019 Tucson show are these lovely Czech Ginko beads from BeadSmith. Check out today’s free tutorial using Ginko beads.
Czech Ginko beads are a two-hole bead in the shape of Ginkgo leaves.
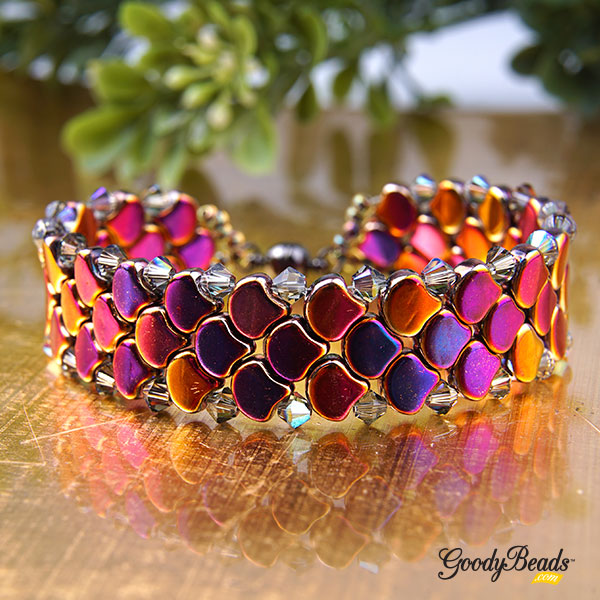
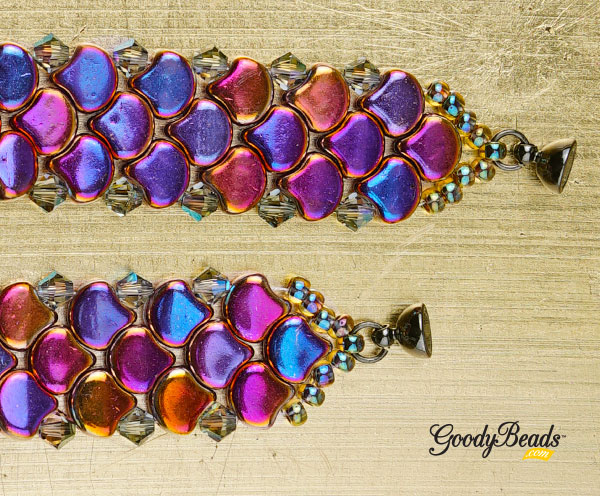
Scale Bracelet
This bracelet tutorial was inspired by Nela Kábelová’s (www.gianelle.beadforum.cz) pattern called Snake Skin Bracelet. We used her pattern and tweaked it slightly to add 4mm Swarovski® bicone crystals instead of 4mm round beads. And used 8/0 Miyuki seed beads in place of the seed beads she used. Don’t they look like fish scales? Dragon scales? Mermaid scales? They are a beautiful shape with lots of option for bead stitching.
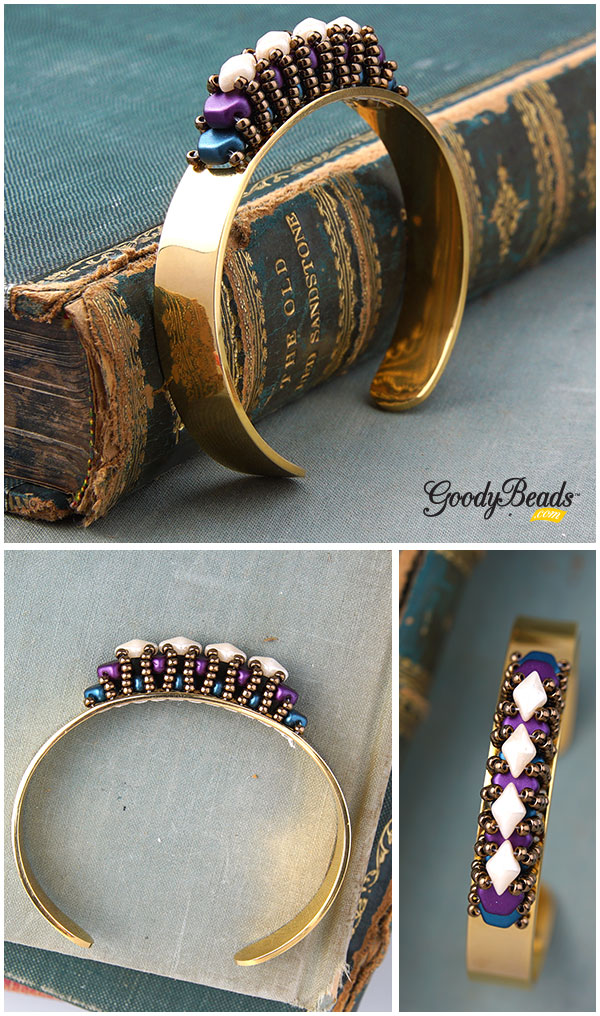
We love these beadable accessories, especially the beadable cuffs. So Vang has designed a layered beadable cuff and we could not be MORE excited to show you how to make one with this illustrated tutorial.
This pattern is great for making a three layered bracelet. You can also layer on top of that, creating a pyramid shape. You can stitch on one layer, two layers or mix-up some two-hole Honeycomb and DiamonDuo/GemDuos beads.
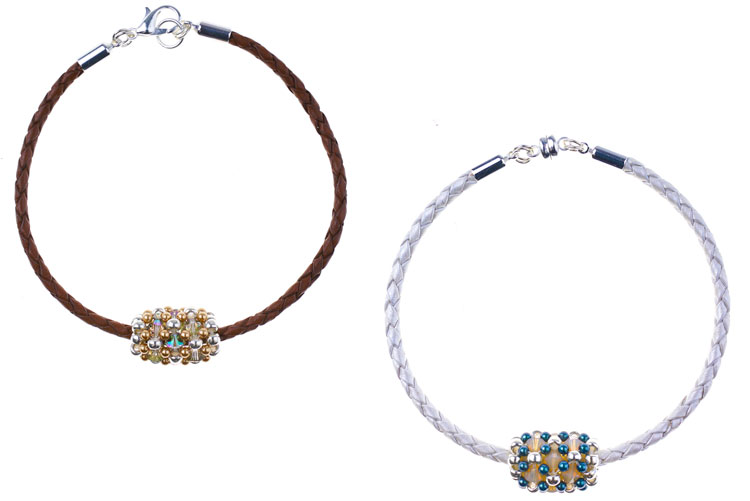
Beaded Bead with 2mm Swarovski® Pearl – Pattern Tutorial
New to GoodyBeads are 2mm Swarovski Pearls! Their glossy shine is sure to add fanciness to your designs. Here is a simple beaded bead using 2mm Swarovski pearls, 4mm Swarovski bicone crystals and 8/0 seed beads.
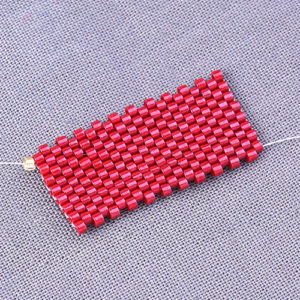
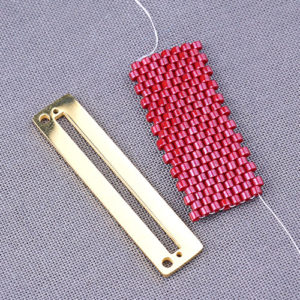
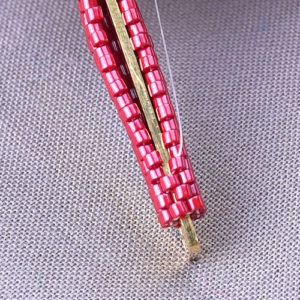
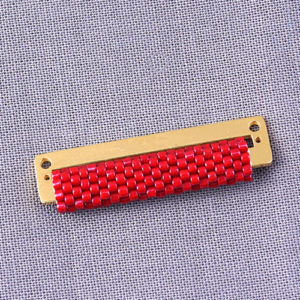
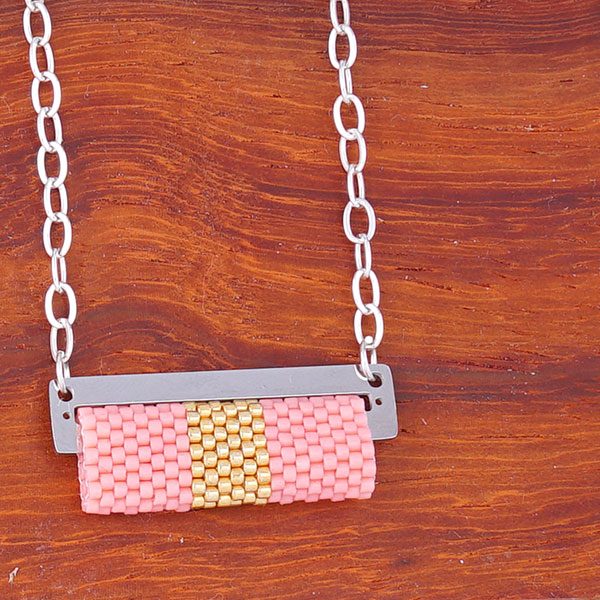
We are in love with our beadable findings! And with a simple knowledge of peyote-stitching Miyuki 11/0 Delicas, create a tube, attached through the Beadable Bar Pendant, to make a minimalistic neckalce.
You don’t have to stick to the 14 rows of peyote rows. You can make the tube longer and with different pattern designs for a longer and unique pendant.
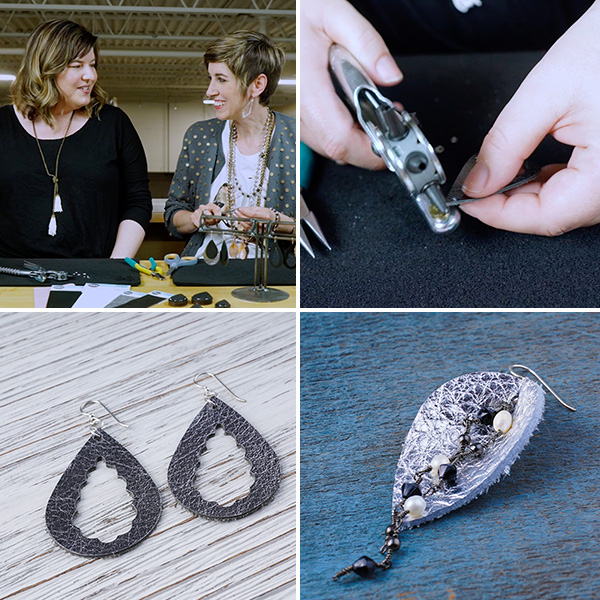
Make trendy and fashionable leather earrings using the Sizzix Big Shot and the Teardrop Dies (SZ00025). Watch this video tutorial as Tory and Candie Cooper show you how easy it is to create some earring for yourself!
Check out our previous blog where you can learn how to Set Up your Sizzix Big Shot and even learn to make DIY Tassels. Theres a ton of ideas we can’t wait to show you!
Here are leather and chain components that was used in this video tutorial:SZ00002, SZ00003, CH00659.
Hope you have fun making some earrings.Add your choice of jump rings and earring findings to finish off your earrings. Or make them into a focal necklace pendant. So many possibilities!
Even Peyote Stitch on Czech Carrier Beads with FREE Patterns
New to GoodyBeads are the oh-so popular Czech Carrier Beads. We have an easy even count peyote stitch pattern to get you started.
Czech Carrier beads are making waves in the DIY jewelry making world. They have two holes and can be used for a stretch bracelet or intricate necklaces! Because they have two holes, they can be easily used in your favorite bead-stitching projects! The typical way to style carrier beads is bead stitching a tube of beads or seed beads to encase the carrier beads. We are using the classic peyote stitch tubes to slide over the carrier beads. Check out this tutorial and pattern ideas below!
Even Count Peyote Stitch
For these patterns, we used an even count peyote stitch pattern and created tubes to side over Czech Carrier beads. Check out this simple illustration below to understand how to do an even count peyote stitch pattern. Don’t forget to PIN this for later!
Even Count Peyote Stitch Tutorial
Peyote Stitch Patterns
We adore these colors! We used four colors to design these 15 different patterns. Make sure to DOWNLOAD PDF of these patterns and a quick tutorial of how to create tubes to add to your Czech carrier beads.
This step is important because this avoids the tubes from sliding off the carrier beads. We would recommend using GS Hypo Cement (A007224). It has a precision applicator, which helps get into small openings and a cap that stops overflowing glue from escaping and drying up. You have two options of when to add your glue.
First option is before you zip up your tube pattern. Apply glue to both sides of the carrier bead and lay it in the middle of your pattern. Fold your pattern around the carrier bead and sew the ends to zip up the tube patter.
Second option is after making your peyote stitch tubes. Complete your tubes and slide carrier bead half way through, still exposing the bead. Run your glue around the exposed area of the bead, let it sit for a second or two and slide the tube over the rest of the carrier bead.
Let it the beads dry completely before using. Make sure to read instructions for more information.
First we cut a 4 feet piece of wire. Fed one end of the wire through a 2′ piece of chain (this will be the extender chain for the necklace) and centered the chain at the middle of the beading wire. Slide on a 2mm crimp tube and using the Magic Crimper (TL00288) crimped the tube into a bead. You can check out our previous blog post HERE about the tool. Next, with both ends, slide on (25) size 4mm ivory miracle bead, (3) size 6mm miracle bead and (3) size 8mm miracle bead. Slide a 6mm miracle bead on each wire thread and slide on first carrier bead. As you can see we added a miracle bead in between each carrier bead. from the top strand, we used size 6mm miracle bead and the bottom used size 8mm miracle bead. This helps the necklace take shape. Reverse the pattern of strung beads to the end and crimp off the end with a lobster claw clasp.
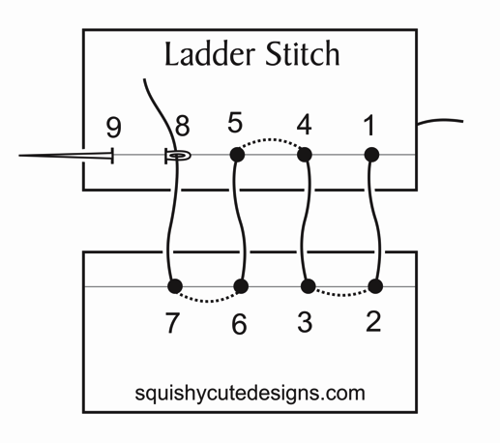
If you’ve done fabric sewing and done a ladder stitch to close openings, this technique would be easy for you. Below is a illustrated look at what a ladder stitch looks like from this external website we found. So every time you come up, that’s when you will sew through your bead hole before sewing across and down.
One of our popular demos was bead stitching Swarovski two-hole spike beads on Beadable Accessories like the cuff and rings. Download our components list HERE for this demo and watch our facebook video of how So Vang ladder stitches the spike beads on beadable rings and cuffs.
Make simple drop earrings using Memory Wire and a few tools. Watch as So shows you how easy it is to create hoops and dangle crystal pendants off it. Download the pdf file HERE to get components and tools used for this super easy demo!
One of our popular project request is our beadable fan earrings with 11/0 Miyuki Delicas and long tassels. Check our video to see how easy they are made.
Starting with 2.5′ to 3′ of beading thread, attach a stopper bead leaving a 6″ tail end.
Start from one end of the fan, come up through the bottom hole.
Add your three delicas and go across the beadable opening and down the hole.
Sew up the next hole, add your three delicas, go across the beadable opening and down the hole.
Repeat this until you’ve gone across the beadable fan pendant.
You will now add your pearl bead by sewing up the hole closest to the round opening, add your pearl bead and go across the circle opening and down the hole.
Sew through the pearl bead again and up the hole, through the pearl again and down the hole.
Tie off your ends and cut excess off.
Open small jump ring and slide on tassel and through the middle hole of your fan pendant. Close jump ring.
Open earwire loop and attached top fan pendant loop to earwire. Close loop.
Repeat all steps for other earring.
Paisley Duos Bracelets – Pattern Tutorial
We are loving these Czech Paisley duos two-hole beads. Their shape makes them versatile that you can turn or flip them when bead stitching and create a whole new design! We have two simple bead stitch bracelet designs you can easily make with Czech Paisley Duos.
Paisley Stripe Bracelet
This is a simple bracelet you loop your beading threads and make a knot to bring everything together. We love how these paisley beads cup each other nicely like a yin yang. Use two different colors to make this Paisley Stripe Bracelet.
We used the same two Paisley colors to stitch a leather wrap bracelet. Find the leather wrap bracelet tutorial from the How to Make a Leather Wrap Bracelet blog post to help make this bracelet and to determine length of desired wraps you want. We first started with adding 5 beads of one color and then one of the second paisley color. Repeat this pattern then gradate in the middle of your bracelet to 5 of the second color and one of your first color.
BeadSmith has some wonderful patterns online using the Paisley Duos. Make sure to stop by their website for inspiration and pattern tutorials HERE.
4 Last-Minute Mother’s Day Ideas
Don’t have a gift for Mother’s Day? We have 4 last-minute gift ideas for the deserving mother and women.
Whether it’s your Mom, sister, Aunt, Grandmother, wife or other beautiful women in your lives, a small gift can show your appreciation. If it’s handmade, that’s extra bonus points! Plan with handmade jewelry made with Swarovski Pearls, customized glass tiles with photos, easy-to-make beadable gifts or select the many DIY kits available.
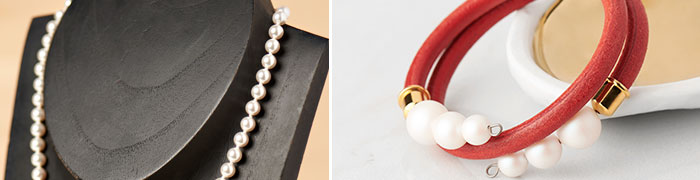
Pearls
It’s been a tradition to gift pearls for mothers, so why not on Mother’s Day. While it embodies purity and love, it’s the kind of jewelry that reflects the elegance of a woman. Here are different ways to use Swarovski Pearls.
Wire-wrap pearls to make linked earrings or a waterfall necklace (Wire-Wrap Loop and June Birthstone Trend). Or make cascading earrings with Swarovski pearls and crystals in this stunning lampwork glass earrings (Wedding Jewelry Trend).
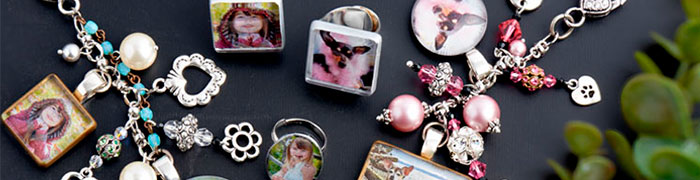
Customized Glass Tiles
One project you can get kids involved in making are customized glass tiles with photos. Check out our previous blog how to make customized glass tile for a fun keychain dangle, ring or add a magnet to stick on the fridge.
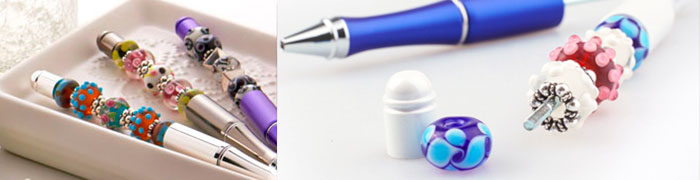
Bead pens are perfect for moms to slip into their handbag or on their work desk. They are sturdy in weight and customizable with beads. Check out Hot Category: Bead Pens for compatible bead pens and large-hole beads to create one today.
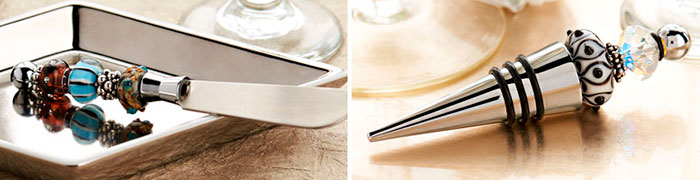
Don’t forget that moms will also love beadable gifts like a letter opener, winestopper or even a beadable keychain. Add large-hole beads and wrap it up for an acceptable gift!
If you can’t decide what to make, pick up a DIY kit. Make jewelry with an easy Earring, Bracelet or Necklace Kit and gift it. These kits are packaged with bead, findings and instructions, so you can even stick on a bow and gift the whole kit for the crafty, beading lady!
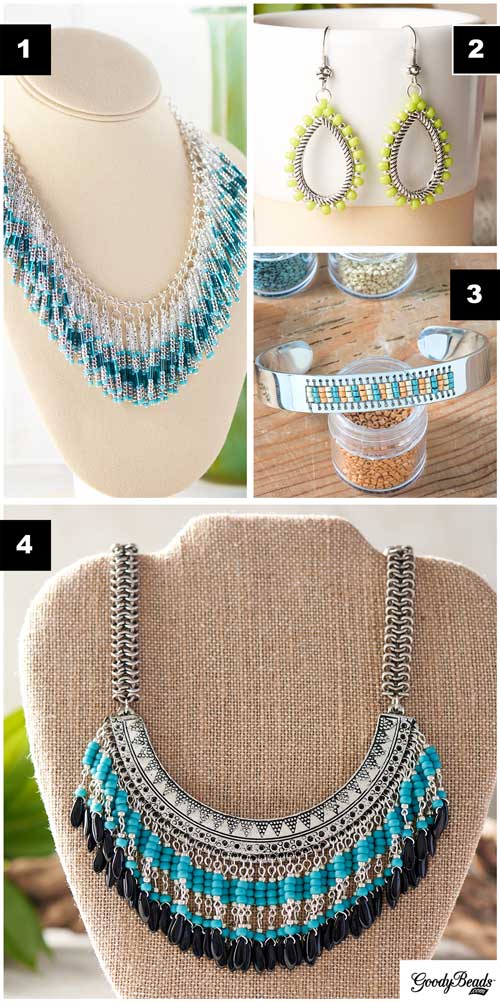
We’re in love with bib connectors at GoodyBeads. So is Candie Cooper! Watch our product video where Tory and Candie will show you bib connectors available at GoodyBeads and how easy it is to add beads, charms, tassels and more for a fun and easy necklace.
Our bib connectors are lightweight with detailed designs. They have holes to easily add charms or tassels to with a jump ring. Watch the video below where Candie and Tory will show you the many kinds of bib connectors you can find on GoodyBeads, sample necklaces using bib connectors and they demonstrate how easy it is to add embellishments to them.
Spring is here and we have some lovely seed bead ideas. If you have a stash of random seed beads, these are great ideas to combine and create with seed beads.