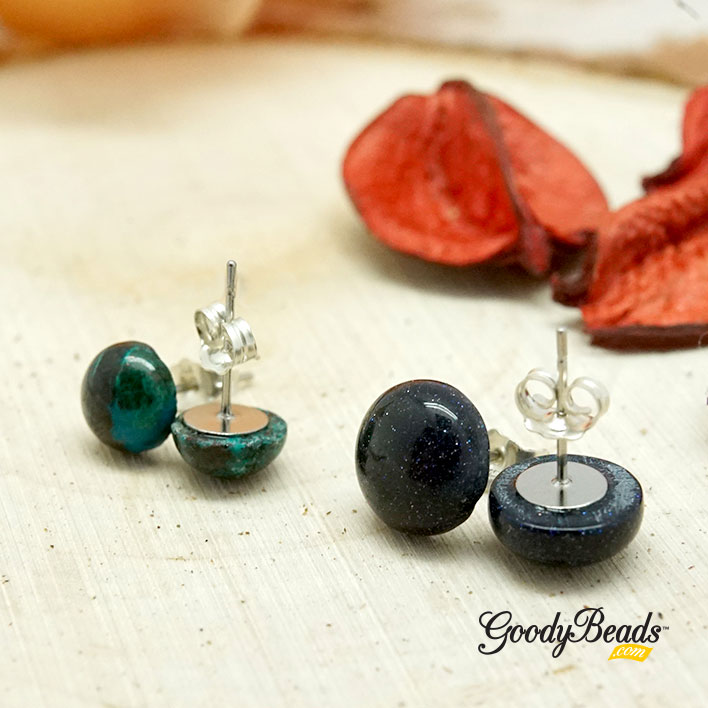
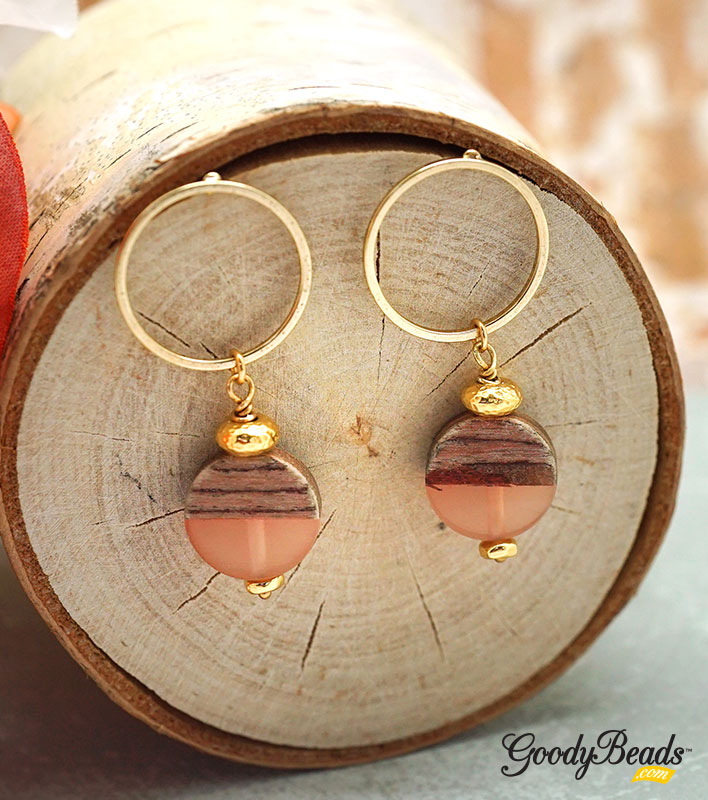
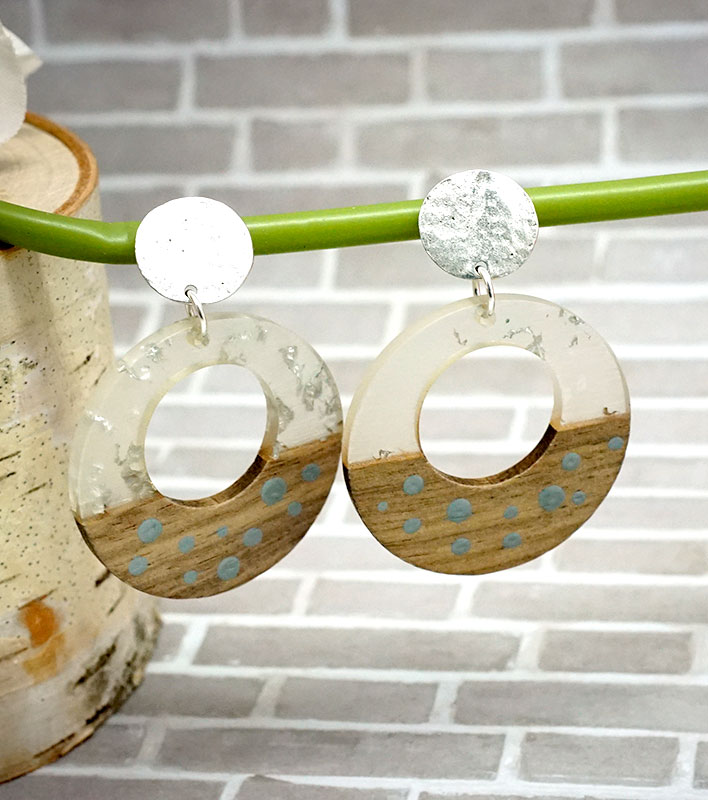
Vintaj Patina Polka Dot Wood & Resin Earrings

Let’s be creative with these DIY Wood & Resin Earrings with Patina Paint. From one of our Facebook LIVE episode, Tory showed how easy it is to paint with Vintaj patinas on these trendy wood & resin pendants.

What you’ll need for wood & resin earrings:

GoodyBeads.com Blog | DIY Wood & Resin Earrings with Patina Paint FREE Tutorial

Directions:

  1. Shake up the patina bottle to mix the contents well. Pour out a small amount of patina.
  2. Using the back side of a paint brush or a small round tip and dip it in to the paint.
  3. Make dots on the wood part on both wood & resin pendants.
  4. Let paint dry for a few minutes.
  5. Open jump ring, slide on wood & resin pendant and through loop of earring. Repeat for other wood & resin and earring.

Video Tutorial

Check out our previous Facebook LIVE episode with these fun wood & resin earrings tutorial.


DIY Ring Link Adjustable Leather Bracelet

Today’s project is the DIY Ring Link Adjustable Leather Bracelet we demoed at the Pinners Conference. This project uses some of our favorite branded components like TierraCast ring component, Dakota Stones large-hole gemstones and Leather Cord USA 1.5mm leather! Combine them all and get a fun DIY you’ll need to make for all your friends.

What you’ll need for Ring Link Adjustable Leather Bracelet:

GoodyBeads Blog | DIY Ring Link Adjustable Leather Bracelet FREE Tutorial

Directions:

  1. Cut two pieces of leather at 18” length each.
  2. Take one leather piece, fold in half and make a lark’s head knot on the TierraCast ring.
  3. Slide a gemstone onto both strands of leather ends.
  4. Repeat steps 2 and 3 with other leather.
  5. Cross leather ends, keeping strands straight. And then tie a sliding knot with an 8” piece of leather:
    1. Lay an inch of leather end over the bracelet’s leather strands.
    2. Hold end under your non-dominant hand and wrap around all the leather strands.
    3. Continue to wrap cord around leather strands loosely, working back towards the cut end of wrapping cord. Make 5 coils.
    4. Thread leather under and through all the coils you’ve just created.
    5. Adjust the coils so they sit neatly and pull both leather ends in opposite directions to secure knot.
    6. Trim away excess leather close to coil
  6. Make an overhand knot with leather ends. Cut off excess leather.


DIY Hanging Crescent Earrings with Swarovski® crystals

Today’s DIY hanging crescent earrings are gorgeous because they contain fun kidney shaped earring findings and popular crescent charms, topped off with Swarovski crystals. You can also make this in a silver version too.

What you’ll need for crescent earrings:

  • Z016772 (2) – 22.4mm Gold Hanging Crescent Connector Charm (Silver Z016773)
  • Z003274 – Gold Plated Kidney Shaped Ear Wire (Silver Z003942)
  • SW00103 (2) – Swarovski 6mm Bicone Crystal Clear Beads
  • A019690 – 1 Inch Gold Plated 21 Gauge Headpins with Ball Top (Silver A019694)

GoodyBeads.com Blog | DIY Hanging Crescent Earrings with Swarovski crystal FREE Tutorial

Directions:

  1. Slide a crystal on a headpin and make a simple loop.
  2. Open crystal dangle loop and slide on inner hole of crescent connector. Close loop.
  3. Open earwire loop, slide on other hole of crescent connector and close loop.
  4. Repeat all steps for other earring.

Designed by Tory


DIY Stretch Bracelet with Miracle Beads and Elonga Cord

Our DIY project for today is a fun and simple stretch bracelet using 0.7mm Elonga Cord from Beadalon®. We used red and ivory miracle beads, which are fitting for the festive season or to show your patriotic side. In this tutorial we’ll show you how to braid and weave this easy DIY stretch bracelet!

Elonga Cord

Elonga is a unique stringing material made up of several individual stretchy strands bonded together. The multiple-strand floss construction of Elonga gives it a soft, silky drape, which makes it easy to knot; and is ideal for lightweight beads. It can be used with big eye or collapsible needles and works great with the Elastic Cord Needle. 

Stretch Bracelet Components & Tutorial

Items used in bracelet:

GoodyBeads.com Blog | DIY Stretch Bracelet with Miracle Beads and Elonga Cord FREE Tutorial

Directions:

  1. Cut 3 feet of cord and pre-stretch your cord to loosen the elasticity.
  2. Slide an ivory bead to the midpoint of cord.
  3. Put one red bead on each cord/side.
  4. Take another ivory bead and put both ends through, crossing each other.
  5. Continue step 3 & 4 until you’ve reached your desired length. Note: make sure to make pattern/bracelet a bit smaller than your wrist size because the cord will stretch a bit over time.
  6. Put one red bead on each cord/side and slide one end through the first ivory bead you added in step 2.
  7. Make a surgeon’s knot with both cord ends. Make second surgeon’s knot (optional).
  8. Trim excess cord end.

Video Tutorial

Check out our previous Facebook LIVE video where Tory demonstrates how to create this DIY stretch bracelet.


DIY Earrings-Black & White Striped Earrings

Our October DIY Black & White Striped Earrings today consists of two components with glue. One of our newer acetate products comes top drilled, which makes the perfect components for our Gold Hook Earrings.

What you’ll need for these pair of DIY striped earrings:

  • Z013649 – Black & White Stripe Acetate Kite Shape Top Drilled Pendant
  • Z011596 – 23mm Gold Hook Earrings with Half Drill Post
  • TL00364 – Loctite Super Glue
    OR
  • A015821 – Super New Glue

Goodybeads.com Blog | DIY Earrings-Black & White Striped Earrings, FREE Tutorial

Directions:

  1. Add a small drop of glue inside the top hole of the acetate top drilled pendant.
  2. Insert the post/mandrel of the hook earring inside the glued hole.
  3. Lay pieces flat to dry.
  4. Repeat to make the other earring.


DIY Irregular Nugget Necklace

We’ve got the perfect easy DIY necklace for you today that requires no tools! Our simple DIY Irregular Nugget Necklace compliments your style with its standout, statement pendant that already comes with its own loop. Top it off with a bail and ready-made necklace, this DIY will get you pumped up for a fun day!

Items used in necklace:

  • Z001033 – 32 Inch Rhodium Plated Cable Chain Necklace
  • TC02582 – 9mm Bright Rhodium Smooth Pinch Bail by TierraCast
  • Z017958 – Crystal Quartz Large Irregular Nugget Pendant

GoodyBeads.com Blog | DIY Irregular Nugget Necklace

Directions:

  1. Slide pendant loop and chain of necklace between the pinch bail.
  2. Pinch the bail down so the prongs are in the loop of the pendant.

    Note: if necklace is too long, open a jump ring and slide off chain end. Cut chain to your preferred length and connect jump ring to new length of chain end.


DIY Gemstone Post Cabochon Earrings

Today, Our easy DIY gemstone jewelry is on how to make these fun post earrings using DakotaStones cabochons.

Items used in earrings:

Directions:

  1. Take the filer and give the back of the cabs a few light scratches.
  2. Wipe the back of the cab. Add a small dot of Super New Glue.
  3. gently position the post earrings in the center of the cab back.
  4. Repeat for other earring.
  5. Leave earrings for a few hours to dry.


DIY Crescent Hoop Necklace with Nunn Design Component

The crescent shape is such a trendy shape to make DIY jewelry with. We have this fun and simple necklace using a crescent connector and a Nunn Design Hoop component.

Items used in necklace:

  • Z001033 – 32 Inch Rhodium Plated Cable Chain Necklace
  • Z016775 – 33mm Antique Silver Hanging Crescent Connector Charm
  • Z008275/Z008276 – 50mm Flat Grande Hoop by Nunn Designs
  • TC00200 – 11mm Rhodium Hammered Round Link by TierraCast
  • A021744 – 10mm Round Clear Faceted Glass Charm with Silver Plating
  • Z011515 – 5mm Silver Plated 18 Gauge Jump Ring
  • A012844 – 8mm Matte Silver Plated 16 Gauge Jump Ring

GoodyBeads.com Blog | DIY Crescent Hoop Necklace with Nunn Design Component FREE Tutorial

Directions:

  1. Open 5mm jump ring, slide on faceted crystal charm and crescent connector (inner hole). Close jump ring.
  2. Open another 5mm jump ring, slide other hole of crescent connector and hammer link. Close jump ring.
  3. Open 7mm jump ring, slide on other hole of hammer link, Grande Hoop and necklace chain. Close jump ring.

Check out other DIY designs using Nunn Design components.


DIY Hoop Post Earrings with Wood Resin Bead

We love our selection of wood & resin charms that we’ve made some super cute beads out of them. And we’ve used them in our project today!

Items used in earrings:

  • Y003022 – 21mm Gold Hoop Post Earrings
  • Z015234 – 15mm Wood & Pale Pink Resin Disc Bead
  • TC02820 (2) – 7mm Bright Gold Hammertone Rondelle Bead by TierraCast
  • TC00567 (2) – 5mm Gold Nugget Spacer by TierraCast
  • A019696 – 2 Inch Gold Plated 21 Gauge Headpins with Ball Top
  • A011517 – 4mm Gold Plated 20 Gauge Round Jump Ring

Get all the components for this project here

GoodyBeads.com Blog | DIY Wood Resin Bead Hoop Post Earrings FREE Tutorial

Directions:

  1. Slide the following on a headpin and make a simple or wrapped loop:
    5mm nugget bead, wood/resin bead & 7mm hammertone bead.
  2. Open jump ring, slide on wood/resin dangle and hoop of earring. Close jump ring.
  3. Repeat all steps for other earring.

Check out more DIY Projects with Wood & Resin.


DIY Bling Leather Bracelet

Don’t you love sweater weather? The DIY Bling Leather Bracelet is flashy and subtle with fun metallic and bling flat leather. It’s the perfect leather bracelet to pair with your fall & winter style.

Items used in bracelet:

  • Z003873 – Shiny Gold Long Leather Setting Slider for 10mm Flat Leather
  • CH01110 (2″) – 10mm Flat Black Leather
  • CH00813 – (7″ or 8″) 10mm Bronze Pearl Metallic Flat Leather
  • Z018344 – 10mm Gold Rounded Magnetic Clasp
  • A015821 – Super New Glue

GoodyBeads.com Blog | DIY Bling Leather Bracelet FREE Tutorial

Directions:

  1. Put glue in the bezel part of the Setting Slider. Put the bling leather in the glued bezel, trim excess.
  2. Glue one end of the flat leather piece into one end of magnetic clasp.
  3. Slide Setting Slider onto the flat leather, making sure the slide is on the correct side of the flat leather.
  4. Glue the other end of the flat leather piece into the other end of the magnetic clasp.
  5. Let the bracelet dry for a few hours or overnight before wearing.

Here are MORE Flat Leather DIYs to try out!


DIY Jewelry Statement Earrings with Acetate Components

We’re layering and combining some of our favorites in this pair of DIY Jewelry Statement Earrings. It includes acetate components, links, charms and jump rings. These earrings are a bit funky with their multi-color acetate designs. Make them today for funky fall style!

Items used in DIY Jewelry Statement Earrings:

Goodybeads.com Blog | DIY Statement Acetate Earrings FREE Tutorial

Directions:

  1. Open 8mm jump ring, slide on 30mm acetate charm, a quick link, disc drop and through a hole of the 15mm acetate link. Close jump ring.
  2. Open a 6mm jump ring, slide through other hole of 15mm acetate link and close jump ring.
  3. Open another 8mm jump ring, slide through 6mm jump ring in step 2 and through ear wire loop. Close jump ring.
  4. Repeat all steps for other earring.


DIY Bracelet Key Chains with Leather and Memory Wire

We have the perfect idea for your holiday gifts; DIY Bracelet Key Chains made with Heavy Duty Memory Wire. They are a fun DIY for every family member, friend and neighbor!

What you’ll need:

GoodyBeads Blog | DIY Bracelet Key Chains with Leather and Memory Wire FREE Tutorial

Directions:

  1. Cut a coil and a half of memory wire with Memory Wire Cutters.
  2. Make a simple, rolled loop to one end of your memory wire, with Memory Wire Finishing Pliers.
  3. Slide on the End Cap, Leather piece and End cap onto the memory wire.
  4. Cut memory wire end to about 3/4″ and make another rolled loop. Roll both ends to tighten up your bracelet keychain.
  5. Open jump ring, slide on tassel and one looped end of bracelet keychain. Close jump ring.
  6. Slide keyring through that end loop also.

More Examples in Video Tutorial

Make sure to swing over to our previous Facebook LIVE where we made some different keychain examples with leather and even LeatherCord USA channel bangles.

CLICK HERE to see Facebook LIVE episode.


DIY Navette Adjustable Bracelet with Swarovski® Sew-On

Our easy project today will be using beautiful Swarovski crystals and satin Adjustable bracelet.

Items used in bracelet:

  • SW01976 – Swarovski® 29mm Crystal Navette Sew-On Stone
  • TC02347 (2) – 8mm Oval Jump Ring by TierraCast
  • Z014807 – Black Twisted Satin Adjustable Bracelet Sliding Clasp

GoodyBeads Blog | DIY Navette Adjustable Bracelet with Swarovski® Sew-On FREE Tutorial

Directions:

  1. Open a jump ring, slide on one side of the crystal link and through one ring on sliding clasp. Close jump ring.
  2. Repeat with other jump ring and ring of sliding clasp.


DIY Double Ring Mixed Media Earrings

We’ve compiled some of our favorites in today’s project! We have TierraCast findings with Leather Cord USA Nubuck leather lace and mixing metals with Nunn Designs hoops. Try these DIY earrings out today!

Items used in earrings:

  • TCZ0077 – Sterling Silver Earring Wire by Tierracast®
  • Z004551 (2) – 30mm Ant. Silver Grande Organic Hoop by Nunn Design
  • Z008273 (2) – 35mm 24k Gold Plated Frame Hoop by Nunn Designs
  • Z016427 – 10mm Black Nubuck Lace
  • A008807 – 7mm Silver Plated 16 Gauge Round Jump Rings
  • A008799 – 5mm Oval Silver Plated 21 Gauge Jump ROpings
  • Tools: TL00043 – Leather Hole Punch Pliers

GoodyBeads.com Blog | DIY Double Ring Mixed Media Earrings FREE Tutorial

Directions:

  1. Cut two pieces of leather at 1.5″ long.
  2. Punch a hole 1/8″ from the edge of your piece of leather. Punch a hole on each leather end. Repeat on the other leather piece.
  3. Open oval jump ring, slide on a hole of a leather piece, slide on a gold and silver ring and slide through other hole of that leather piece. Close jump ring.
  4. Open 7mm jump ring, slide on oval jump ring from step 3 and through ear wire loop. Close jump ring.
  5. Repeat Steps 3 and 4 for other earring.


DIY Golden Resin Foil Earrings

Nothing says fall better than some wood and gold jewelry! Our pair of earring today uses gold-plated findings with our every-popular wood & resin pendant charms.

Items used in earrings:

  • Z004331 – 13mm Satin Gold Rectangle Textured Post Earrings
  • Z010290 – 28mm Wood & Clear Resin with Gold Foil Disc Pendant Charm
  • Z011522 – 6mm Gold Plated 20 Gauge Round Jump Ring
  • TC01208 (2) – Clear Comfort Earring Back by TierraCast®

GoodyBeads Blog | DIY Golden Resin Foil Earrings

Directions:

  1. Open jump ring, slide on wood/resin charm and loop of earring. Close jump ring.
  2. Repeat for other earring.
  3. Don’t forget the earring backs!