How to Use Pinch Bails with Swarovski® Pendants

Pinch bails are used for top-drilled beads to create a dangle for necklace or earrings. They are easy to use and functional for jewelry-making.


GoodyBeads | Blog: Detail look at how to use a pinch bail with Swarovski top-drilled pendants.

Pinch bails have two prongs at the bottom which will insert into the hole of your top drilled bead. Wedge one prong to one side of your bead, line up the other prong to the other side of the hole and pinch the prongs together. If the pinch bail is difficult to pinch, use nylon pliers to help squeeze the bail. String through the bail with your choice of chain or our favorite, beaded chain.

Here are some examples of how we used pinch bails:

GoodyBeads | Blog: Cross Tribe Pendant with pinch bail on beaded chain.

This Cross Tribe Pendant has a simple TierraCast® pinch bail strung on 30” of beaded chain.

Products used: SW01522, TC02316, CH00271.


GoodyBeads | Blog: Hammered Ring with pinch bail and Swarovski sun pendant with gold chain and findings.

Here’s a different take on how we used the pinch bail. Gently open the pinch bail and slide a TierraCast Hammertone Ring onto the bail. Then, slide the pinch bail prongs into the top-drilled, Swarovski Sun Pendant’s holes. Gently pinch the bail to close. Lastly, tie your chain into a lark’s head knot around the ring and add your clasp to your chain ends..

Products used: SW01107, A010862, CH00532, TC00613, A008801, Z006530


GoodyBeads | Blog: Pinch bail with pear-shaped Swarovski on ear wire.

Create some lovely earrings like these from our December ’15 Swarovski pendant trend. Attach pinch bails to 16mm Swarovski pear-shaped pendants. Open two 4mm jump rings, and slide each through one side of a pinch bail and the bottom loop of an ear wire. Close each jump ring. Repeat. You now have a very classy and simple pair of earrings to wear!

Products used: SW01593, A002413, TCZ0096, A007515.


Leather: Cutter Tools and Adhesive

Having the right tools and adhesive for leather projects will make it easier to create stylish accessories. We will show you the basic tools for cutting leather and the types of adhesive to use when adding clasp ends to leather.


Leather Cutter Tools

When cutting leather, you want a precise and straight cut. This will help with adding clasps and keeping your measurements accurate.

Flat and small round leather (i.e. 1mm, 2mm, or 3mm) needs a pair of scissors. Before making your cut, measure your piece of leather and mark with a pencil lightly.

GoodyBeads | Blog: Cut flat leather or small size leather cords with shears.


Licorice and round leather are thicker and need a heavy-duty cutter. Below, we have a two cutter tools you can use to cut thicker side leather.

GoodyBeads | Blog: Cut Licorice leather or thicker round leather cord with these licorice leather cutter tools.


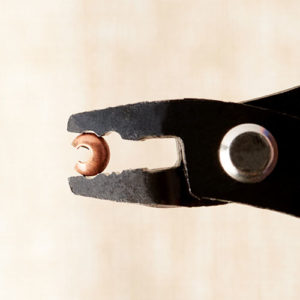
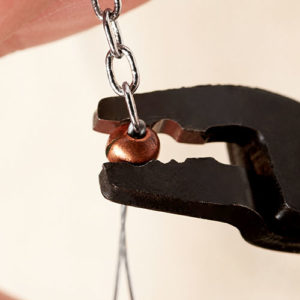
The Little Cut (TL0053) has a sharp angle blade that cuts leather by squeezing the handles together.

The Licorice Leather Cutter (A015862) has narrow handles, but cuts a perfect edge on your leather.

GoodyBeads | Blog: Cut Licorice leather or thicker round leather cord with these licorice leather cutter tools.

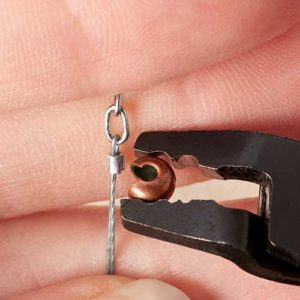
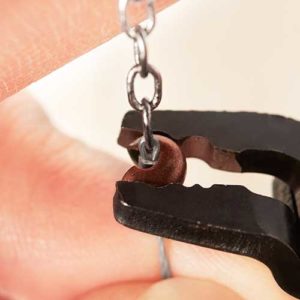
Pinch the handles to open the cutter. Slide the leather under the cutter, lining it up with the middle groove. Bring your blade down to wedge the leather in place. Grasp the cutter towards the front and squeeze down.

NOTE: Make sure to always have your angle blade facing down.


Leather Adhesive

We have two adhesive options to use when adding clasp ends.

Super New Glue

We like to use super new glue (A015821) for its quick drying and superior holding quality.

GoodyBeads | Blog: Use Super New Glue for quick and strong quality bonds when adhering flat leather or small round leather to clasp ends.

Precut your leather. Put 1-2 drops of super new glue inside your clasp ends and swirl the glue inside to cover the edges and corners. Insert your leather and let it dry lying down on a flat surface. Dry time should take a few seconds to a minute or two.


E-6000

E-6000 (A011455) is used on heavy-duty beading and crafting projects. While it has a slower drying time, E6000 is a good filler especially when filling excess space or gaps around your leather when inserted into the clasp.

GoodyBeads | Blog: Use E6000 to adhere licorice leather or thick round leather cords to clasps.

Precut your leather. Scoop up some E-6000 with a toothpick. Swab the inside of your clasp end. Repeat if necessary. You want to apply enough to coat the inside of the clasp. Insert leather ends and let it dry for 12-24 hours lying on a flat surface. Wipe excess glue cleanly if it flows out after leather is inserted.

Extra Note: You can use rubber bands to keep licorice leather in a round shape as the glue dries. And always use E6000 in a well ventilated area.


Important Notes:

  • Make sure the inside of your clasp end is clean and dry. This helps ensure that your leather end sits flushed inside the clasp. You can swab the inside with a toothpick or cotton swabs to clean any dust or moisture.
  • If you find your leather cords have extra space in the clasp end, you can coil thin wire or beading thread like SuperLon thread at the ends before insert clasps.
  • Leather is stored in spools, which in time will create a natural curve. Use the natural curve of your leather to wrap around your wrist. Licorice leather will have a slight curve which you will need to bend to create a round curve.
  • Having more length of leather is better than not having enough. This is because the inner size of the bracelet may decrease depending if you are adding beads, charms or other embellishments to the leather. First, plan out your design. Next, without using glue, slide on clasp and test it on your wrist. Measure and cut your leather to the desired length. Glue other side of clasp and let dry.
  • And always, always don’t glue your clasps until you’re sure you’ve added your design elements and your measurements are correct.


Beadalon® Tassel Maker and Video

With thisBeadalon tassel maker, you can a make tassel in no time! Check out how to set up and use this tool. Embellish your next project with customized tassels.


Learn to easily make tassels with the tassel maker (TL00230).

Grab some of your favorite thread or pick up some Beadalon cotton thread and check out the tutorial video below, provided by Beadalon.


Tassel Maker Video


GoodyBeads EZ DIY Series: Swarovski® Crystal Flat Memory Wire Bracelet

We are in love with bracelets that wrap around and bling, of course! We have an EZ DIY tutorial on how to create this sparkling wrap bracelet with flat memory, Swarovski emerald-cut crystals and 24-gauge wire.


Tutorial

GoodyBeads | Blog: EZDIY Series - Swarovski Emerald Cut crystal wire wrapped on Flat Memory Wire.


Items used:


Tools use:


Czech Honeycomb Jewel Beads with Bracelet Tutorials

With the popularity of the Czech Honeycomb two-hole bead, comes the Honeycomb Jewel bead. Here are two projects where we used these beads to make a bead-stitched bracelet with DiamonDuos and as a wire cuff bracelet with bead wire.

What makes Czech Honeycomb Jewel beads different than other honeycomb beads? Honeycomb jewel beads are faceted on one side, to give depth and dimension, and flat on the other.

GoodyBeads | Blog: Czech Honeycomb Jewel with faceted look on one side.

Honeycomb Jewel and DiamonDuo Bracelet with Tutorial

GoodyBead | Blog: chalk blue Czech honeycomb jewel bracelet with DiamonDuos and size 8/0 Miyuki seed beads.
Designed by So Vang

We paired the Honeycomb Jewel shape with DiamonDuos, which plays off each others’ faceted look. We took the Chalk Lazure Jewel (Z018620) and gave this bracelet a pop with a bold hue of the Pastel Montana Blue DiamonDuo (SB03347).

Products used for this bracelet: Z018620, SB03347, SB00106, TC00185, A010902, Z004093, A006588, A015210.

Download and PRINT out this bracelet tutorial.

Endless Bronze Bracelet

GoodyBead | Blog: Bronze Czech honeycomb jewel bracelet with Black DiamonDuos and size 8/0 Miyuki seed beads.
Designed by So Vang

Using the same pattern, we used bronze and black beads for a striking contrast. And the clasp coordinates with the black hue.

Products used for this bracelet: Z018614, SB03322, SB00066, TC00873, A010905, A008804, A006588, A0015210.

Download and print out this tutorial to create these two bracelets. Play off on your own color schemes!

Honeycomb Wire Cuff Bracelet

GoodyBead | Blog: Honeycomb Jewel beads wire wrapped on a wire cuff. Free Tutorial.
Designed by So Vang

Create this unique cuff bracelet using two different jewel bead colors, see our easy-to-follow tutorial.

Products used for this bracelet: Z002579, AW00088, Z018620, Z018622.


Falling Waters Seed-Beaded Necklace

Designed by our own Heidi Urlaub, this gorgeous necklace was featured in our 2015 December seed bead fringe trend. We love her edgy designs. See her wear another similar style and learn how to make the simple loops needed for this piece on our YouTube video: How to Make Simple Loops. This statement necklace is a showstopper and very easy to make!

Falling Waters Necklace

GoodyBeads | Blog : Falling Waters Necklace with seed beads and bugle beads.
Designed by Heidi Urlaub

With a basic understanding of how to make simple loops and opening and closing jump rings, this necklace is quite easy to make. Made with a combinations of size 8/0 and 11/0 Miyuki seed beads and bugle beads, you can make this necklace in many different colors.

Necklace Tutorial

What you will need to make this:

  • (2 pk. OR 185) A019697/A0019688– 2 Inch Silver Plated 21 Gauge Headpins with Ball Top
  • (2 pk. OR 39) A001529 – 6mm Jump Rings
  • (2 pk. OR 37) A001528 – 5mm Jump Rings
  • (1) SB00076 – Opaque Turquoise Green Miyuki Seed Beads
  • (1) SB00106 – Galvanized Silver Miyuki Seed Beads
  • (1) SB00093 – Turquoise Ceylon Miyuki Seed Beads
  • (1) SB02858 – Teal Silver-Lined Bugle Seed Beads Tube
  • (1) SB00332 – 11/0 Silver Lined Crystal Miyuki Seed Beads
  • (1) Z002683 – 16mm Silver Plated Spring Ring Clasp
  • (18”) CH00515 – 4.7mm Chain Link


New Year’s Statement Necklaces

Glam up your New Year’s Eve party with your favorite dress, dancing shoes and statement necklace. We have a few fashion trend necklaces sure to turn heads before the ball drops!


GoodyBeads | Blog: Statement Necklace - Turquoise Isle Bib Necklace made with Miyuki Seed Beads, Czech Daggers and bib connectors.
Designed by So Vang

Make this iconic bib necklace from our Sept ’16 trend. Create this stunning necklace with our free tutorial, a bold bib connector, seed beads and Czech dagger beads.


GoodyBeads | Blog: statement necklace with suede tassel, end caps and silver-plated chain.
Designed by Heidi Urlaub

From our May ’16 Boho Fringe and Tassel Jewelry trend, these statement necklaces are made with various lengths of microfiber suede cords inserted into end caps, then attached to chain. Rock this statement piece with a sassy dress or pair of your favorite jeans


GoodyBeads | Blog: Statement Necklace with Jesse James bead collection at GoodyBeads and bib connectors, chain, feather charms and leather cord.
Designed by Tory Vezina

Tease your fun side with a statement necklace donned with Jesse James beads from our Dec ’16 trend. Create this statement necklace with the Cabin by the Lake Mix, chain, bib connectors and feather charms. Finish it up with leather cord and you can get on with the partying!


GoodyBeads | Blog: Statement Necklace with wire wrapping Swarovski Pearls strung on gold-plated chain.
Designed by So Vang

Check out this waterfall necklace from our June ‘16 Birthstone Trend. This statement necklace has Swarovski® pearls linked together by wire wrapping each dangle and attaching each dangle to the gold-plated necklace with jump rings.


GoodyBeads | Blog: Gold and Czech Fire Polished Emerald on Chain Maille Statement Necklace
Designed by So Vang

Make statement necklaces simple by draping Czech fire polish glass bead dangles across some elegant chain maille (CH00736/CH00737), like this necklace from our May ’16 Birthstone Trend.


GoodyBeads | Blog: Siam Czech glass beads and Chinese crystal makes this brass statement necklace.
Designed by So Vang

From our July ’16 Birthstone Trend, this statement necklace has the perfect hues for the festive holidays. Headpins are strung with Czech fire polish beads, through Textured Large Oval Links (CH00738/CH00739) and teardrop Chinese crystals.


GoodyBeads | Blog: Dakota Gemstone Pendants Statement Necklace
Designed by So Vang

Let these Dakota Stone Gemstone Pendants (Nov ’16 Trend) create the ultimate focal statement necklace. Simply string one of these pendants with small round beads to separate the stunning sets and add your favorite chain to complete a necklace you can wear year ‘round!


GoodyBeads | Blog: Seed beads and bugle beads makes this stunning statement necklace
Designed by Heidi Urlaub

Seed beads and bugle beads makes this stunning statement necklace from our Dec ’15 Fringe Trend. Find the tutorial to this necklace here.

–Click HERE for more DIY projects from GoodyBeads–


GoodyBeads EZ DIY Series: How to Make a Rhinestone Link and Leather Bracelet

For supplies and tools totaling under $20, you can learn how to make a rhinestone link and leather bracelet with a Rhinestone Link Bracelet Kit (A020661/A020662) and 2mm Round Leather Cord.

Tutorial

GoodyBeads | Blog: EZDIY Series - How to Make a rhinestone link and leather bracelet

Items used:

  • A020661 – Matte Silverstone Rhinestone Link Bracelet Kit
  • A013402 – 2mm Denim Blue Round Leather Cord
  • A015821 – Super New Glue OR A011455 – E-6000 Craft Adhesive
  • Optional: A012924 – Double Nylon Jaw Pliers
  • A pair of scissors


Czech SuperDuo Duets™

From BeadSmith® comes a new wave of SuperDuos beads: Duets. SuperDuo Duets features a two-toned color that shimmers, and different hues on each side of the bead. These unique beads are perfect for defining lines and beading accent color around borders.


BeadSmith has an inspiring video featuring these new SuperDuo Duets.


Color Shifting Bracelet from BeadSmith w/ Tutorial

Color Shifting Bracelet with SuperDuo Duets

We love the simplicity of this bracelet pattern from BeadSmith. We used the Black/Red Luster SuperDuo Duets (SB03501) with Orange Luster on Chalk SuperDuo (SB02110).

Check out the PDF Tutorial here.

Product used for this bracelet: SB02110, SB03501, SB00422, SB00066, SB00387, Z001256, A006587


Black and Bronze SuperDuo Duets Bracelet

GoodyBeads | Blog: black and bronze SuperDuo duets bracelet with Miyuki Tila seed beads
Designed by So Vang

Here, we took the same pattern from the Color Shifting Bracelet and redesigned it by substituting the middle SuperDuos with a size 11/0 Miyuki seed bead, a Miyuki Tila and another size 11/0 Miyuki seed bead. We used Black/White Beige Luster SuperDuo Duet (SB03491) and layered the black sides of the duet together on the edges for an interesting stripe effect.

We also used 8/0 Miyuki Dark Bronze seed bead for the outer edges instead of alternating between a size 11/0 and 8/0 seed bead. Plus, check out the image below on how we’ve sewn our ends. We had sewn in a size 8/0 seed beads at the end to loop in a jump ring and lobster clasp on one end and chain link on the other.

GoodyBeads | Blog: Black and Bronze SuperDuo Duet Bracelet End image with Tila Miyuki seed beads.

Product used for this bracelet: SB03491, SB00831, SB00387, SB00084, SB02110, A006587, A008803, Z006523/Z006528, Z006527.


Bronze Legend Bracelet

Black and Bronze SuperDuo Duets Cuff Bracelets with Tila Miyuki seed beads & Czech SuperDuo.
Designed by So Vang


We amped up the pattern and adding more rows of SuperDuos and SuperDuo Duets to the previous bracelet. This bracelet pattern will create a band width just under 1.5” with a cream and black stripe effect and bronze border.

We have included a PDF illustrated tutorial on how to make this bracelet with the inspiration of the Color Shifting Bracelet from BeadSmith.

GoodyBeads | Blog: Bronze Legend Full Bracelet with SuperDuo Duets and Tila Miyuki seed beads. Free Tutorial

Product used for this bracelet: SB03491, SB00831, SB00387, SB00084, SB02110, SB01406, A006587, A008803, Y004707.


Czech Honeycomb Pendant with Groovy Bead Frame – FREE Tutorial

Here’s a unique way to use popular Czech Honeycomb beads. We have sewn them into a stunning pattern using a Groovy Bead Frame. Groovy Bead Frames are designed to string and decorate from different angles. This easy tutorial will create the perfect focal pendant on a necklace or dangled on a pair of earrings.

Honeycomb Necklace and Earrings

New to GoodyBeads are Tweedy Honeycomb beads that have a two-tone, splattered color finish.

Mia Mosaic Honeycomb Necklace – Golden

GoodyBeads | Blog: Czech Honeycomb Groovey Bead Frame Pendant - golden tweedy honeycomb necklace
Designed by So Vang

Mia Mosaic Honeycomb Earrings – Fuchsia 

GoodyBeads | Blog: Czech Honeycomb Groovey Bead Frame Pendant - fuchsia tweedy honeycomb earrings
Designed by So Vang

Czech Honeycomb Pendant with Groovy Bead Frame Tutorial

What you will need:

Click here for pdf download for tutorial.

Bead Components:

Mia Mosaic Honeycomb Necklace – Golden

  • (1) Z019394 – 20mm Antique Silver Finish Pewter Round Groovy Bead Frame
  • (1 pk.) Z018637 – 6.5mm Gold Tweedy 2-Hole Honeycomb Czech Glass Beads
  • (1 tube) SB00106 – 8/0 Galvanized Silver Miyuki Seed Bead
  • (1 tube) SB00422 – 11/0 Galvanized Silver Miyuki Seed Bead
  • (1 pk.) A002413 – 4mm Silver Plated Jump Ring
  • (2) A008182 – 2.5mm Silver Plated Rollo Chain
  • (1) A006585 – Smoke Fireline Thread
  • (1) A006767 – Beading Needles

Mia Mosaic Honeycomb Earrings – Fuchsia

  • (2) Z019394 – 20mm Antique Silver Finish Pewter Round Groovy Bead Frame
  • (1 pk.) Z018641 – 6.5mm Pink Tweedy 2-Hole Honeycomb Czech Glass Beads
  • (1 tube) SB00106 – 8/0 Galvanized Silver Miyuki Seed Bead
  • (1 tube) SB00422 – 11/0 Galvanized Silver Miyuki Seed Bead
  • (1 pk.) A002413 – 4mm Silver Plated Jump Ring
  • (1) A006585 – Smoke Fireline Thread
  • (1) A006767 – Beading Needles
  • (1) TCZ0096 – Sterling Silver Hoop Earring Wires with Loop by Tierracast®


Artistic Wire® Finding Forms – Beaded Holiday Ornament Charms

Make some fun beaded holiday ornament charms with Artistic Wire® Finding Forms. Watch Artistic Wire demonstrate how to create a star, snowman or tree. Hang one from a holiday tree, dangle one from a window or attach one to a neatly wrapped present! Get your finding forms, artistic wire, and seed beads today at GoodyBeads to make some beaded holiday ornaments of your own!


What you will need to create a finding form ornament charm:

Artistic Wire Finding Forms

20 or 22 Gauge Artistic Wire

26 Gauge Artistic Wire


Holiday Tree Ornament Charm

GoodyBeads | Blog: Artistic Wire Finding Forms - holiday tree ornament form with seed beads
Designed By Tory Vezina

Here we created a holiday tree (TL00250) with 22 Gauge Antique Brass Wire (AW00026) and included a Swarovski® star bead to the top. We took 26 Gauge Artistic Wire and wrapped back and forth on the inside of the tree while adding random seed beads. This project is perfect if you have leftover seed beads from previous projects. You can also use our Miyuki Seed Bead Grab Bag (A011619) for a nice variation of color and sizes.


Holiday Star Ornament Charm

GoodyBeads | Blog: Artistic Wire Finding Forms - holiday star ornament form with seed beads
Designed By Tory Vezina

Our star (TL00251) is made with Antique Brass Wire (AW00026) with bronze, white, clear and cream hued seed beads crisscrossed in the middle on 26 gauge wire.


Holiday Snowman Ornament Charm

GoodyBeads | Blog: Artistic Wire Finding Forms - holiday snowman ornament form with seed beads
Designed By Tory Vezina

We think this snowman (TL00253) is just darling! We added an 8mm squaredelle (A011435) and 6mm Swarovski cube (SW00309) to depict a top hat for our snowman. We ran some 26 Gauge artistic wire side to side, and layered with seed beads and Czech melon beads for the scarf.


Fabric Tassel Jewelry

Fabric tassels are new at GoodyBeads and we can’t get our hands off of them! They are small in size but they sure are vibrant in color and easy to use. Tassels are a must-have fashion staple, especially to tempt the love of tribal-inspired fashion jewelry. Learn to make a tassel necklace with silver drop charms or blush-hue earrings with gold-plated findings.


Silver Charm Fabric Tassel Necklace

GoodyBeads | Blog: silver charm fabric tassel necklace
Designed by So Vang

This necklace combines fabric tassels and silver charms.

What you will need:

  • (1 pk.) Z013686 – Red Fabric Tassel
  • (1 pk.) Z013689 – Turquoise Fabric Tassel
  • (1 pk.) Z013685 – Coral Fabric Tassel
  • (1 pk.) Y006450 – Silver Plated Round Disc Drop
  • (1 ft) A008131 – 7mm Silver Plated Bar Chain
  • (1 ft) CH00533 – 2.5mm Silver Plated Soldered Cable Chain
  • (1 pk.) A002413 – 4mm Silver Plated Jump Rings
  • (1) Z001124 – Silver Plated Lobster Claw


Instructions:

  1. Attach a silver drop to the round O-ring of the bar chain with a 4mm jump ring.
  2. Attach a tassel charm to the next O-ring of the bar chain with a 4mm jump ring.
  3. Repeat steps 1-2 until you’ve reached the end of your chain, ending with a silver drop.
  4. Cut your cable chain in half.
  5. Open a 4mm jump ring and attach one end of the bar chain with one end of the cable chain half. Close jump ring.
  6. Open another 4mm jump ring and attach the other end of the bar chain to the second cable chain half.
  7. Open a 4mm jump ring and slide on one end of your cable chain. Close jump ring.
  8. Open another 4mm jump ring and slide on other end of the cable chain and slide on a lobster clasp. Close jump ring.


Zahra Rose Tassel Earrings

GoodyBeads | Blog: zahra rose tassel earring
Designed by Tory Vezina

This pair of earrings will make you want to scream in excitement, that you may forget they’re handmade. Beautifully made with gemstones and gold earring findings, you can rock this street-chic look in style

What you will need:

  • (1 pk.) Z013672 – Fuchsia Fabric Tassel with Gold Cap
  • (1 pk.) Z013678 – Purple Fabric Tassel with Gold Cap
  • (1 pk.) Z013673 – Rose Fabric Tassel with Gold Cap
  • (1 pk.) A019605 – 1.5 Inch Gold Plated Eyepin
  • (1 pk.) A010234 – Gold 7 Ring Chandelier Lever Back Earwire
  • (1 pk.) PKL4RD-8 – 4mm Round Pink Crazy Lace Agate


Instructions:

  1. Slide one gemstone onto an eyepin and make a simple loop. Make loop large enough to slide on tassel loop. Create a total of 7 gemstone eyepin dangles.
  2. Open larger loop of a dangle and slide on tassel. Close loop.
  3. Repeat to create a total of 7 dangles; 2 purple tassel, 4 fuchsia, 1 rose.
  4. Open small loop of purple dangle and slide on to first loop of ear wire. Close loop,
  5. Repeat with attaching next loop with 2 fuchsia dangle, 1 rose, 2 fuchsia and 1 purple dangle.
  6. Repeat all steps for other earring.


Check out our September ’16 Tassel Fringe Trend or November ’16 Tassel Earring Trend for more tassel inspiration!


Easy DIY Charm Earrings

An easy idea for your holiday gift-giving or for a fun weekend project are charm earrings. All you need are charms, earwire findings and flat nose pliers.


Let the gift giving begin with easy charm earrings. Select from a variety of TierraCast® charms, metal charms, or resin. Or make mismatch charm earrings for the bold and daring jewelry wearers. The only tool you’ll need for this easy DIY project are flat nose pliers to open jump rings or earwire loops.


Here are some easy charm earrings that we’ve made with just charms and earwires.

Charm Earrings

GoodyBeads | Blog: Easy DIY Charm Earrings - resin donut charm earrings

Love sweets? Make these earrings with donut resin charms. YUM!

Items used: A012460, A008998


GoodyBeads | Blog: Easy DIY Charm Earrings - snowflake charm earrings

Celebrate the love of winter and fluffy snow with this pair of snowflake earrings.

Items used: FTEA0003, A011284


GoodyBeads | Blog: Easy DIY Charm Earrings - gold feather earrings

Embrace your wild side with gold feather earrings.

Items used: Z015964, A014108


GoodyBeads | Blog: Easy DIY Charm Earrings - dreamcatcher charm earrings

Or even channel good dreams and positive vibes with these dreamcatcher charm earrings.

Items used: Z006627, A010966


How to Use Crimp Covers

Crimp covers are used to conceal the crimp tubes you use in treasured jewelry designs. They not only hide the tubes, but they also prevent your jewelry piece from snagging on clothing and create an overall professional look. See our easy-to-follow instructions below to learn how to place crimp covers.


When you crimp to finish your jewelry piece, using crimp covers to hide your crimps will create an overall professional look. Check out our video below on how to first crimp your crimp tubes.


Crimp Covers

Crimp covers come in many different sizes, as well as crimp tubes. Depending on the size of your crimp tube, you will need a crimp cover large enough to encase the crimp tube. For instance, if you used a 3mm crimp tube, you will need a 4mm crimp cover. There is helpful information in the description of the crimp covers to help determine the best crimp tube size to use with. Note the highlighted information below.
crimpcoverhighlight


Crimp Cover Tutorial

Once you have crimped your crimp tubes, you are ready to add your crimp covers. Here’s how to use crimp covers.


Samples of Jewelry Using Crimp Covers

GoodyBeads | Blog: Lampwork Bracelet using crimp covers.
Designed by Tory Vezina

This Glass Menagerie Bracelet from our lampwork jewelry blog uses crimp covers.


GoodyBeads | Blog: Pearl Necklace using crimp covers.
Designed by Tory Vezina

From our May 2015 Wedding Day Jewelry Trend, crimp covers help to finish this elegant pearl necklace.


GoodyBeads | Blog: Czech Bracelet using crimp covers.
Designed by Tory Vezina

And this Czech beaded bracelet with owl dangle uses crimp covers to create an extra design element next to the bronze seed beads.


GoodyBeads EZ DIY Series: How to Make a Resin Pendant

From our GoodyBeads vault, we pull out our EZ DIY Series on how to make a resin pendant. This tutorial will show you the basics of how to mix resin and to use resin with bezels.


Resin

Resin comes in two parts: a resin solution and a hardener solution. To utilize the resin, you will mix equal parts of the two. Only then will it cure or harden after 24 hours of sitting. Check out GoodyBeads Resin supplies.

When mixing the resin, always pour into a container that will be discarded later, like these cups and sticks. When mixing the two solutions, always scrape the bottoms and sides at a slow speed for two minutes. If you mix rigorously, you will create more bubbles, which may be harder to get rid of later.

Once mixed, let the it settle for a minute before use. Depending on the resin, you have less than an hour to use the resin before it starts to thicken or become unmanageable.


Bezels

Each bezel has a framed lip, which is great for resin, as the resin will be contained within the bezel area. You can also create a resin dome with a bezel. To do so, pour the resin almost to the top. Let it dry for a few hours. Then pour more resin on top slowly, in the middle, to create a dome.

Note: Make sure to clean off any debris or dust that may have settle in the bezel before pouring in resin.


Resin and Bezel Tutorial

GoodyBeads | Blog: GoodyBeads EZ DIY Series: How to make a resin pendant


Resin Tips

  • If there are small bubbles after you pour in your resin, take a straw and blow gently at the bubble. This will help pop it. You can also use a toothpick to pop the bubbles.
  • To dome your resin in your bezel, fill your bezel until it reaches almost to the top. Let it sit for a few hours. Your second resin layer will dome your bezel. Slowly pour a little resin at a time. Let it settle to the edges while your slowly pour the resin into a done shape. Let it dry for another 24 hours.
  • If you use pre-printed collage sheets or a printed image from your printer, make sure to seal the front and back of the paper with glue or Modge Podge. Let it completely dry before use.
  • Color or tint your resin with opaque or transparent Dye.
  • You can pour resin into resin molds. Make sure to coat the molds with a conditioner for easy resin removal later.