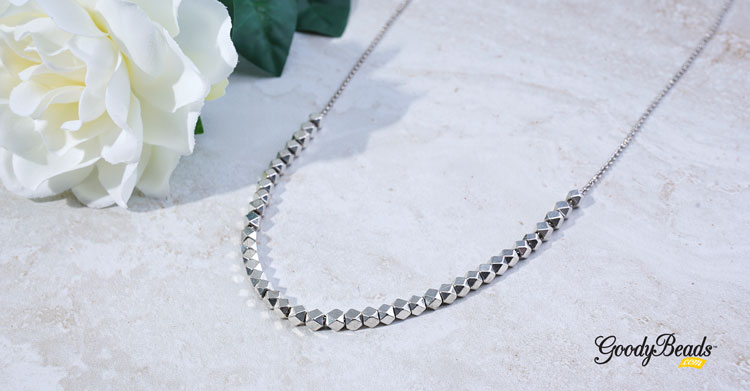
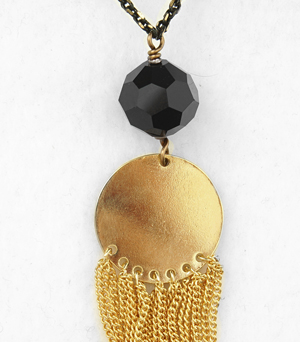
Tory and Heidi popped onto Facebook LIVE this week to create this stunning piece, inspired by window shopping at Nordstroms. Check out how easy it is to make this necklace using our popular rollo chain and adjustable sliding clasp.
A fun pastime we love doing is shopping! Who doesn’t like shopping? Tory came across a lariat necklace window shopping on Nordstrom.com and figured she can make her own! See how easy it is to make and how versatile it is.
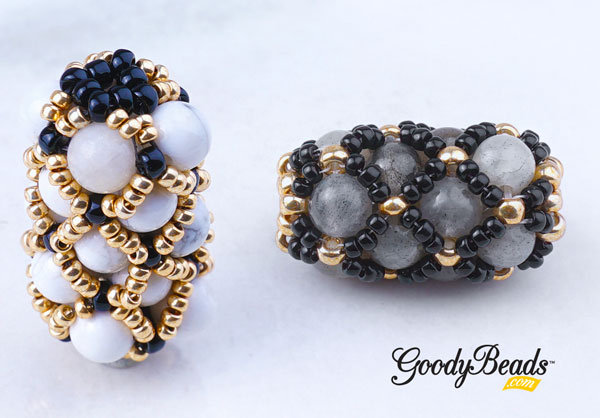
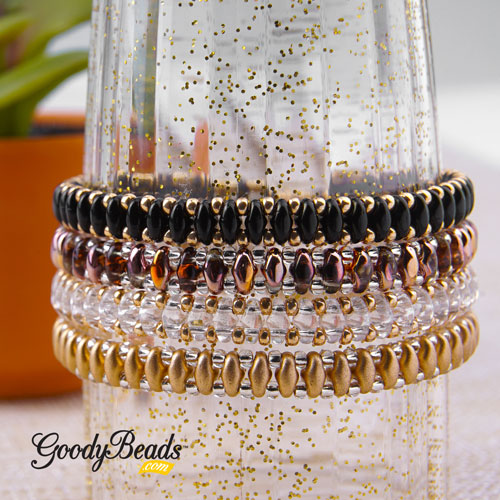
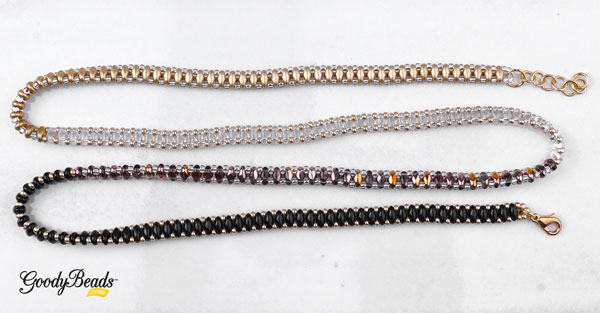
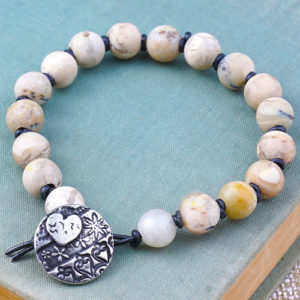
We’ve got a fun lattice beaded bead pattern tutorial for you using 6mm round gemstones. Can’t you image the possibilities!
As a request from our viewers, So Vang is sharing her pattern to making a lattice beaded bead using 6mm round gemstones. You don’t have to use 6mm gemstones. You can use 6mm bicone beads or 6mm round Chinese Crystals or Pearls. You can decide on the colors, that’s the fun of taking a tutorial and making it your own!
This pattern is also an altered version to the 2mm Pearl blog.
Sometimes, when designing your lattice beaded bead, you will find that the tutorial pattern won’t work as well and you’ll need to adjust the pattern. In this example, we have the 6mm Labradorite round beads. These beads are a slight smaller than the white Howlite, so in Step 6 I had adjusted to using THREE 11/0 seed beads instead of FOUR. This way, the lacing of the seed beads will hug the round gemstones.
What will you design today! We would love to see them. Make sure to tag us on Social Media so we can see your lovely creations!
Painted Leather Wrap Bracelet
Check out this bracelet Tory and Candie taught at the Spring 2019 Twin Cities Bead Bazaar, using Vintaj Patinas painted on leather.
If you were able to join us at the Twin Cities Bead Bazaar on March 2 & 3, you’ll know how much fun it was! We are sharing this super easy bracelet Candie Cooper and Tory taught at one of the hourly Make & Takes. It’s made with leather cord and TierraCast end caps on NEW Extra Heavy Duty Memory Wire. And then painted with Vintaj Patinas.
Instructions:
Using Finishing Pliers, make a loop at one end of the memory wire.
Slide on memory wire a bead cap, leather and a bead cap.
Cut excess memory wire leaving about 1/2 inche to 3/4 inch end.
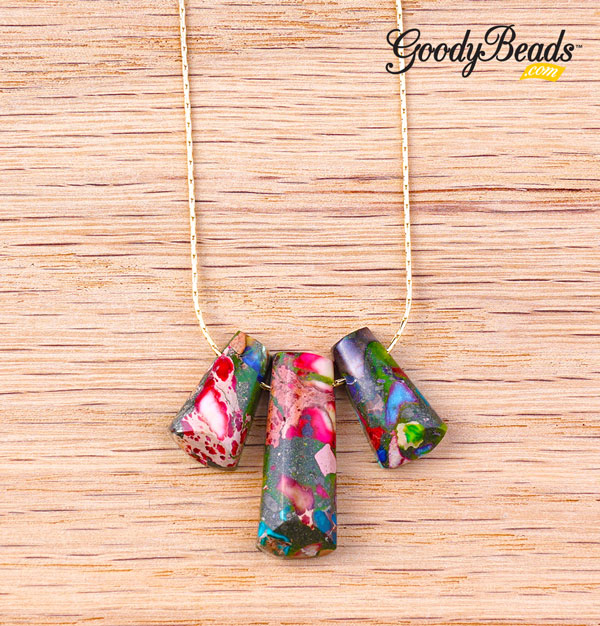
These pendant sets are a composite made by fusing stone fragments using heat, pressure and a stabilizing agent or resin. The stone fragments remain clearly visible, creating fascinating patterns. Composite beads may also be called “mosaic beads” because of the visible fragments. The stone used to create composite beads is usually the remnants from cutting, making them a great way to incorporate upcycled elements in designs with a vibrant pop of color!
These 11 piece gemstone ladder pendant sets are versatile for your jewelry designs! They make a great statement piece when using all 11 pieces or just use a few pendants in multiple designs. The size ranges from 15mm-38mm. Here are 3 ways to using these gemstone pendant sets.
The most basic way to using these pendant set is making a collar necklace. We used the entire set and strung the pendants on Soft Flex wire with a seed bead in between each pendant. At each end we slid on a clamshell bead tip and crimped a 1.5mm crimp tube to sit inside the clamshell tip. Because we LOVE our adjustable necklace slide clasp, we slid on its jump ring end to the loop of the clamshell bead tip and closed the loop. Instant necklace to wear!
Crimp a 1.5mm crimp tube on Soft Flex wire, inside the clamshell bead tip.
Make a pendant drop with one or a few pendants from your set. One way is to simple slide a pendant on an eyepin for an easy drop. Or slide on three pendants with a seed bead on either side (optional) on an eyepin or wrapped wire loop. Then add your adjustable necklace chain to each loop of your drop pendant for a super easy necklace.
A fun third option is to slide your pendants on a beading chain. Cut your beading chain to your preferred necklace length. Slide pendants onto the beading chain. End your beading chain using the Loop Crimp Lobster Clasp Set (Z012741/Z012743). Slide end cap on beading chain and crimp the end to your beading chain. Repeat to other beading chain end. Open jump ring and slide on lobster clasp and through end cap loop. Repeat to other end cap without a clasp.
Easy SuperDuo Bracelet – Tutorial
Czech SuperDuos are a versatile two-hole bead that can be easily made into a simple stitched bracelet. Check out this super simple tutorial using only Czech SuperDuos, size 11/0 Miyuki seed beads and beading thread.
If you know So Vang, you know that SuperDuos are her favorite two-hole bead to use when bead stitching. It creates fun angles and combines easily with her other favorites like Czech Honeycomb beads and DiamonDuos. But a simple basic way to make a bracelet using SuperDuos is combining it with size 11/0 and warping the strands around for this easy DIY bracelet.
You can make a one wrap bracelet with this tutorial or make a multi-wrap. To make this bracelet, start out with your bracelet length (in this case we did 7 inches), multiply that by the amount of wraps we wanted and add another foot. This length will be the amount of beading thread you will need. In this case, we used about 4 feet. We strung 4 sections of 4 different color ways to make this bracelet. Each section measures 7 inches in length.
A quick tip, when you are finished sewing all the necessary beads, lay your piece straight and smooth out the piece so that everything lays flat before you tie off your ends.
Sample Color ways
Test out different colors to play with. Here we have four samples of various color ways you can make your bracelet.
New from the 2019 Tucson show are these lovely Czech Ginko beads from BeadSmith. Check out today’s free tutorial using Ginko beads.
Czech Ginko beads are a two-hole bead in the shape of Ginkgo leaves.
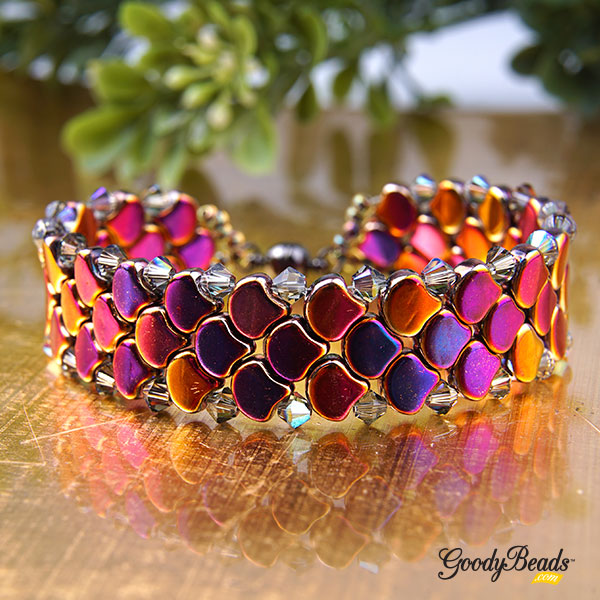
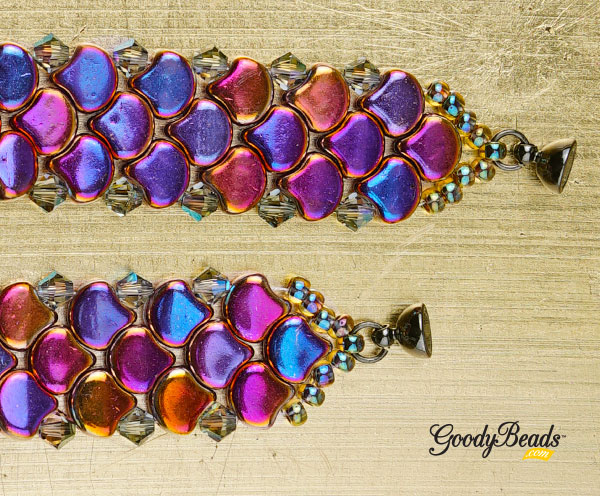
Scale Bracelet
This bracelet tutorial was inspired by Nela Kábelová’s (www.gianelle.beadforum.cz) pattern called Snake Skin Bracelet. We used her pattern and tweaked it slightly to add 4mm Swarovski® bicone crystals instead of 4mm round beads. And used 8/0 Miyuki seed beads in place of the seed beads she used. Don’t they look like fish scales? Dragon scales? Mermaid scales? They are a beautiful shape with lots of option for bead stitching.
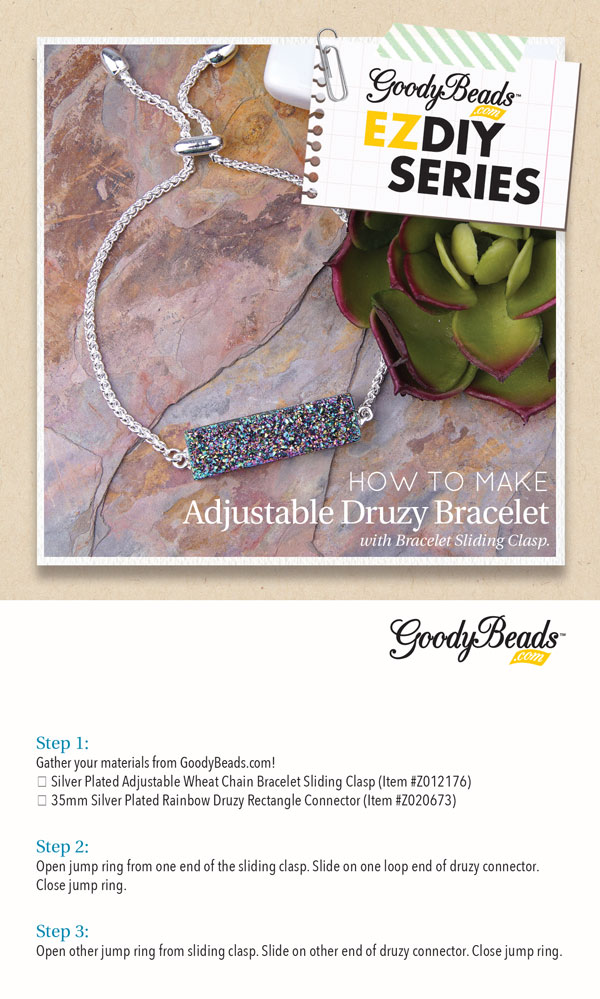
Jump on this fashionable jewelry trend of adjustable jewelry with the versatile finding of Bracelet Sliding Clasps.
Bracelet sliding clasps is a versatile clasp with two chain pieces fed through a stopper clasp where you can easily slide the chains back and forth to adjust the length of the bracelet. Sliding clasps also has a jump ring attached to the chain to make it easy to add your favorite connector or link. Here is an easy DIY tutorial using the sliding clasps and druzy connector with the help of a chain nose plier tool.
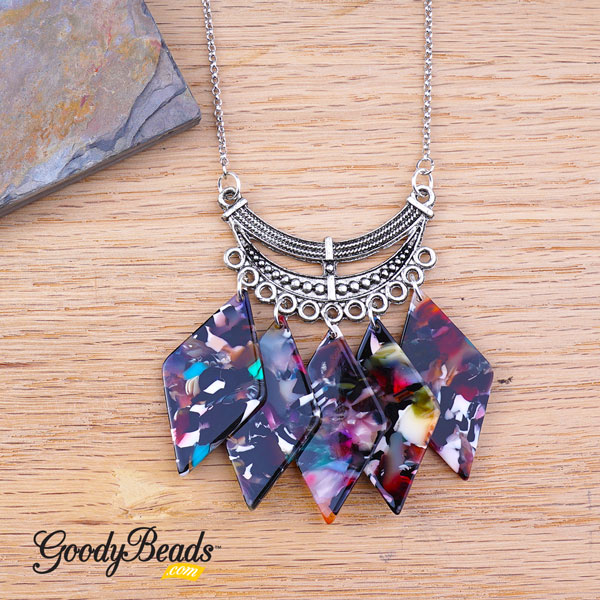
Check out this DIY Bib Necklace with Acetate components, worthy of a rock concert!
Statement jewelry is trendy with all types of fashion. So we’re dabbling on some statement jewelry with bib necklaces made with bib connectors and flamboyant acetate charms and pendants. And to make your jewelry wearing easier, we used adjustable necklace chain to top of these necklace ideas!
Blue Suede Bib Necklace
When looking at this necklace, I’m getting an old school Walking in Memphis song by Marc Cohn in my head. ‘Put on my blue suede shoes and I boarded the plan.’ Yes, the perfect song!
We used 18mm acetate coin charms for this sassy bib necklace. Starting at the middle of the necklace, added an acetate coin charm with a jump ring. Then add an acetate to every other hole fanning out, adding a total of 9 acetate. Lastly, add the adjustable necklace chain to the bib connector with a jump ring attaching to the small jump ring on the chain.
Have you seen the movie Bohemian Rhapsody? If not, you at least know that it is one of Queen’s iconic song. I first heard the song when watching Wayne’s World and I guess reflects me millennial age. Either way, donning this necklace, let’s rock out to a good song!
For tutorial, repeat the same steps like the necklace above, adding a total of 5 pendants.
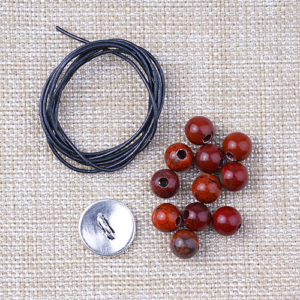
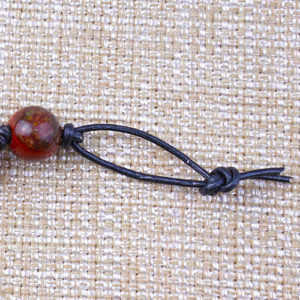
Large Hole Gemstone Leather Knot Bracelet – Tutorial
Step 1: Measure your wrist and multiply that amount by 4. Cut the leather cord to that amount.
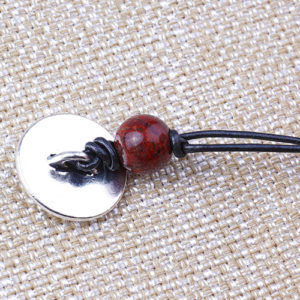
Step 2: Slide on button hole and make one end shorter. This short end will be the length of your wrist size + 5 inches.
Step 2: Make an overhand knot with the leather cords next to the button.
Step 4: Slide on a gemstone bead. Take the long leather piece and make an overhand knot around the shorter cord.
Step 5: Gently tighten the knot, while sliding it close to the gemstone.
Step 6: Repeat until you’ve reached your wrist length.
Step 7: Make an over hand knot with both leather cords to the diameter of your button. Cut off excess cord.
Step 8: Your bracelet is complete.
Make this easy leather knotted bracelet with large hole gemstones from Dakota Stones.
Happy Friday. We’re having a fun time today since we’re all looking forward to the weekend. Why not try your hand at this easy leather bracelet tutorial with 1mm leather cord from LeatherCordUSA, large-hole gemstones from DakotaStones and a TierraCast button. You’ll make a simple overhand knot in between each large-hole gemstones. Don’t worry, you got it!
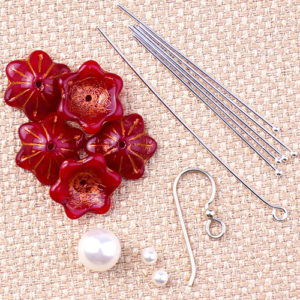
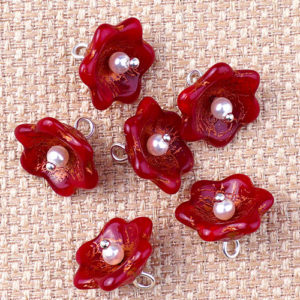
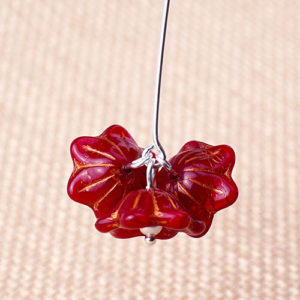
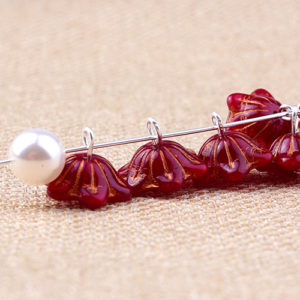
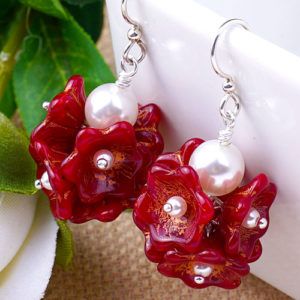
Flower Burst Earrings with Czech Bellflowers – Tutorial
Dreaming about warmer weather? Let’s get a kickstart to spring weather with a pair of flower burst earrings designed with Czech Bellflower glass beads from Raven’s Journey® and white pearls from Swarovski®.
We’re experiencing some cold and snowy weather in Minnesota. Our piles of snow keep going up and we cross our fingers that our drive into work is a safe and uneventful one. So we are dreaming of spring weather and flowers! Here is a fun and simple pair of earrings donned with colorful Bellflowers from Raven’s Journey.
An easy tip to using various beads is linking them to make a beaded chain. Here are two easy necklaces linking up Chinese Crystal beads, metal beads and inch long chain.
Preparing Bead Links
With the help of eyepins, make a fun amount of links by sliding a bead unto the eyepin and making a simple loop. And then cut chain into inch long pieces. These chain links will be the connectors between each beaded link.
See how versatile these beaded links are. Link up a sequence of a bead and chain or mix up the sequence for an organic look.
Make sure to try out different beads, sizes and shapes for a full beaded chain link.
We linked three different sequence of beaded chain to make a three-tiered necklace on an adjustable necklace chain.
First link includes the following beaded link: gold tube, silver oval, gold tube, cube crystal, gold tube, silver, oval, gold tube, cube crystal, gold tube, silver, oval, gold tube, cube crystal, gold tube, silver, oval, gold tube.
Second link includes the following beaded link: chain, gold tube, cube crystal, gold tube, cube crystal, gold tube – Repeat TWO more times. And add a chain link at the end.
Third link includes the following beaded link: chain, cube crystal, silver oval – Repeat FIVE more times. And add a chain link at the end.
Open one jump ring from adjustable necklace chain and slide on all three beaded chain links. Close jump ring.
Repeat to other jump ring on adjustable necklace chain.
Cut 6 link at an inch long. Cut one link at 12 inches long.
Chain link a flat brass bead, 14mm Chinese Crystal bead and flat brass bead with chain link.
Sequence of beaded chain link: chain, flat brass, crystal, flat brass, chain, flat brass, crystal, flat brass, chain, flat brass, crystal, flat brass and 12 inch chain
Next sequence will link to the other side of 12 inch chain: flat brass, crystal, flat brass, chain, flat brass, crystal, flat brass, chain, flat brass, crystal, flat brass, chain.
Make a wrapped loop and slide on both chain ends before completing wrapped loop. Slide on crystal bead and make another loop, while sliding on Tassel Pendant (Z001347).
GoodyBeads EZ DIY Series: Green Gold Tassel Earrings
Enjoy another EZ DIY tutorial with these Green Gold Tassel Earrings with suede tassels and disc connectors.
We adore these suede tassels. We also love how versatile these tassels are. You can keep the long length and use them for a boho necklace pendant. Or cut the length for a short tassel easily used for a charming pair of earrings.
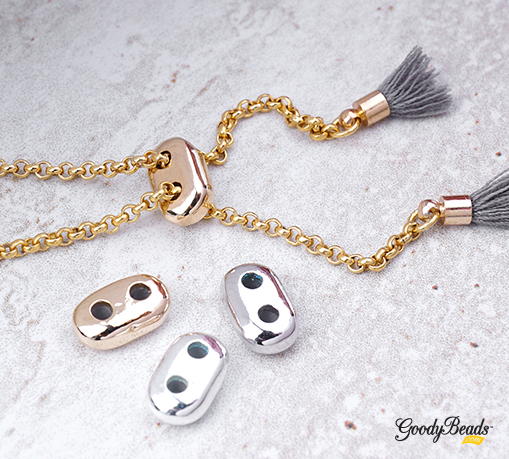
New Slide Clasps & Compatible Chain for Easy Adjustable Jewelry
Adjustable jewelry really gives a new meaning to One Size Fits All. Our NEW slide clasps will give you the ability to customize your own adjustable jewelry.
This blog will cover the two types of clasps and compatible chain, perfect for making adjustable jewelry. Plus, a tip on how to get your chain through the slide clasps.
Slider Clasp and Slide on Clasp
We have two types of slider clasps.
Two Hole Slider Clasp: This will allow chain to run through the holes parallel to each other.
(Item#: Z011948, Z011951, Z011952)
2. Slide on Clasp with Hole for Jump Ring: This clasp has a hole on the side that you can attach a jump ring and chain. You will typically use two Slide on Clasp, two pieces of chain and two jump rings. The chain will run parallel and in opposite directions.
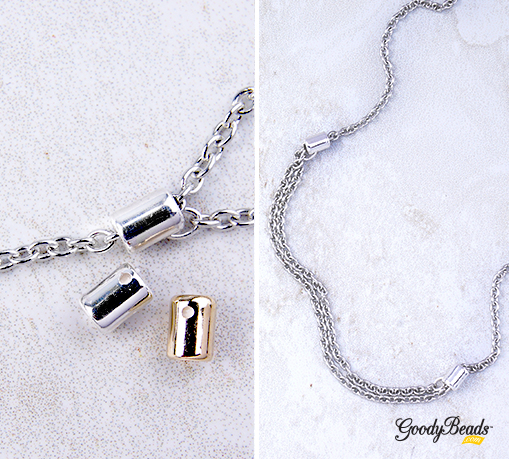
The best chain to use with these slider clasps are small dainty chains between 1.8mm and 2.2mm in size. The following chains will work with the slider clasps:
However, we would recommend using the Two Hole Sider Clasps with 2mm Rollo Chain and 2.2mm Soldered Cable Chain. And all chain recommendations can be used with the Slide on Clasp with Hole for Jump Ring.
Chain and Clasp Tip
There is a silicone ring inside each hole of the slider clasp. This allows the chain to slide and make your jewelry adjustable. To get your chain through, we have two suggestions for you:
Use a 2 inch piece of wire and make a small loop at one end and attach your chain to the loop. Use this makeshift needle to sew through hole clasp, and pull your chain through.
Or if you are using a very thin wire, fold your 2 inch piece of wire in half, slide your chain end through to the middle section of the wire and use both end of the wire to sew through hole clasp.