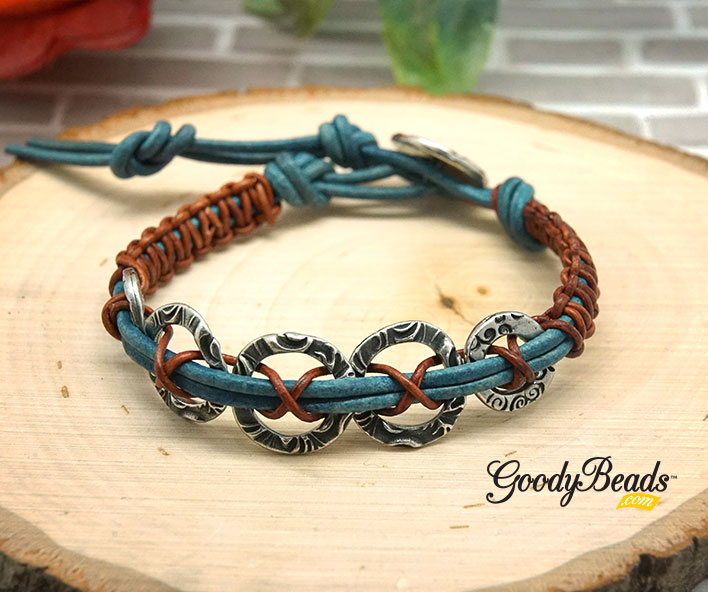
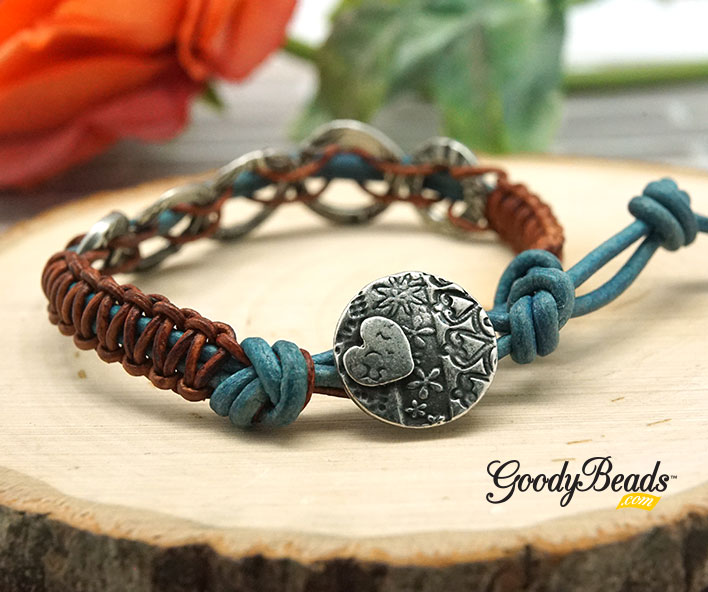
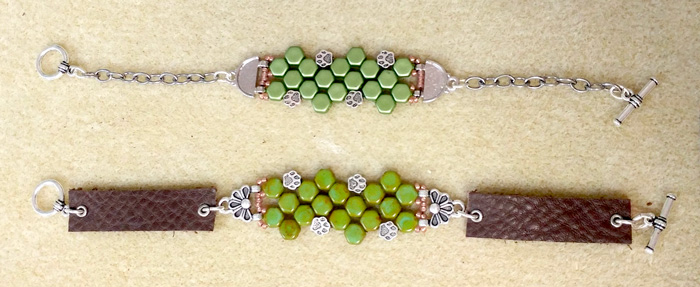
TierraCast® Paw Print Bracelet by Tracy Proctor with Patten Tutorial

Get this free tutorial for the Paw Print Bracelet our friend Tracy from TierraCast provided. She accompanied Tory during one of our Facebook LIVE episodes and demonstrated this easy bead-stitching pattern. You can even check out the video or check out the instructions below to get you started!

Items you’ll need for pattern:

— CLICK for FREE Downloadable Pattern Tutorial —

–Click HERE for more DIY projects from Goody Beads–

Video Tutorial

Tracy was with us during our Facebook Live event and demoed how to stitch this pattern. Check out the episode HERE!


DIY Gemstone, Ribbon & Leather Bracelet with Video Tutorial

We’ve got a special DIY for your summer outfits! Create a leather bracelet with large-hole gemstones and braided with silk ribbon. This tutorial is a revamp of our previous blog post: Criss Cross Leather Bracelet by Dakota Stones. Check out this blog post for written directions on how to make these bracelets. Plus, below is a previous LIVE episode where Tory demonstrates how to braid and make this leather bracelet!

GoodyBeads.com Blog | DIY Gemstone, Ribbon & Leather Bracelet with FREE Video Tutorial

Items used in bracelets:

  • TC02349 – 16.5mm Antique Pewter Amor Round Button by TierraCast®
  • A022076 – 2mm Natural Light Brown Round Leather Cord
  • A021777 – Tutti Frutti Hand Dyed Silk Ribbon
  • RHO8RDLH-8 – Rhodonite Large Hole 8mm Round

Bracelet Video Tutorial

CLICK HERE to Watch the Facebook Tutorial Video

CLICK HERE for more DIY projects from Goodybeads

Tutorial begins at 3:30 minutes.


DIY Succulent Earrings with Crazy Lace Agate Gemstones

Make these cute succulent earrings using TierraCast succulent findings from their Renewal Collection and Crazy Lace Agate gemstones from Dakota Stones.

Items used in earrings:

  • TC02874 – 10mm Antique Silver Succulent Earring Post by TierraCast®
  • TC02877 (2) – 12mm Antique Silver Succulent Charm by TierraCast
  • GCL8RD-M-8 – MATTE Green Crazy Lace Agate 8mm Round 8-Inch
  • TC01253 (2) – 2 Inch Silver 21 Gauge Eyepin by TierraCast
  • TC01208 (2) – Clear Comfort Earring Back by Tierracast

GoodyBeads.com Blog | DIY Succulent Earrings with Crazy Lace Agate Gemstones FREE Tutorial

Directions:

  1. Open eyepin loop, slide on succulent charm and close loop.
  2. Slide a gemstone onto the eyepin and make a simple loop.
  3. Open loop and slide onto loop of post earring. Close loop. Make sure loops on eyepin are parallel and facing the same direction. This will help the succulent dangle to face forward.
  4. Repeat all steps for other earring.

— Click HERE for more DIY Projects from GoodyBeads–


Happy Mother’s Day with an Easy DIY Bracelet with TierraCast Charms & More!

Mother’s Day is coming up and we have this sweet and east bracelet idea using TierraCast Wire Bracelet, TierraCast® Birthstone Crystal charms & more! Let your mom feel loved this year.

Dress up a TierraCast Wire Bracelet with birthstone crystal charms that represents each meaningful child or grandchild in their lives. Each month has it’s own birthstone and below is a list of each TierraCast birthstone crystal charm to add to your mom’s bracelet:

  • JanuaryGarnet (Siam)TC02103
  • FebruaryAmethyst/Tanzanite – TC02104/TC02114
  • MarchAquamarine TC02105
  • AprilCrystal TC02106
  • MayEmerald TC02107
  • JuneLight Amethyst – TC02108
  • July Ruby (Light Siam)TC02109
  • August PeridotTC02110
  • SeptemberSapphire TC02111
  • OctoberRose TC02112
  • November TopazTC02194
  • DecemberBlue Zircon – TC02198

Need more charms to add to your bracelet, we’ve got a fun collection of Large-Hole Girl and Boy charms with birthstone crystals! Get these to add to the bracelet too:

Girls Birthstones:

Boy Birthstone:

Celebrate Moms with her own personalized Wire Bracelet today!

Items used in Wire Bracelet: TCZ1514, TC02105, TC02109, A008031, TC02111, TC00095 & A008799.

  1. Cut bail off of large hole girl charm. Open jump ring and slide on girl charm.
  2. Open another jump ring and slide on Mom charm
  3. Open wire bracelet, slide on charms through looped end.
  4. Wrap and gift it to Mom!


DIY Blue-Blue Straw Earrings with Deerskin Leather Lace

We’re ending the year with one of our favorites from 2020, straw earrings. We’ve paired our colored straw components with LeatherCord USA deerskin leather lace, a soft leather that can easily bend and shape.

Items used in earrings:

  • Z010962 – 3mm Saddle Deerskin Leather Lace
  • Z016790 – Turquoise Handmade Woven Rattan Straw
  • TC02360 – 11mm Brass Oxide Jardin Crimp End Cap by TierraCast®
  • Z002858 – Antique Brass Fishhook with 2mm Ball Earwires

GoodyBeads.com Blog | DIY Blue-Blue Straw Earrings with Deerskin Leather Lace FREE Tutorial

Directions:

  1. Cut two pieces of leather at 5 inches.
  2. Fold one piece of leather and make a lark’s head knot through the straw component. Make sure the leather is laid next to each other and the front of the leather is faced the same way. (Refer to our earrings tutorial to see step 1 and 2 on making a lark’s head knot with leather lace.)
  3. Repeat step 2 for other leather piece and straw.
  4. Determine the length you want your leather to be. You can cut a 1/4″ off the end of your leather. Make sure it is a flush cut.
  5. Cap your leather ends with the TierraCast end cap. Using nylon pliers, crimp the end cap to secure the leather ends. Repeat for other leather and end cap. (As an option, you can add a small dot of E-6000 inside the end cap. Use a toothpick to spread it around. Do not use Super New Glue, it may discolor the leather where it is inserted.)
  6. Open earwire loop, slide on end cap loop and close earwire loop. Repeat for other earring.


DIY Flora Link Criss Cross Leather Bracelet with Macrame Knots

We love the contrasting colors in this Flora Link Cross Cross Leather Bracelet. This DIY uses a braided and macramé technique using round leather cord and TierraCast Flora Links. It’s also a revamp version of the Criss Cross Leather Bracelet we did back in May.

What you’ll need for Leather Bracelet:

  • Z015514 – 1mm Natural Light Brown Leather
  • A022077 – 2mm Natural Blue Leather
  • TC02377 (2) – Small Flora Link
  • TC02379 (3) – Medium Flora Link
  • TC02349 – Button

Get all the components for this project here

GoodyBeads.com Blog | DIY Flora Link Criss Cross Leather Bracelet with Macrame Knots

GoodyBeads.com Blog | DIY Flora Link Criss Cross Leather Bracelet with Macrame Knots

Directions:

  1. Cut 30 inches of the 2mm leather cord.
  2. Cut 60 inches of the 1mm leather cord.
  3. Slide 2mm leather through button and center it. Take both leather ends and make a knot an inch away from the button.
  4. You can use a macrame board to anchor your 2mm leathers down or pin it down to anchor it also.
  5. Slide the middle part of your 1mm leather behind both of the 2mm leather cord, near the knot you made in Step 3. Make 7 full square macramé knots.
  6. Slide on a small flora link. In front of the link cross the left piece of the 1mm over the 2 strands of 2mm cord and then cross the right piece over the left peice.
  7. Take the both ends of 2mm leather and bend them back over the crisscrossed strands and go back thru the ring. Tighten, adjust and straighten your strands.
  8. Repeat steps 6 and 7 with a sequence of 3 medium flora link and 1 small flora link.
  9. After last ring do 7 FULL macramé square knots.
  10. With all 4 pieces of cord make an overhand knot where the macramé ends. Trim ends of the 1mm cord.
  11. Make another overhand knot with both leather ends about one inch from the first to create your button hole clasp. Make another for an optional length.

Video Tutorial

Check out our previous Facebook LIVE episode where Tory makes this bracelet HERE!


TierraCast® DIY Lavender Garden Loomed Bracelet

The DIY Lavendar Garden Loomed Bracelet comes from our friends at TierraCast. This bracelet uses a bead loom and one of their newest products, The Stitch-In Link Connector.

Items you’ll need for Loomed Bracelet:

GoodyBeads.com Blog | TierraCast® DIY Lavender Garden Loomed Bracelet FREE Tutorial

GoodyBeads.com Blog | TierraCast® DIY Lavender Garden Loomed Bracelet FREE Tutorial

Directions courtesy of TierraCast.com:

  1. Loom Set-up: String 10 warp threads onto your loom, per loom manual instructions.
  2. Row 1: Begin your weft thread with plenty of length, at least 36” to 40”, and anchor per your loom instructions, then string nine color C beads and complete Row 1. Most looms complete rows by bringing all nine beads, strung along the thread, under the warp threads, aligning them between each of the warps, and then bringing the needle back through the beads in the opposite direction, making sure to keep the needle above the warp threads.
  3. Row 2: string one Color B, seven Color C, and one Color B. Stitch back through the beads in the opposite direction, making sure to keep the needle above the warp threads.
  4. Row 3: String two B, two C, then string one stitch-in through the first hole, ensuring the top loop is facing up, so that it will sit on top of the work when loomed in. (Fig 1) Bring the beads and button stitch in under the warps and align them between the warp threads. (Fig 2) Then string two C and two B and align the beads between the warp threads. Stitch back through all beads and the stitch-in above the warps in the same way you would complete a regular loomed row.
  5. Row 4: String three B, one C, then bring your thread under the warp threads and pass the needle through the stitch-in’s middle hole (Fig 3). String one C and three B. Align the beads between the warps and complete the row with the thread passing back through all beads and the stitch in above the warp threads.
  6. Row 5: Repeat Step 5, but with four B, then stitch through the top hole of the button stitch-in (Fig 4). String four B and complete the row. (Fig 5)
  7. The rest of the pattern is loomed normally, following the Loom Pattern. Download a pdf of the bead chart and pattern here.
  8. When you reach row 50, string one B, three C, the first hole of the second stitch-in connector, three C, and one B. Complete the row with the thread passing back above the warp threads through all beads and the stitch-in.
  9. Row 51. String two B, two C then bring your thread under the warps and pass through the center hole of the stitch-in, string two C and two B. Complete the row with the thread passing back above the warp threads through all beads and the stitch-in.
  10. Row 52. String three B, one C, then bring your thread under the warps and pass through the last hole of the stitch-in, then string one C and three B. Complete the row with the thread passing back above the warp threads through all beads and the stitch-in.
  11. Finish the remaining rows 53-55 as normal, then remove from the loom and weave in warp threads per your loom manual’s instructions.
  12. Using chain nose pliers, open a jump ring and attach the apple blossom button to the stitch-in loop over row 4. Close jump ring.
  13. Cut a 10” length of 2mm leather cord. String the cord through the loop of the button stitch-in over row 52. Center cord in loop.
  14. Tie an overhand knot with both strands of the leather. *Measure from the knot along the cord approx. 17mm (a little over half an inch) and then tie another overhand knot with both strands. Tighten. * Repeat from * to create a second button loop for an adjustable closure. Trim leather and use a small amount of glue to secure the knots.
  15. Optional: Open one jump ring and attach to cord at the loop of the stitch-in connector. Before closing string on charm. Close jump ring.

(Check out TierraCast page for image reference.)


DIY Jewelry Statement Earrings with Acetate Components

We’re layering and combining some of our favorites in this pair of DIY Jewelry Statement Earrings. It includes acetate components, links, charms and jump rings. These earrings are a bit funky with their multi-color acetate designs. Make them today for funky fall style!

Items used in DIY Jewelry Statement Earrings:

Goodybeads.com Blog | DIY Statement Acetate Earrings FREE Tutorial

Directions:

  1. Open 8mm jump ring, slide on 30mm acetate charm, a quick link, disc drop and through a hole of the 15mm acetate link. Close jump ring.
  2. Open a 6mm jump ring, slide through other hole of 15mm acetate link and close jump ring.
  3. Open another 8mm jump ring, slide through 6mm jump ring in step 2 and through ear wire loop. Close jump ring.
  4. Repeat all steps for other earring.


DIY Double Ring Mixed Media Earrings

We’ve compiled some of our favorites in today’s project! We have TierraCast findings with Leather Cord USA Nubuck leather lace and mixing metals with Nunn Designs hoops. Try these DIY earrings out today!

Items used in earrings:

  • TCZ0077 – Sterling Silver Earring Wire by Tierracast®
  • Z004551 (2) – 30mm Ant. Silver Grande Organic Hoop by Nunn Design
  • Z008273 (2) – 35mm 24k Gold Plated Frame Hoop by Nunn Designs
  • Z016427 – 10mm Black Nubuck Lace
  • A008807 – 7mm Silver Plated 16 Gauge Round Jump Rings
  • A008799 – 5mm Oval Silver Plated 21 Gauge Jump ROpings
  • Tools: TL00043 – Leather Hole Punch Pliers

GoodyBeads.com Blog | DIY Double Ring Mixed Media Earrings FREE Tutorial

Directions:

  1. Cut two pieces of leather at 1.5″ long.
  2. Punch a hole 1/8″ from the edge of your piece of leather. Punch a hole on each leather end. Repeat on the other leather piece.
  3. Open oval jump ring, slide on a hole of a leather piece, slide on a gold and silver ring and slide through other hole of that leather piece. Close jump ring.
  4. Open 7mm jump ring, slide on oval jump ring from step 3 and through ear wire loop. Close jump ring.
  5. Repeat Steps 3 and 4 for other earring.


Spend the Holidays with Swarovski® – Fall/Halloween

We’re going to dive into fall weather with our friends at Swarovski: Create Your Style and celebrating with Fall & Halloween colors. Because we live here in the Midwest, we’ve started to see trees bursting with fall colors like dark greens, bright yellows and oranges, flaming reds and popping purples! Plus, we have a fun DIY project to get your spooky Halloween going.

Here are our selection of Swarovski crystals to embrace the fall and Halloween colors:

  • Black Colors – Jet Black, Silver Shade
  • Browns – Topaz, Light Topaz, Light Colorado Topaz, Golden Shadow
  • Oranges – Tangerine, Fire Opal, Sunflower
  • Even try our Halloween Master MixesMX0028

Scaredy Cat Earrings

GoodyBeads.com Blog | pend the Holidays with Swarovski® - Fall/Halloween FREE Scaredy Cat Earrings Tutorial.

Items used in earrings: TC02297, SW01187 (2), SW00969 (2), A007659 & TC01590 (2).

Directions:

  1. Open eyepin loop, slide on cat charm and close loop.
  2. ON the eyepin slide on the following and make a simple loop (make sure loops are facing opposite directions):
    rondelle crystal and bicone crystal.
  3. Open earwire loop, slide on dangle and close loop.
  4. Repeat all steps for other earring.


DIY Leather Band Bracelet with Large-Hole Gemstones

Let’s welcome fall with a this fun DIY using LeatherCord USA 1.5mm leather, Blue Crazy Lace large-hole gemstones from Dakota Stones and the perfect findings from TierraCast to pull it all together.

What you’ll need:

GoodyBeads Blog | DIY Leather Band Bracelet with Large-Hole Gemstones FREE Tutorial

Directions:

  1. Cut 4 pieces of leather at 9″.
  2. Slide all 4 pieces of leather through a barrel bead and center the bead in the middle of the leather pieces.
  3. Divide 2 leather pieces to each side of the barrel bead.
  4. On one side, fold the inner leather in half and slide a gemstone bead onto both leather ends.
  5. Fold the outer leather strands in half, laying them on either side of the gemstone you added in Step 4 and slide all 4 ends through a barrel bead. Adjust leather strands to lay flat, and slide barrel up close to the gemstone you previously added.
  6. Using nylon pliers or a flat nose pliers, gently crimp down on the barrel bead to keep the middle leather and gemstone in place.
  7. Repeat steps 4 through 6 to other side of the bracelet.
  8. Trim to wrist size and minus about ½ inch; making sure your barrel/gemstone design is centered and you’re making a straight flush cut.
  9. Add an end cap to one end of your leather design, making sure all 4 leather strands fit inside and crimp down on your end cap using a flat nose or nylon pliers. Repeat on the other end of the bracelet.
  10. Open 1 jump ring and slide on your end cap loop and clasp loop. Repeat on the other end cap loop and magnet end.

— Click HERE for more DIY projects from GoodyBeads–


Swarovski® Create Your Own Style: Trio of Opulent Earrings

Our blog post today consists of three projects in one, using some of Swarovski’s newest pearl shapes! We are really loving these new shapes because they look organic with fun depths to them. Here are three pair of earrings pair the new pearls with some fitting TierraCast components.

Opulent Earrings #1

Items used in earrings: SW02568 (2), SW01454 (4), TC02572 (2), TC02568 & A019612.

Directions:

  1. Open eyepin loop, slide on TierraCast charm and close loop.
  2. Slide the following on the eyepin and make a simple loop:
    crystal, pearl and crystal.
  3. Open dangle loop and slide on earwire loop and close loop.
  4. Repeat all steps for other earring.

Opulent Earrings #2

Items used in earrings: SW02579 (2), SW01454 (4), TC02576 (2), TC02297 & A019697.

Directions:

  1. Slide the following on to the headpin and make a simple loop:
    Opulent bead, crystal, pearl and crystal.
  2. Open ear wire loop, slide on pearl dangle and close loop.
  3. Repeat all steps for other earring.

Opulent Earrings #3

Items used in earrings: SW02604 (2), SW01454 (4), TC02562 (2), TC02297 & A019697.

Directions:

  1. Slide the following on the headpin and make a simple loop:
    Pearl, crystal, dragon bead and crystal.
  2. Open ear wire loop, slide on pearl dangle and close loop.
  3. Repeat all steps for other earring.


Cymbal Koutalas DIY Chevron Jewelry

Some of our newest products are Cymbal Components, which pairs with Chevron Duo and Ginko beads. We have two awesome patterns using Czech Chevron Duos and the Cymbal Koutalas.

Chevron Spike Bracelet

Items used in bracelet: Z013806, SB00422, Z010306, SW01711 (3), Z011500, X003062, A021633, Z001124, TC01897 (4).

Make sure to follow our LINK to download the FREE tutorial for this bracelet.

This bracelet used stretch cord, which makes it to easy make and wear. It also uses some blingy Swarovski Hexagon, two-hole spike crystal beads, which breaks up the chevrons and adds a focal section!

Chevron Spike Earrings

Items used in earrings: Z013812, SB00423, Z010306, TC02816 (2), A014108, A006585 & A015211.

Still using the same Cymbal ending, we’ve made a this pair of earrings with Chevron beads and TierraCast dagger bead from the Hammertone Collection, all using gold findings.

Get FREE PDF tutorial HERE to make your own pair of earrings!


DIY Enamel and Faceted Glass Earrings

One thing we love about making jewelry is creating length and layers by linking connectors and dangles. When it comes to our Enamel Chevron and Faceted Glass Earrings, designed by Heidi, she did just that! She used enamel and faceted connectors with gold findings!

Here is what you’ll need for earrings:

  • 18mm White Mix Enamel Gold Plated Round Zigzag Connector – Z016108 (2)
  • 16mm Round Gold Plated Aqua Faceted Glass Connector – A021761 (2)
  • 10mm Round Clear Faceted Glass Charm with Gold Plating – A021745 (2)
  • 9mm Bright Gold Round Hammertone Post by Tierracast – TC02765
  • 3mm Gold Jump Rings – Z007861

Directions:

  1. Open jump ring with two pliers, slide on glass dangle and one loop of faceted glass connector. Close jump ring.
  2. Open another jump ring, slide on other loop of faceted glass connector and one loop of enamel connector. Close jump ring.
  3. Open another jump ring, slide on other loop of enamel connector and post ear wire loop. Close jump ring.
  4. Repeat all steps for other earring.


DIY Leather Hoop and Silver Teardrop Earrings

In today’s DIY, make a leather hoop and silver teardrop earrings using leather cord and TierraCast’s new Hammertone collection. Here is what you’ll need:

  • 2mm leather cord – item used in earrings A022076
  • 1mm leather cord – item used in earrings Z015514/A022070
  • TierraCast earring post – TC02764
  • Clear Earring Back – TC01208 (2)
  • TierraCast End Cap – TC02800 (2)
  • TierraCast Teardrop – TC02777 (2)
  • 5mm Oval jump ring – Z004093
  • 5mm TierraCast Nugget Spacer – TC02639 (6)

Directions:

  1. Cut a 4 inch piece of 2mm round leather and a 1 inch piece of 1mm round leather.
  2. Add 3 nugget beads to the 2mm round leather.
  3. String the teardrop charm onto the 1mm leather.
  4. Insert one end of the 2mm leather, the 2 ends of the 1mm leather and the other end of the 2mm leather into the crimp end.
  5. Check the length of the tear drop charm and 2mm leather, trim to desired lengths if needed.
  6. Then use a flat nose pliers to crimp the crimp end. Squeeze both sides.
  7. Open 5mm oval jump ring, add earring post and loop on crimp end.
  8. Close jump ring.
  9. Repeat all steps for other earring