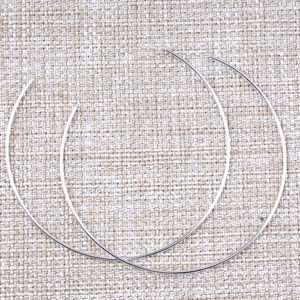
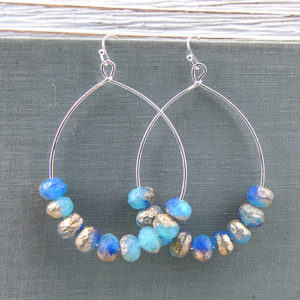
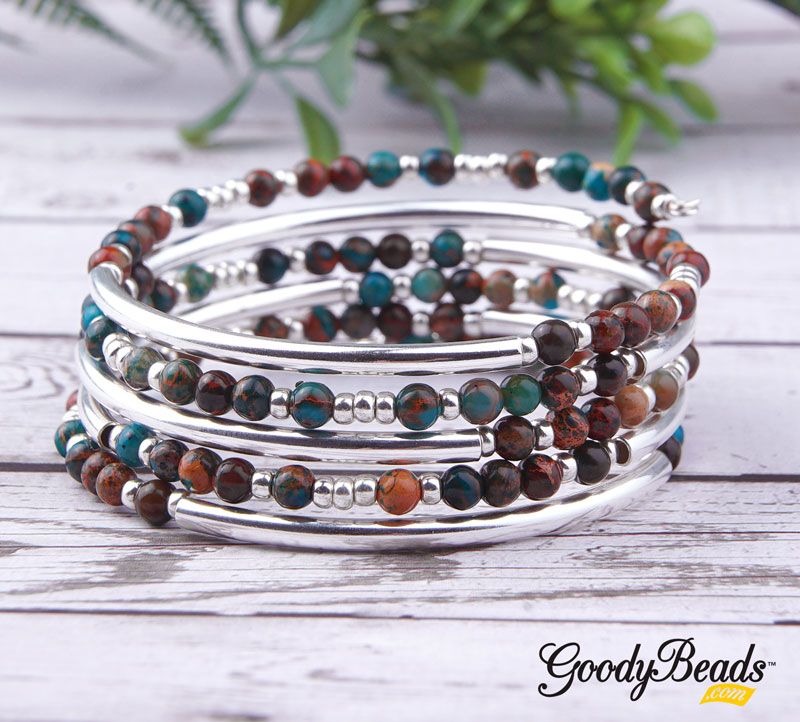
So Vang’s Teal Brown Impression Jasper Wrap Bracelet

The holidays are upon us and we’re starting off your DIY holiday gifts with So Vang’s wrap bracelet using her new favorite Teal Brown Impression Jasper beads. Wrap bracelets are easy to make and design with Beadalon Memory Wire and your favorite beads! Here’s what you need to design this Teal Brown Impression Jasper Wrap Bracelet:


GoodyBeads | Blog - Teal Brown Impression Jasper Wrap Bracelet with FREE Tutorial

Directions:

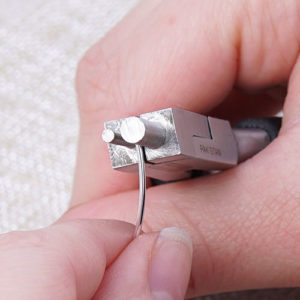
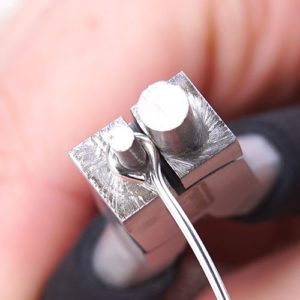
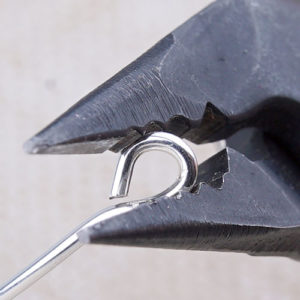
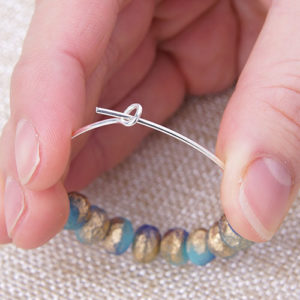
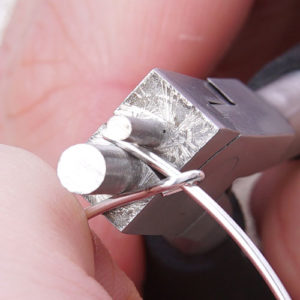
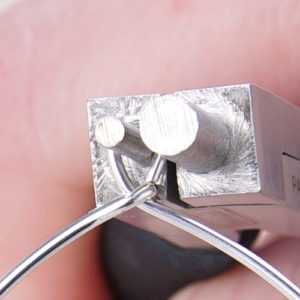
  1. Make a simple loop at one end of your memory wire with memory wire finishing pliers.
  2. Slide the following SECTIONS onto the memory wire:
    1. Seed bead, gemstone, seed bead, 3 gemstone, seed bead, gemstone, 3 seed bead, gemstone, seed bead, 3 gemstone, seed bead, gemstone, 3 seed bead, gemstone, seed bead, 3 gemstone, seed bead, gemstone, seed bead, and curved tube.
    2. Seed bead, gemstone, seed bead, 3 gemstone, seed bead, gemstone, 3 seed bead, gemstone, seed bead, 3 gemstone, seed bead, gemstone, seed bead and curved tube.
    3. Repeat SECTION 1.
    4. Repeat SECTION 2.
    5. Repeat SECTION 1.
    6. Repeat SECTION 2.
    7. Repeat SECTION 1.
    8. Seed bead, gemstone, seed bead, 3 gemstone, seed bead, gemstone, 3 seed bead, gemstone, seed bead, 3 gemstone, seed bead, gemstone and seed bead.
  3. Cut excess memory wire, leaving a 1/2″ end.
  4. Make a simple loop to memory wire end you just cut. (Option: Wrap simple loop into a coil to tighten your designs.)


DIY Satin Wrap Bracelet with Memory Wire

Talk about arm candy with this festive Satin Wrap Bracelet with memory wire, satin beads, miracle beads, Chinese crystals and gold split rings. Make it in time for the winter holidays because its got the fancy red, ivory and gold look!

Here is what you’ll need to make this wrap bracelet:

GoodyBeads | Blog - Red Satin Memory Wire Wrap Bracelet with FREE Tutorial

Directions:

  1. Create a simple loop at one end of the memory wire using the Memory Wire Finishing Pliers.
  2. Slide on the following sequence of beads onto the memory wire:
    1. 3 miracle bead, two split rings, three clear Chinese crystal and two split rings. Repeat two more times. Add three miracle beads, two split rings and three clear Chinese crystal.
    2. Three red satin beads and brass bead. Repeat 4 more times.
    3. Three red satin beads, two split rings, three clear Chinese crystal and two split ring. Repeat 4 more times. Omit last two split rings.
    4. Miracle bead, two split rings, miracle bead, two split rings, miracle bead, two split rings, red satin, two split rings, red satin, two split rings, red satin and two split rings. Repeat 2 more times.
    5. End with miracle bead, two split rings, miracle bead, two split rings, miracle bead.
  3. Trim memory wire with Memory Wire Cutter so there is a 3/8” to 1/2” tail. Create a simple loop using Memory Wire Finishing Pliers.


Memory Wire Necklace with Tassels

Our love for memory wire extends beyond just bracelets. We have Beadalon memory wire that has a large diameter for necklace jewelry! Here is a dazzling way to making a collar/choker necklace with memory wire, TierraCast cord ends, rhinestone rondelles, LEATHER and tassels!

GoodyBeads | Blog - Beadalon Memory Wire Necklace with Leather and Tassels - Free Tutorial


What you’ll need:


Directions

  1. Cut a full circle of memory wire using Memory Wire Cutters.
  2. At one end, make a loop using Memory Wire Finishing Pliers.
  3. On the memory wire slide on the following pieces:
    Black crystal, green rondelle, black rondelle, fuchsia rondelle, green rondelle, black rondelle, fuchsia rondelle, cord end, leather, cord end, fuchsia rondelle, black rondelle, green rondelle, fushcia rondelle, black rondelle and green rondelle.
  4. Cut memory wire with with about 1/2 to 3/4 inch left. Use your finishing pliers to making a loop at their end. Tighten your loop ends if needed.
  5. Open loop of tassel and slide on one end of your memory wire loops. Close tassel loop. Repeat to other memory wire end.


Memory Wire Wrap Bracelets with Swarovski Fine Rocks Beads

Mix up shiny Swarovski crystals and natural gemstone beads in an easy memory wrap bracelet.


Mixing up different types beads makes for a modern and even edgy DIY jewelry, especially when you use Swarovski Fine Rocks Tube beads and round Dakota Stones gemstone beads. And to bring even a more edgy look, we’ve added some beautiful Star Cut Crystal Quartz gemstone.


GoodyBeads Blog | Swarovski Fine Rocks Crystal Tube and Gemstone Memory Wrap Bracelet with Tutorial

What you’ll need for project:


Minimal Fine Rocks Bracelet

GoodyBeads | Blog - Swarovski Fine Rocks Crystal Tube Bracelet with Memory Wire!

Items used in bracelet: SW01736 & WR00131

Nothing like a simplistic DIY jewelry! Here, we used Extra Heavy Duty Memory Wire, cut a 1.25 coil and slide on the Fine Rocks Tube. The trick to getting the crystal tube curve is to gently curve the tube while sliding it on the memory wire. Center the tube and make a loop to both memory wire ends with the Memory Wire Finishing Pliers. The thick memory wire gives a hearty substance to a minimalistic design, without covering the whole wire!


Sparkly Starry Wrap with Gemstones

GoodyBeads | Blog Swarovski Fine Rocks Wrap Bracelet with Gemstone beads (Tutorial)

Items used in Onyx bracelet: WR00121, CRY6RD-SC, TC00034 (4), SW01736 (2) & ONX6RD-8.

Items used in Howlite bracelet: WR00121CRY6RD-SCTC00034 (4), SW01740 (2) & WHT6RD-8.

In these two bracelets are 6mm round gemstones and 6mm Crystal Quartz star cut beads. The star cut and fine rocks tube bead are both a compliment to an edgy and even punk-ish vibe!

  1. Cut a coil and a half of heavy duty memory wire.
  2. Make a loop to one end of your memory wire with memory wire finishing pliers.
  3. Slide the following onto the memory wire:
    9 gemstone beads, nugget spacer, fine rocks tube, nugget spacer, 5 Crystal Quartz star cut beads, nugget spacer, fine rocks tube, nugget spacer and 9 gemstone beads.
  4. Cut excess wire, leaving a 3/8 inch end. Make a loop.


Video Tutorial

Check out our previous Facebook LIVE episode, where Tory demonstrates how to easily create one of these wrap bracelets!


Gemstone Ripple Necklace

Get lost in this mesmerizing DIY necklace with DakotaStones Gemstone Ladder Pendant set and Adjustable Necklace Sliding Clasp.


What you’ll need to make Gemstone Ripple Necklace:


GoodyBeads Blog | Gemstone Ripple Adjustable Necklace with DakotaStones Ladder Pendant Set

Directions:

  1. Cut necklace memory wire at 1/3″ of a coil with Memory Wire Shears.
  2. With Memory Wire Finishing Pliers, curl one end of your memory wire inwards, towards curve of your memory wire to make a simple loop.
  3. Slide on the sequence of your gemstone ladder set.
  4. Make another simple loop to the other end of your memory wire.
  5. Center gemstone set in the middle of the memory wire.
  6. With the 20 Gauge Artistic Wire, wrap 4 coils around the memory wire, on each end of the pendant set. Cut excess wire.
  7. Use crimping pliers to crimp the coils in Step 6 to keep coils and pendant set in place.
  8. Open jump ring on necklace sliding clasp and slide through one loop of memory wire. Close jump ring. Repeat to other jump ring and other memory wire loop.


Design necklace with these other 11 Piece Gemstone Ladder Pendant Sets


GoodyBeads | Blog - 3 Ways to making DIY necklaces with Gemstone Pendant Sets

Pendant Set Item Numbers: LAPLGIM15-38-LAD-PENPPLBRZ15-38-LAD-PENRCJ15-38-LAD-PENORIM15-38-LAD-PENLAPBRZ15-38-LAD-PENTQSBRZ15-38-LAD-PENMLTPYR15-38-LAD-PENPKBL15-38-LAD-PENMGI-FAN-PEN-11


Flat Memory Wire and Gemstone Bracelet – Video Tutorial

Candie Cooper came by the GoodyBeads Mezzanine to show us how to make an easy DIY wrap bracelet with flat memory wire and gemstone beads. Watch the video today!


GoodyBeads Blog: Flat Memory Wire and Gemstone Bracelet Video Tutorial

After the Spring Twin Cities Bead Bazaar, Candie stopped by to demonstrate how to make a classy and chic bracelet using 4mm faceted coin gemstone beads, wire wrapped around flat memory wire.


What you’ll need:


Video Tutorial


Extra Heavy Duty Memory Wire Hoop Earrings – Tutorial

Make memory wire hoop earrings using the new Beadalon® Extra Heavy Duty Memory Wire. They’re so easy, you’ll find yourself making them over and over!

Hoop earrings have been a big fashion trend since the 1970’s. This pictorial shows how easy it is to make your own pair of hoop earrings with Czech beads. This tutorial was also demonstrated by So Vang during the 2018 Bead and Button show. Check out the video tutorial and blog. And when Candie Cooper was here, Tory and Candie did a Facebook LIVE video on this same tutorial. (Tutorial starts at 30 minutes)

What you’ll need:

Tools you’ll need:

Tips to note when making your hoops. The Extra Heavy Duty Memory Wire is thick, so make sure you grasp tightly with the Finishing Pliers when you make your loops. AND make your loops at the base of your pliers. You’ll get a firmer grasp on the wire and lessen the tension and strain you will put on your Finishing Pliers. You can also make these hoops using other memory wires, it will work just the same.

Tutorial

Items used in earrings tutorial: WR00131, Z012031 & Z011359