DIY Golden Resin Foil Earrings

Nothing says fall better than some wood and gold jewelry! Our pair of earring today uses gold-plated findings with our every-popular wood & resin pendant charms.

Items used in earrings:

  • Z004331 – 13mm Satin Gold Rectangle Textured Post Earrings
  • Z010290 – 28mm Wood & Clear Resin with Gold Foil Disc Pendant Charm
  • Z011522 – 6mm Gold Plated 20 Gauge Round Jump Ring
  • TC01208 (2) – Clear Comfort Earring Back by TierraCast®

GoodyBeads Blog | DIY Golden Resin Foil Earrings

Directions:

  1. Open jump ring, slide on wood/resin charm and loop of earring. Close jump ring.
  2. Repeat for other earring.
  3. Don’t forget the earring backs!


DIY Golden Fine Rocks Bracelet

Are you getting your New Year’s jewelry ready? Why not make this fun bracelet to ring in the new year.

Items used in bracelet:

  • WR00120 – Large Silver Heavy Duty Memory Wire
  • CH00926 (6) – 5mm Braided Metallic Gold Round Leather Cord
  • SW02313 – Swarovski® Light Colorado Topaz Dorado Fine Rocks
  • Z006380 (4) – 5mm Gold Brass Cord End Cap
  • SW00398 (2) – Swarovski® 6mm bicone crystal beads silver night

GoodyBeads Blog | DIY Golden Fine Rocks Bracelet FREE Tutorial

GoodyBeads Blog | DIY Golden Fine Rocks Bracelet FREE Tutorial

Directions:

  1. Cut 2 coils of memory wire.
  2. Make a simple loop at one end of the memory wire with memory wire finishing pliers.
  3. Cut leather piece in half or two pieces at 3 inches.
  4. Slide on the following components on the wire:
    End cap, leather, end cap, bicone crystal, fine rocks tube, bicone crystal, end cap, leather and end cap.
  5. Cut wire end with 3/4″ wire left with memory wire cutters and make a simple loop with memory finishing pliers.


DIY Post Earrings with Turquoise Gemstone Hexagon Points

Stun them on your next zoom meeting with this pair of Turquoise Hexagon Point Earrings! They are quick and easy and only take a few minutes to make.

Items use in earrings:

GoodyBead Blog | DIY Turquoise Hexagon Point Earrings FREE Tutorial

Directions:

  1. Remove small bail from the turquoise pendant. Repeat on other pendant.
  2. Slide hoop of post earring into the bail and put the prongs of the bail into the loop on the pendant and pinch them together.
  3. Repeat Step 2 for other earring.


DIY Miyuki Delica Colorblock Necklace with Griffin Cord

Let’s take out some Delica seed beads and make this fun colorblock necklace with Griffin silk cord.

What you’ll need for necklace:

  • 11/0 Delica Seed Beads – Use a variety of colors!
    Items used in necklace: SB00141, SB02339, SB00229, SB00259
  • Size 4 Silk Cord – Make sure it is a No. 4 size
    Item used in necklace: A006574

Get all the components for this project here

GoodyBeads Blog | DIY Delica Colorblock Necklace FREE tutorial with Miyuki Delica Seed Beads

Directions:

  1. Unravel silk cord from its card and straighten out the cord with water. (Check out Blog as an example HERE)
  2. Make a knot at the end of the silk cord.
  3. Slide on 4 delicas and make another knot, close to the last delica.
  4. Slide on a delica bead. (This will act as your slider piece at the end).
  5. Slide on 1.5 – 2 inches of 1st delica beads.
  6. Alternate the 1st and 2nd delicas 5-6 times.
  7. Slide on 1.5 – 2 inches of 2nd delica beads.
  8. Alternate the 2nd and 3rd delicas 5-6 times.
  9. Slide on 1.5 – 2 inches of 3rd delica beads.
  10. Alternate the 3rd and 4th delicas 5-6 times.
  11. Slide on 1.5 – 2 inches of 4th delica beads.
  12. Alternate the 3rd and 4th delicas 5-6 times.
  13. Slide on 1.5 – 2 inches of 3rd delica beads.
  14. Alternate the 2nd and 3rd delicas 5-6 times.
  15. Slide on 1.5 – 2 inches of 2nd delica beads.
  16. Alternate the 1st and 2nd delicas 5-6 times.
  17. Slide on 1.5 – 2 inches of 1st delica beads.
  18. slide needle through delica you added in step 4. You’re going to make a loop, so feed needle through the side that has the silk cord end.
  19. Put necklace on to determine the length you would like your necklace. Necklace in sample is 38″ long. It can be adjusted to be shorter too.
  20. Make a knot at the other cord end. Slide on 4 delicas and make another knot close to the last delica. Cut off excess silk cord.


DIY Heidi’s Large Crescent Earrings

We’ve have an easy pair of earrings for your fun fall fashion with these DIY Large Crescent Earrings.

Items used in earrings:

GoodyBeads Blog | DIY Heidi's Large Crescent Earrings FREE Tutorial

Directions:

  1. Cut FOUR chain pieces to approximately 1 inch.
  2. Open jump ring, slide on one chain end, through one crescent end loop and close jump ring.
  3. Open another jump ring, slide on another chain end, through other crescent end loop and close jump ring.
  4. Open another jump ring, slide both ends of the chain ends and through earwire loop. Close jump ring.
  5. Repeat all steps for other earring.


DIY Glam Cuff with Flat Leather and Glue-in Cuff

Let’s get to rocking out to beautiful fall weather with this DIY Glam Cuff. It will be your fun go-to jewelry accessory for your cool, fall fashion.

What you’ll need:

  • Z020292 – Rose Gold Glue-in-Cuff
  • CH01080 (7) – 10mm Multi-Colored Shimmer Flat Leather
  • CH00821 (15) – 5mm Matte Gold Pearl Metallic Flat Leather
  • A015821 – Super New Glue

Directions:

  1. Cut 5mm leather in half.
  2. Add glue to bezel part of Glue-in-Cuff .
  3. Starting at one end, line up all three strand ends to that end.
  4. Keeping the leather straight, lay it inside the bezel part of the cuff. Press leather firmly to adhere.
  5. Cut excess leather.
  6. Let it dry for a full 24 hours before wearing.

Try these other DIYs using Flat Leather.


Light Rose Shimmer Circle Post Earrings

Our earring project today is quick and easy! Using one of our newer post earrings with 2 loops, we are linking some beautiful Swarovski® light rose shimmer crystals with chain for this sweet pair of earrings!

What you’ll need for earrings:

  • SW02619 (4) – Swarovski 4mm Light Rose Shimmer Bicone Beads
  • SW02620 (4) – Swarovski 5mm Light Rose Shimmer Bicone Beads
  • SW02621 (4) – Swarovski 6mm Light Rose Shimmer Bicone Beads
  • A007659 – 1 Inch Silver Plated Eyepins
  • Z005958 – 20mm Silver Plated Half Circle Post Earrings with 2 Loops
  • A008182 – 2.5mm Silver Plated Steel Rollo Chain

Directions:

  1. Cut two pieces of chain at 1.25 inches.
  2. Slide a crystal on an eyepin and make a simple loop. Make sure both loops are facing the same direction. Repeat for all crystals.
  3. Link the crystals and chain starting at one end of the post earring loops in the following sequence:
    4mm, 5mm, 6mm, chain, 6mm, 5mm and 4mm
  4. Link the last 4mm to the other loop of the post earrings.
  5. Repeat steps 3 and 4 for the other earring.

Check out more Post Earring DIYs.

Designed by Tory.


Swarovski® Create Your Own Style: Trio of Opulent Earrings

Our blog post today consists of three projects in one, using some of Swarovski’s newest pearl shapes! We are really loving these new shapes because they look organic with fun depths to them. Here are three pair of earrings pair the new pearls with some fitting TierraCast components.

Opulent Earrings #1

Items used in earrings: SW02568 (2), SW01454 (4), TC02572 (2), TC02568 & A019612.

Directions:

  1. Open eyepin loop, slide on TierraCast charm and close loop.
  2. Slide the following on the eyepin and make a simple loop:
    crystal, pearl and crystal.
  3. Open dangle loop and slide on earwire loop and close loop.
  4. Repeat all steps for other earring.

Opulent Earrings #2

Items used in earrings: SW02579 (2), SW01454 (4), TC02576 (2), TC02297 & A019697.

Directions:

  1. Slide the following on to the headpin and make a simple loop:
    Opulent bead, crystal, pearl and crystal.
  2. Open ear wire loop, slide on pearl dangle and close loop.
  3. Repeat all steps for other earring.

Opulent Earrings #3

Items used in earrings: SW02604 (2), SW01454 (4), TC02562 (2), TC02297 & A019697.

Directions:

  1. Slide the following on the headpin and make a simple loop:
    Pearl, crystal, dragon bead and crystal.
  2. Open ear wire loop, slide on pearl dangle and close loop.
  3. Repeat all steps for other earring.


DIY Delicate Delica Adjustable Bracelet

Looking for an easy weekend project? Why not get into a super simple peyote stitch pattern and make it into an adjustable bracelet! We’re using size 11/0 Delica seed beads, making an odd-stitch peyote stitch pattern. Make a simple wrap bracelet with one color delica or multiple, you choose! Get the FREE downloadable PDF tutorial for the Delicate Delica Adjustable Bracelet HERE!

If you’re not a fan of an adjustable bracelet, you can also alter it with a lobster clasp and jump ring. Or even make a multi-wrap bracelet

What you’ll need:

Items used in TOP bracelet sample: SB00269, SB03777, Z012178, A006587 & A006768.

Items used in BOTTOM bracelet sample: SB00269, SB00250, Z012178, A006587 & A006768.


DIY Leather Twist Necklace with Gemstone Donut

The days are getting cooler, so fall is surely coming soon. Why not try this leather necklace with a TWIST to accompany your fall weather fashion!

What you’ll need:

Directions:

1. Cut a 60”-70” piece of leather cord and fold in half. Slide the mid point through donut hole. **Note – it’s better to have too much leather starting out than not enough. You can always cut it before making the sliding knots in the final step.

2. Pull cord ends through to almost make a lark’s head knot.

3. Flip donut around.

4. Take the midpoint of the loop and make a twist. Pull cord ends through that loop.

5. Pull your cords to create a cross loop.

6. Make sliding knots to cord ends to make it adjustable. Check out previous blog on how to make a Sliding Knot.


DIY Colorblock Memory Wire Bracelet Wrap with Vinyl Beads

Today’s DIY Colorblock project was featured in our previous Facebook LIVE episode, and uses bright Vinyl beads and memory wire. Create color blocking with separating chunks of color and wavy disc beads.

Items used in DIY colorblock bracelet project:

  • X002168 – 6mm Multi Color Vinyl Beads
  • X001538 – 6mm Black/Grey Vinyl Beads
  • WR00126 – Gold Memory Wire
    OR WR00139 Gold Assortment Memory Wire
  • Z018412 – 6mm Gold Wavy Disc

Directions:

  1. Make a simple loop on one end of memory wire.
  2. Without pulling all the beads off the multi-color strand, grab about an inch off and hold between your fingers while you feed the memory wire through them. Grab another chunk and slide on memory wire. Do this to add 30-50 vinyl beads.
  3. Add 5 wavy disc beads to memory wire, making sure to feed them in opposition directions to create the wavy look.
  4. Separate the whites from the Black/Grey strand and slide on 10-15 white vinyl beads on the memory wire.
  5. Add 5 wavy disc beads.
  6. Repeat Steps 2-5 another two or three more times, or to your desired length.
  7. Add another 2-3 inch length of multi-color vinyl.
  8. Cut off excess memory wire with memory wire cutters, leaving about 1/4 inch tail.
  9. Loop that end to finish your bracelet.

Video Tutorial

Check out the Facebook video on how to make this bracelet. Go to this VIDEO LINK and tutorial starts at 9:00 minutes.


DIY Porcelain Pineapple Necklace with Alphabet Charm

Summer is a HOT one and Summer means pineapples. Here is a simple DIY necklace with a porcelain pineapple bead and alphabet charms.

What you’ll need:

Directions:

  1. On a headpin, slide on the following and make a simple loop:
    8/0 seed bead, pineapple bead and 8/0 seed bead.
  2. Open a jump ring and slide on pineapple dangle and on chain necklace. Close jump ring.
  3. Open another jump ring, slide on alphabet charm and on chain necklace. Close jump ring.


DIY Jewelry with Swarovski® Around the World: Costa Rica

This month’s trip is Costa Rica. Find out how tranquil this destination is from its tropical vibe to its endless blue skies. Plus, check out the hues Swarovski suggests to inspire your Costa Rica trip along with a DIY jewelry project for you to try.

Costa Rica

Starting as underwater volcanoes which then surfaced over thousands and thousands of years, Costa Rica has evolved into one of the largest, lush ecosystems in the world. Imagine yourself rappelling down a waterfall, relaxing in hot springs, hiking along the rolling fog of the cloud forest or exploring the pink sandy beaches of the Guanacaste coastline. Theses adventures paired with rich tropical flora and fauna and soft sunsets over crystal blue water were the incredible inspiration for these pieces – and my version of ‘paradise’.

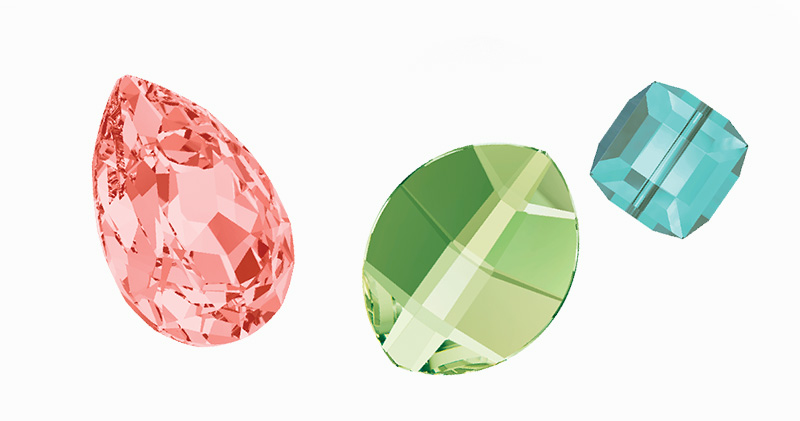
Costa Rica – Swarovski Crystal Colors

  • Peridot
  • Light Turquoise
  • Rose Peach

Costa Rica Inspired DIY Jewelry

GoodyBeads Blog | DIY Jewelry with Swarovski® Around the World: Costa Rica FREE tutorial.

GoodyBeads Blog | DIY Jewelry with Swarovski® Around the World: Costa Rica FREE tutorial.

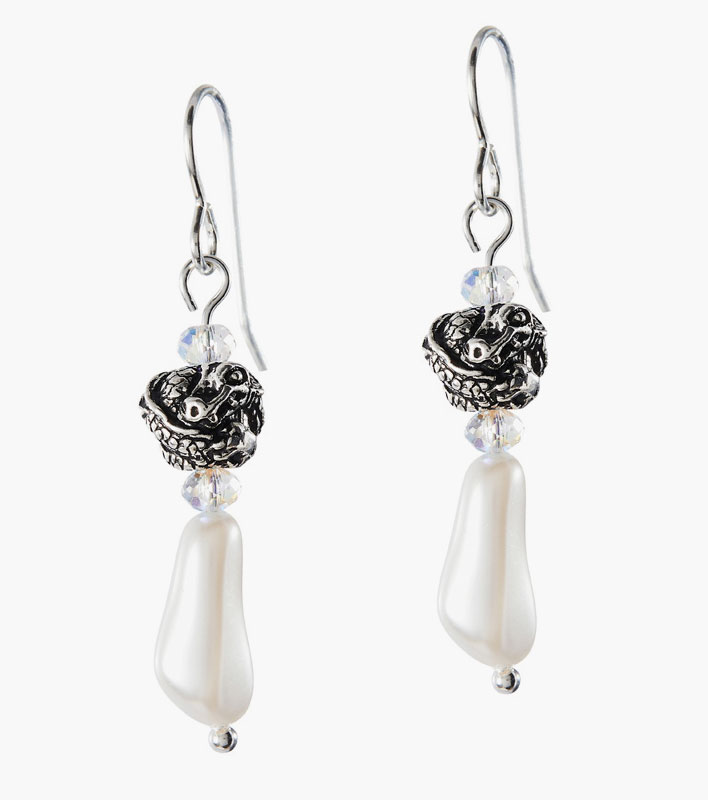
Our pair of earrings is cool and bright! It has the simplicity for a warm beach stroll and an elegance for a beach-side patio dinner!

What you’ll need for earrings:

  • SW02553 (2) – Swarovski crystal 18mm Light Turquoise Meteor Pendant
  • SW00157 (2) – Swarovski crystal 4mm Peridot Bicone
  • SW02213 (2) – Swarovski crystal 4mm Rose Peach Shimmer Bicone
  • SW02552 (2) – Swarovski crystal 4mm Light Turquoise Bicone
  • SB00444 – 11/0 Matte Opaque Cream Seed Bead
    You can sub seed bead for 2mm Pearlescent Pearls SW01920 (8)
  • A001494 – 2 Inch Silver Plated Eyepin
  • TCZ0077 – Sterling Silver Earring Wire by TierraCast®

Directions:

  1. On eyepin, slide on the following:
    seed bead, peridot crystal, seed bead, light turquoise crystal, seed bead, rose peach crystal and seed bead.
  2. Make a simple loop about 4mm or large enough to slide on crystal pendant.
  3. Open the loop you made in step 2 and slide on crystal pendant. Close loop.
  4. Open earring wire loop and slide on on other eyepin loop. Close loop.
  5. Repeat all steps for other earring.


DIY Black and White Acetate Stripe Earrings

We love the classic black and white themed jewelry. It’s hip and gorgeously elegant all in one. Our pair consists of acetate connectors and enamel components, with of course gold findings! (Shop All Acetate Components)

What you’ll need for Kite Earrings:

GoodyBeads Blog | DIY Black and White Stripe Earrings FREE Tutorial

Directions:

  1. Open 6mm jump ring, slide on enamel charm and acetate connector. Close jump ring.
  2. Open 6mm jump ring and slide on other hole of acetate connector and close jump ring.
  3. Open 3mm jump ring slide on top 6mm jump ring and earring loop. Close jump ring.
  4. Repeat all steps for other earring. Note: You can flip flop the acetate for an asymmetrical look or keep it consistent.

Check out other Acetate DIY jewelry ideas.


DIY Delicate Delica Necklace or Wrap Around Bracelet

Today’s project is perfect for Summer because it’s delicate and minimalistic; the right kind of jewelry to not outshine your summer style! Made with only two products, Griffin silk cord (No. 4 cord) and Miyuki 11/0 Delica mix, this project is easy to make for a lazy summer day.

What you’ll need:

  • Griffin silk cord (No. 4 cord) – Item used in necklace A006569
  • Miyuki 11/0 Delica mix – Item used in necklace SB03797

Tools needed:

  • Thin tipped, needle nose pliers
  • OR you can use thin tweezers to make the knots.

Get all the components for this project here

GoodyBeads Blog | DIY Delicate Delica Necklace or Wrap Around Bracelet - FREE tutorial.

GoodyBeads Blog | DIY Delicate Delica Necklace or Wrap Around Bracelet - FREE tutorial.

Directions:

  1. Unravel your Griffin cord and straighten/smooth the strands to remove kink. (Refer to Silk Cord Blog)
  2. Make a knot at the end of your silk cord, leaving a 1/4 tail. Sew on 4 delica seed beads.
  3. Make a knot 4 inches from the first knot you made. Sew on 8 delicas and make another knot close to the end of your delicas.
  4. Make a knot about 1/2″ from the previous knot. Sew on 8 delicas and make another knot close to the end of your delicas.
  5. Repeat step 4 until you have about 5-6 inches left of your Griffin cord.
  6. Sew through the last delica that you added in the beginning (Step 2). this will act as your slider and create your necklace loop. Pick 3 more delicas and make a knot at the end of your Griffin cord, 1/4″ from to the needle. Cut off needle.

GoodyBeads Blog | DIY Delicate Delica Necklace or Wrap Around Bracelet - FREE tutorial.

You can wear this wrapped around your necklace two times or wear it as a wrap-around bracelet, using the slider piece to adjust.

You can also shorten the pattern to alter the length of your necklace.