DIY Flora Link Criss Cross Leather Bracelet with Macrame Knots

We love the contrasting colors in this Flora Link Cross Cross Leather Bracelet. This DIY uses a braided and macramé technique using round leather cord and TierraCast Flora Links. It’s also a revamp version of the Criss Cross Leather Bracelet we did back in May.

What you’ll need for Leather Bracelet:

  • Z015514 – 1mm Natural Light Brown Leather
  • A022077 – 2mm Natural Blue Leather
  • TC02377 (2) – Small Flora Link
  • TC02379 (3) – Medium Flora Link
  • TC02349 – Button

Get all the components for this project here

GoodyBeads.com Blog | DIY Flora Link Criss Cross Leather Bracelet with Macrame Knots

GoodyBeads.com Blog | DIY Flora Link Criss Cross Leather Bracelet with Macrame Knots

Directions:

  1. Cut 30 inches of the 2mm leather cord.
  2. Cut 60 inches of the 1mm leather cord.
  3. Slide 2mm leather through button and center it. Take both leather ends and make a knot an inch away from the button.
  4. You can use a macrame board to anchor your 2mm leathers down or pin it down to anchor it also.
  5. Slide the middle part of your 1mm leather behind both of the 2mm leather cord, near the knot you made in Step 3. Make 7 full square macramé knots.
  6. Slide on a small flora link. In front of the link cross the left piece of the 1mm over the 2 strands of 2mm cord and then cross the right piece over the left peice.
  7. Take the both ends of 2mm leather and bend them back over the crisscrossed strands and go back thru the ring. Tighten, adjust and straighten your strands.
  8. Repeat steps 6 and 7 with a sequence of 3 medium flora link and 1 small flora link.
  9. After last ring do 7 FULL macramé square knots.
  10. With all 4 pieces of cord make an overhand knot where the macramé ends. Trim ends of the 1mm cord.
  11. Make another overhand knot with both leather ends about one inch from the first to create your button hole clasp. Make another for an optional length.

Video Tutorial

Check out our previous Facebook LIVE episode where Tory makes this bracelet HERE!


DIY Beaded Lattice Collar with FREE Pattern Tutorial

Our Beaded Lattice Collar necklace is certainly one all bead-stitchers would love to create! It’s also simple enough for any beginner who would like to create an iconic, show-stopping, statement necklace. Get your components and FREE Downloadable Tutorial HERE.

What you’ll need for Beaded Lattice Collar:

——- CLICK for FREE Downloadable Pattern Tutorial ——-

GoodyBeads.com Blog | DIY Beaded Lattice Collar with FREE Pattern Tutorial

GoodyBeads.com Blog | DIY Beaded Lattice Collar with FREE Pattern Tutorial

Beaded Lattice Collar Pattern Tutorial

——- CLICK for FREE Downloadable Pattern Tutorial ——-

GoodyBeads.com Blog | DIY Beaded Lattice Collar with FREE Pattern Tutorial


TierraCast® DIY Lavender Garden Loomed Bracelet

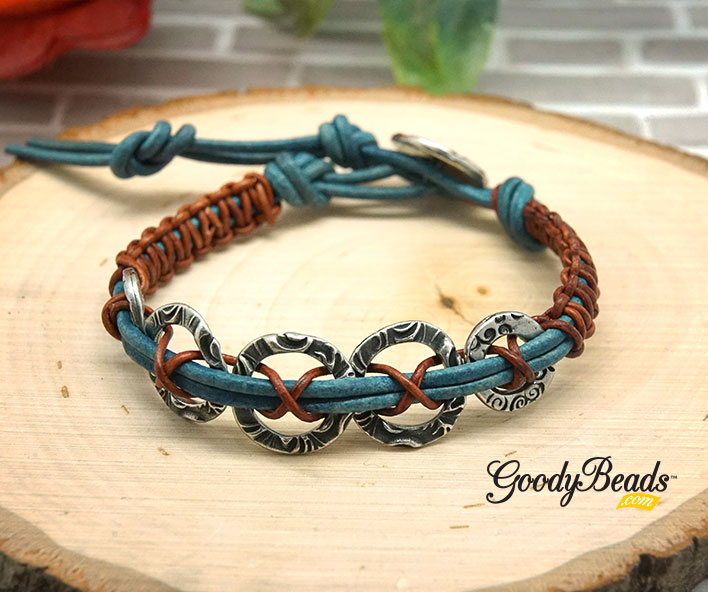
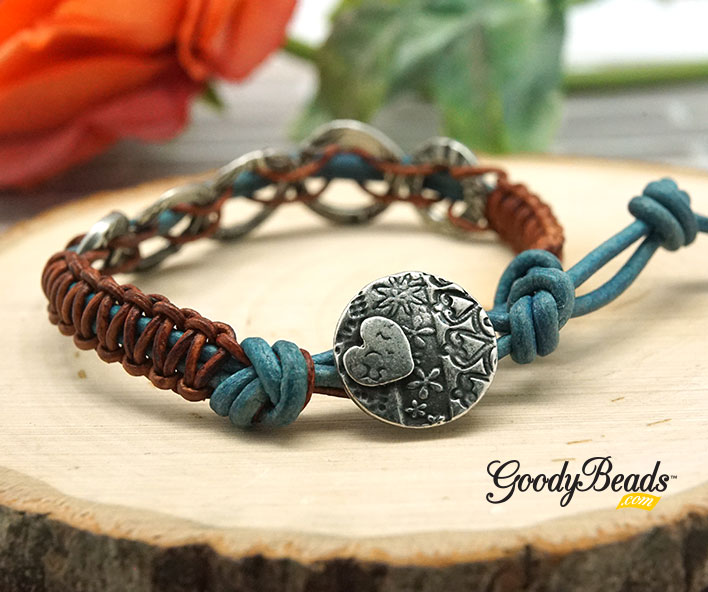
The DIY Lavendar Garden Loomed Bracelet comes from our friends at TierraCast. This bracelet uses a bead loom and one of their newest products, The Stitch-In Link Connector.

Items you’ll need for Loomed Bracelet:

GoodyBeads.com Blog | TierraCast® DIY Lavender Garden Loomed Bracelet FREE Tutorial

GoodyBeads.com Blog | TierraCast® DIY Lavender Garden Loomed Bracelet FREE Tutorial

Directions courtesy of TierraCast.com:

  1. Loom Set-up: String 10 warp threads onto your loom, per loom manual instructions.
  2. Row 1: Begin your weft thread with plenty of length, at least 36” to 40”, and anchor per your loom instructions, then string nine color C beads and complete Row 1. Most looms complete rows by bringing all nine beads, strung along the thread, under the warp threads, aligning them between each of the warps, and then bringing the needle back through the beads in the opposite direction, making sure to keep the needle above the warp threads.
  3. Row 2: string one Color B, seven Color C, and one Color B. Stitch back through the beads in the opposite direction, making sure to keep the needle above the warp threads.
  4. Row 3: String two B, two C, then string one stitch-in through the first hole, ensuring the top loop is facing up, so that it will sit on top of the work when loomed in. (Fig 1) Bring the beads and button stitch in under the warps and align them between the warp threads. (Fig 2) Then string two C and two B and align the beads between the warp threads. Stitch back through all beads and the stitch-in above the warps in the same way you would complete a regular loomed row.
  5. Row 4: String three B, one C, then bring your thread under the warp threads and pass the needle through the stitch-in’s middle hole (Fig 3). String one C and three B. Align the beads between the warps and complete the row with the thread passing back through all beads and the stitch in above the warp threads.
  6. Row 5: Repeat Step 5, but with four B, then stitch through the top hole of the button stitch-in (Fig 4). String four B and complete the row. (Fig 5)
  7. The rest of the pattern is loomed normally, following the Loom Pattern. Download a pdf of the bead chart and pattern here.
  8. When you reach row 50, string one B, three C, the first hole of the second stitch-in connector, three C, and one B. Complete the row with the thread passing back above the warp threads through all beads and the stitch-in.
  9. Row 51. String two B, two C then bring your thread under the warps and pass through the center hole of the stitch-in, string two C and two B. Complete the row with the thread passing back above the warp threads through all beads and the stitch-in.
  10. Row 52. String three B, one C, then bring your thread under the warps and pass through the last hole of the stitch-in, then string one C and three B. Complete the row with the thread passing back above the warp threads through all beads and the stitch-in.
  11. Finish the remaining rows 53-55 as normal, then remove from the loom and weave in warp threads per your loom manual’s instructions.
  12. Using chain nose pliers, open a jump ring and attach the apple blossom button to the stitch-in loop over row 4. Close jump ring.
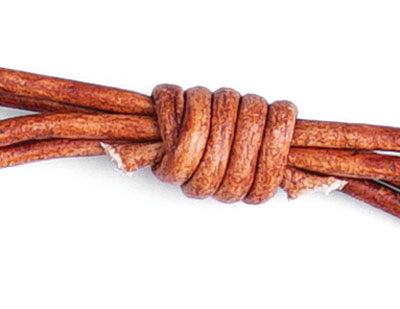
  13. Cut a 10” length of 2mm leather cord. String the cord through the loop of the button stitch-in over row 52. Center cord in loop.
  14. Tie an overhand knot with both strands of the leather. *Measure from the knot along the cord approx. 17mm (a little over half an inch) and then tie another overhand knot with both strands. Tighten. * Repeat from * to create a second button loop for an adjustable closure. Trim leather and use a small amount of glue to secure the knots.
  15. Optional: Open one jump ring and attach to cord at the loop of the stitch-in connector. Before closing string on charm. Close jump ring.

(Check out TierraCast page for image reference.)


DIY Carabiner Lariat Necklace with Swarovski® Baroque Pearl

Our lariat necklace tutorial today features the popular carabiner clasps, along with our newer Swarovski baroque pearls. Make this necklace long or short, it will be the start of some fun layering neck mess pieces.

Items you’ll need for Lariat Necklace:

GoodyBeads.com Blog | DIY Carabiner Lariat Necklace with Swarovski® Baroque Pearl FREE Tutorial

GoodyBeads.com Blog | DIY Carabiner Lariat Necklace with Swarovski® Baroque Pearl FREE Tutorial

Directions:

  1. Slide pearl onto the headpin and make a larger simple or wrapped loop. Make sure loop can slide on through clasp.
  2. Open jump ring, slide on charm and close jump ring.
  3. Cut chain to 16 inches. Or cut to your preferred length.
  4. Open carabiner clasp by unscrewing clasp, slide on jump ring with charm and pearl drop. Then slide on both ends of your paper clip chain. Close clasp.


Vintaj Patina Polka Dot Wood & Resin Earrings

Let’s be creative with these DIY Wood & Resin Earrings with Patina Paint. From one of our Facebook LIVE episode, Tory showed how easy it is to paint with Vintaj patinas on these trendy wood & resin pendants.

What you’ll need for wood & resin earrings:

GoodyBeads.com Blog | DIY Wood & Resin Earrings with Patina Paint FREE Tutorial

Directions:

  1. Shake up the patina bottle to mix the contents well. Pour out a small amount of patina.
  2. Using the back side of a paint brush or a small round tip and dip it in to the paint.
  3. Make dots on the wood part on both wood & resin pendants.
  4. Let paint dry for a few minutes.
  5. Open jump ring, slide on wood & resin pendant and through loop of earring. Repeat for other wood & resin and earring.

Video Tutorial

Check out our previous Facebook LIVE episode with these fun wood & resin earrings tutorial.


DIY Ring Link Adjustable Leather Bracelet

Today’s project is the DIY Ring Link Adjustable Leather Bracelet we demoed at the Pinners Conference. This project uses some of our favorite branded components like TierraCast ring component, Dakota Stones large-hole gemstones and Leather Cord USA 1.5mm leather! Combine them all and get a fun DIY you’ll need to make for all your friends.

What you’ll need for Ring Link Adjustable Leather Bracelet:

GoodyBeads Blog | DIY Ring Link Adjustable Leather Bracelet FREE Tutorial

Directions:

  1. Cut two pieces of leather at 18” length each.
  2. Take one leather piece, fold in half and make a lark’s head knot on the TierraCast ring.
  3. Slide a gemstone onto both strands of leather ends.
  4. Repeat steps 2 and 3 with other leather.
  5. Cross leather ends, keeping strands straight. And then tie a sliding knot with an 8” piece of leather:
    1. Lay an inch of leather end over the bracelet’s leather strands.
    2. Hold end under your non-dominant hand and wrap around all the leather strands.
    3. Continue to wrap cord around leather strands loosely, working back towards the cut end of wrapping cord. Make 5 coils.
    4. Thread leather under and through all the coils you’ve just created.
    5. Adjust the coils so they sit neatly and pull both leather ends in opposite directions to secure knot.
    6. Trim away excess leather close to coil
  6. Make an overhand knot with leather ends. Cut off excess leather.


DIY Hanging Crescent Earrings with Swarovski® crystals

Today’s DIY hanging crescent earrings are gorgeous because they contain fun kidney shaped earring findings and popular crescent charms, topped off with Swarovski crystals. You can also make this in a silver version too.

What you’ll need for crescent earrings:

  • Z016772 (2) – 22.4mm Gold Hanging Crescent Connector Charm (Silver Z016773)
  • Z003274 – Gold Plated Kidney Shaped Ear Wire (Silver Z003942)
  • SW00103 (2) – Swarovski 6mm Bicone Crystal Clear Beads
  • A019690 – 1 Inch Gold Plated 21 Gauge Headpins with Ball Top (Silver A019694)

GoodyBeads.com Blog | DIY Hanging Crescent Earrings with Swarovski crystal FREE Tutorial

Directions:

  1. Slide a crystal on a headpin and make a simple loop.
  2. Open crystal dangle loop and slide on inner hole of crescent connector. Close loop.
  3. Open earwire loop, slide on other hole of crescent connector and close loop.
  4. Repeat all steps for other earring.

Designed by Tory


DIY Earrings-Black & White Striped Earrings

Our October DIY Black & White Striped Earrings today consists of two components with glue. One of our newer acetate products comes top drilled, which makes the perfect components for our Gold Hook Earrings.

What you’ll need for these pair of DIY striped earrings:

  • Z013649 – Black & White Stripe Acetate Kite Shape Top Drilled Pendant
  • Z011596 – 23mm Gold Hook Earrings with Half Drill Post
  • TL00364 – Loctite Super Glue
    OR
  • A015821 – Super New Glue

Goodybeads.com Blog | DIY Earrings-Black & White Striped Earrings, FREE Tutorial

Directions:

  1. Add a small drop of glue inside the top hole of the acetate top drilled pendant.
  2. Insert the post/mandrel of the hook earring inside the glued hole.
  3. Lay pieces flat to dry.
  4. Repeat to make the other earring.


DIY Irregular Nugget Necklace

We’ve got the perfect easy DIY necklace for you today that requires no tools! Our simple DIY Irregular Nugget Necklace compliments your style with its standout, statement pendant that already comes with its own loop. Top it off with a bail and ready-made necklace, this DIY will get you pumped up for a fun day!

Items used in necklace:

  • Z001033 – 32 Inch Rhodium Plated Cable Chain Necklace
  • TC02582 – 9mm Bright Rhodium Smooth Pinch Bail by TierraCast
  • Z017958 – Crystal Quartz Large Irregular Nugget Pendant

GoodyBeads.com Blog | DIY Irregular Nugget Necklace

Directions:

  1. Slide pendant loop and chain of necklace between the pinch bail.
  2. Pinch the bail down so the prongs are in the loop of the pendant.

    Note: if necklace is too long, open a jump ring and slide off chain end. Cut chain to your preferred length and connect jump ring to new length of chain end.


DIY Gemstone Post Cabochon Earrings

Today, Our easy DIY gemstone jewelry is on how to make these fun post earrings using DakotaStones cabochons.

Items used in earrings:

Directions:

  1. Take the filer and give the back of the cabs a few light scratches.
  2. Wipe the back of the cab. Add a small dot of Super New Glue.
  3. gently position the post earrings in the center of the cab back.
  4. Repeat for other earring.
  5. Leave earrings for a few hours to dry.


DIY Hoop Post Earrings with Wood Resin Bead

We love our selection of wood & resin charms that we’ve made some super cute beads out of them. And we’ve used them in our project today!

Items used in earrings:

  • Y003022 – 21mm Gold Hoop Post Earrings
  • Z015234 – 15mm Wood & Pale Pink Resin Disc Bead
  • TC02820 (2) – 7mm Bright Gold Hammertone Rondelle Bead by TierraCast
  • TC00567 (2) – 5mm Gold Nugget Spacer by TierraCast
  • A019696 – 2 Inch Gold Plated 21 Gauge Headpins with Ball Top
  • A011517 – 4mm Gold Plated 20 Gauge Round Jump Ring

Get all the components for this project here

GoodyBeads.com Blog | DIY Wood Resin Bead Hoop Post Earrings FREE Tutorial

Directions:

  1. Slide the following on a headpin and make a simple or wrapped loop:
    5mm nugget bead, wood/resin bead & 7mm hammertone bead.
  2. Open jump ring, slide on wood/resin dangle and hoop of earring. Close jump ring.
  3. Repeat all steps for other earring.

Check out more DIY Projects with Wood & Resin.


DIY Bling Leather Bracelet

Don’t you love sweater weather? The DIY Bling Leather Bracelet is flashy and subtle with fun metallic and bling flat leather. It’s the perfect leather bracelet to pair with your fall & winter style.

Items used in bracelet:

  • Z003873 – Shiny Gold Long Leather Setting Slider for 10mm Flat Leather
  • CH01110 (2″) – 10mm Flat Black Leather
  • CH00813 – (7″ or 8″) 10mm Bronze Pearl Metallic Flat Leather
  • Z018344 – 10mm Gold Rounded Magnetic Clasp
  • A015821 – Super New Glue

GoodyBeads.com Blog | DIY Bling Leather Bracelet FREE Tutorial

Directions:

  1. Put glue in the bezel part of the Setting Slider. Put the bling leather in the glued bezel, trim excess.
  2. Glue one end of the flat leather piece into one end of magnetic clasp.
  3. Slide Setting Slider onto the flat leather, making sure the slide is on the correct side of the flat leather.
  4. Glue the other end of the flat leather piece into the other end of the magnetic clasp.
  5. Let the bracelet dry for a few hours or overnight before wearing.

Here are MORE Flat Leather DIYs to try out!


DIY Jewelry Statement Earrings with Acetate Components

We’re layering and combining some of our favorites in this pair of DIY Jewelry Statement Earrings. It includes acetate components, links, charms and jump rings. These earrings are a bit funky with their multi-color acetate designs. Make them today for funky fall style!

Items used in DIY Jewelry Statement Earrings:

Goodybeads.com Blog | DIY Statement Acetate Earrings FREE Tutorial

Directions:

  1. Open 8mm jump ring, slide on 30mm acetate charm, a quick link, disc drop and through a hole of the 15mm acetate link. Close jump ring.
  2. Open a 6mm jump ring, slide through other hole of 15mm acetate link and close jump ring.
  3. Open another 8mm jump ring, slide through 6mm jump ring in step 2 and through ear wire loop. Close jump ring.
  4. Repeat all steps for other earring.


DIY Navette Adjustable Bracelet with Swarovski® Sew-On

Our easy project today will be using beautiful Swarovski crystals and satin Adjustable bracelet.

Items used in bracelet:

  • SW01976 – Swarovski® 29mm Crystal Navette Sew-On Stone
  • TC02347 (2) – 8mm Oval Jump Ring by TierraCast
  • Z014807 – Black Twisted Satin Adjustable Bracelet Sliding Clasp

GoodyBeads Blog | DIY Navette Adjustable Bracelet with Swarovski® Sew-On FREE Tutorial

Directions:

  1. Open a jump ring, slide on one side of the crystal link and through one ring on sliding clasp. Close jump ring.
  2. Repeat with other jump ring and ring of sliding clasp.


DIY Double Ring Mixed Media Earrings

We’ve compiled some of our favorites in today’s project! We have TierraCast findings with Leather Cord USA Nubuck leather lace and mixing metals with Nunn Designs hoops. Try these DIY earrings out today!

Items used in earrings:

  • TCZ0077 – Sterling Silver Earring Wire by Tierracast®
  • Z004551 (2) – 30mm Ant. Silver Grande Organic Hoop by Nunn Design
  • Z008273 (2) – 35mm 24k Gold Plated Frame Hoop by Nunn Designs
  • Z016427 – 10mm Black Nubuck Lace
  • A008807 – 7mm Silver Plated 16 Gauge Round Jump Rings
  • A008799 – 5mm Oval Silver Plated 21 Gauge Jump ROpings
  • Tools: TL00043 – Leather Hole Punch Pliers

GoodyBeads.com Blog | DIY Double Ring Mixed Media Earrings FREE Tutorial

Directions:

  1. Cut two pieces of leather at 1.5″ long.
  2. Punch a hole 1/8″ from the edge of your piece of leather. Punch a hole on each leather end. Repeat on the other leather piece.
  3. Open oval jump ring, slide on a hole of a leather piece, slide on a gold and silver ring and slide through other hole of that leather piece. Close jump ring.
  4. Open 7mm jump ring, slide on oval jump ring from step 3 and through ear wire loop. Close jump ring.
  5. Repeat Steps 3 and 4 for other earring.