Rockstar Bib Necklaces with Acetate

Check out this DIY Bib Necklace with Acetate components, worthy of a rock concert!


Statement jewelry is trendy with all types of fashion. So we’re dabbling on some statement jewelry with bib necklaces made with bib connectors and flamboyant acetate charms and pendants. And to make your jewelry wearing easier, we used adjustable necklace chain to top of these necklace ideas!


Blue Suede Bib Necklace

GoodyBeads | Blog - Bib Necklace with Acetate Coin Charms

When looking at this necklace, I’m getting an old school Walking in Memphis song by Marc Cohn in my head. ‘Put on my blue suede shoes and I boarded the plan.’ Yes, the perfect song!

We used 18mm acetate coin charms for this sassy bib necklace. Starting at the middle of the necklace, added an acetate coin charm with a jump ring. Then add an acetate to every other hole fanning out, adding a total of 9 acetate. Lastly, add the adjustable necklace chain to the bib connector with a jump ring attaching to the small jump ring on the chain.

Items used in necklace: Z021568, A001529, Z011944, Z007242 (5)


Queenie Necklace

GoodyBeads | Blog - Bib Necklace with Acetate Pendants

Have you seen the movie Bohemian Rhapsody? If not, you at least know that it is one of Queen’s iconic song. I first heard the song when watching Wayne’s World and I guess reflects me millennial age. Either way, donning this necklace, let’s rock out to a good song!

For tutorial, repeat the same steps like the necklace above, adding a total of 5 pendants.

Items used in necklace: Z018066A001529, Z010754, Z020505 (3)


Lotus Inspired Jewelry

The Lotus is iconic and symbolic in many cultures. Learn its significance and check out our DIY lotus jewelry, inspired by the lotus motif.

Lotus: A Religious Symbolism

  • Through Egyptian art, “(t)he Lotus is used as a symbol in ancient Egyptian art representing the sun, of creation, rebirth and was a symbol of Upper Egypt. As a symbol of the sun it is closely associated with Atum-Ra, the Sun god and later with Nefertum, lotus god of perfume. Lotus flowers, also called water lilies, open in the morning and close again at night symbolizing rebirth and regeneration. ” (LandofPyramids)
  • In Buddahism, the Lotus symbolize not only rebirth, but also purity and spiritual enlightenment. (LotusFlowerMeaning)
  • And in Hinduism, the Lotus motif is a strong symbol associated with “beauty, fertility, prosperity, spirituality, and eternity.” (LotusFlowerMeaning)

Check out our jewelry using the strong and symbolic meaning of Lotus.

Lotus Porcelain Necklace

GoodyBeads Blog Lotus and Porcelain Necklace - Free Tutorial

We paired a stunning TierraCast Lotus link with an organic-looking porcelain oval bead. Take a headpin, slide on a small silver seed bead, porcelain bead and another seed bead. Make a wrapped loop by hooking on the lotus link before wrapping the headpin. Open a jump ring, slide on the top part of the lotus and onto the necklace chain and close jump ring. STUNNING, don’t you think?

Items used in necklace: TC02466, A019656A008273, SB00106, A001528, Z001033

Lotus Chain Earrings

GoodBeads Blog Czech Lotus Drop Bead - Free Tutorial

We can’t get enough of the beading chain here at GoodyBeads. We used the same tutorial and concept from our previous blog to make this pair of earrings with Czech Lotus Coin Beads.

Items used in earrings: Z018245, CH00724, X001505, TC01897 (2), TCZ0077

Lotus Link Bracelet

LotusJewelry_Bracelet

Who doesn’t love a simple adjustable bracelet! We certainly do. We used the Silver Plated Adjustable Rollo Chain Bracelet Sliding Clasp (Z012151) with a gold lotus charm. The contrasting metal really makes the lotus charm pop!


Stretch Bracelets & the Tricky Ricky Knot

We have Ricky from DakotaStones to teach us how to make a Tricky Ricky Knot in this video tutorial. Make fun stretch bracelets using this knot for tying your elastics!


A few products and tools to get your started in making your own stretch bracelets:


Video Tutorial


Now that you have watched the video and found the perfect knot to making your stretch bracelet, you are sure to make an arm full of stretchy bracelets! A few important notes to keep in mind when making your knots:

  • Start with a 2.5′ elastic
  • Pre-stretch your elastic before stringing.
  • Cut one end of your Big Eye Needle to be able to easily slide your needle off the elastic. You can re-use needle for more stretch bracelets.
  • Optional: you can add a drop of glue to add strength to your knot.
  • A visual illustration of tying the elastic:

Screen Shot 2019-07-24 at 2.10.51 PM


Easy TierraCast Feather Necklace

Here’s a super simple TierraCast Feather Necklace using all TierraCast components. It’s simple enough to have John, our photographer, put this ensemble together.


This necklace is made with simply using a pinch bail to connect the feather and necklace. Read our previous on How to Use Pinch Bails.


What you’ll need:


Video Tutorial

Items used in video tutorial:TC02511, TC02319,TC02065


DIY Lava Bracelets and Essential Oils

Lava bead jewelry is all the rage, whilst combining them with essential oils. Learn about basic essential oil healing properties and create an easy DIY lava bracelets using lava beads from Dakota Stones.

Essential Oils Healing Properties

The aromatic scent of essential oils add extra healing and therapeutic property to calm your mind and your soul. While essential oils are used in aromatherapy, it’s even trending for medicinal uses.

Here are some healing properties of 5 basic essential oils. 

  1. Lavender
    Healing Properties: calming and relaxing, stress reliever
  2. Peppermint
    Healing Properties: uplifting and invigorating, energy booster
  3. Eucalyptus
    Healing Properties: clarifying, enhance concentration
  4. Tea Tree
    Healing Properties: cleansing and clarifying
  5. Lemon
    Healing Properties: moon enhancer, cleansing, freshening, improves concentration

One way to use essential oils is adding a drop or two to jewelry made with lava beads. Let lava beads absorb the essential oils for a few minutes before wearing your jewelry!

DIY Lava Bracelets

GoodyBeads Blog - Lava Beads Wood Beads

An easy DIY you can make are stretchy bracelets! Pair lava beads with wood beads for a natural look. And we couldn’t resist these dyed lava beads! What we did to make this bracelet was pre-stretching a 9″ piece of elastic. String on your beads and make a surgeon’s knot. (Check out previous Stretch Bracelet blog for surgeon’s knot).

Item used in bracelet: LVA6RD-TQS, WD-BYG6RD, Z002570, A021634

Nov18_LavaBeads_image01

We made this bracelet using wavy disc and the popular gray lava beads. Cut a 9″ soft flex wire. Slide on 9 lava beads. Slide on 10 wavy discs by sliding one bead concave out and slide another concave in so that the two discs cup together. Repeat for the rest. Then slide on 9 more lava beads. You can add more lava beads to either sides to customize your wrist size. Slide on a crimp tube to one end and loop of your clasp. Loop flex wire back through the crimp tube and crimp your tube. Cut flex wire with a 1/4″ tail. Repeat to other end but adding a jump ring.

Items used in bracelet: LVA8RD, Z018418, TC01896 (2), A012353, A011517, Z011537


How to Use Vintaj Patinas on Leather – Video Tutorial

Candie Cooper is back with us again! Watch this informational video today and learn some tips and tricks to customize leather jewelry with Vintaj Patina paints.

GoodyBeads Blog Sizzix Leather with Vintaj Patina paint.


Video Tutorial


Vintaj Patina is versatile to use with metal, wood and even leather! With the help of Candie Cooper, she and Tory have a fun and innovative way of making leather jewelry with Vintaj Patina and the Sizzix Big Shot.

Here are some tips and tricks that were used in the video tutorial:

  • Use metallic patina paints over matte leather
  • Paint patina on bubble wrap and press leather on bubble wrap
  • Use a fan brush to lightly brush patina while creating hashing designs
  • Glide the tip of the patina paint bottle over leather in quick strokes and scribbles


Sizzix Die Cuts used in video: Leaf Die Set (SZ00062) & Wide Bracelet Die (SZ00028) 


Swarovski® Fine Rocks Tube Beads

Swarovski fine rocks tube beads are the envy of every jewelry-makers’ supply. Here are three simple and modern projects to get you started.


Swarovski fine rocks tube bead comes in two sizes: 15mm and 30mm. As well as multiple color options. These tube shape beads are layered with pavé crystals with a metallic and crystal shine. Here are three simple projects using Swarovski fine rocks tube beads.


Pretty Rockin’ Bracelet

GoodyBeads Blog - Swarovski Crystal Rock Tube Bead Bracelet Tutorial

This gorgeous bracelet is made with an adjustable bracelet slider clasp. Using few components to make one bracelet, you’ll see how easy it is to want to make a whole bunch of them!

Items used in bracelet: SW01962, Z002570, WR00033, Z012151

  1. Start with a 4 inch piece of 22-Gauge wire. Make a wrapped loop at one end.
  2. Slide silver spacer, crystal tube and silver spacer on wire. Make a wrapped loop.
  3. Open jump ring from one side of slider clasp and slip on end of crystal tube link. Close jump ring.
  4. Repeat to the other jump ring on slider clasp.


Midnight Blush Earrings

GoodyBeads Blog - Swarovski Crystal Rock Tube Bead earrings Tutorial

We spruced up this wickedly awesome pair of earrings with silver coiled spacers and Swarovski classic cut crystal pendants.

Items used in earrings: SW01965 (2) SW01748 (2), SW01906 (4), A002413, A001495, A003564, TCZ0078

  1. Open jump ring, slide on classic crystal pendant and close jump ring.
  2. Open eyepin, slide on jump ring from step one and close eyepin.
  3. Slide the following onto the eyepin and make a simple loop: 4mm bicone crystal, spacer, crystal tube, spacer and bicone crystal.
  4. Open earwire loop, slide on tube dangle and close loop.
  5. Repeat all steps for other earring.


Crystal Rock Drop Necklace


Sw_CrystalRock_04

Jam out to some hoppin’ holiday music with this Crystal Rock Drop Necklace.

Items used in necklace: Z003715A001495A003564, SW00114 (2), SW01825, SW01896, SW01970, TC00446, SW01830

  1. Mix equal amounts of the Two-Part Epoxy.
  2. Dab a drop into the crystal setting. Lay raindrop fancy stone into setting. Let it dry for at least an hour before assembling necklace.
  3. Open eyepin and slide on raindrop stone dangle. Close eyepin.
  4. On the eyepin, slide on the following and make a simple loop: bicone crystal, spacer, crystal tube, spacer and bicone crystal.
  5. Open top loop, slide onto bail loop and close loop.
  6. Open clasp of necklace chain and slide on bail.
  7. Necklace complete.


Beadalon® Instant Pendant Necklace – Tutorial

Make an easy necklace pendant when you have the Beadalon Instant Pendant.


The Instant Pendant has a removable ball or point end that unscrews off. The mandrel is 1.5mm thick and 33mm long, so it is perfect for large-hole gemstones, large heavy beads, etc.

There are two styles; one with a ball tip and the other is a cone tip. They come in silver or gold finish. AND you get THREE with each package. So many combinations to think of!

Gold: Z016435 (ball) & Z016437 (cone)

Silver: Z016434 (ball) & Z016436 (cone)


Here is a step-by-step instruction sheet that shows how easy it is to make a necklace with an Instant Pendant.

GoodyBeads Beadalon Instant Pendant Tutorial

Click for PDF file instructions. (Tutorial by Beadalon)


Components in step-by-step tutorial:

Findings: Z016436, Z012742, Z012746

Tools: TL00316, TL00317, TL00318

Beads: WAF8RDLH-8, A009055, NBWB0011, A021464, A021481


Easy DIY Earrings with Faceted Glass Charms & Links

Learn to make easy DIY earrings with faceted glass charms today! These fabulous earrings projects are the perfect easy DIY for your fast and fun adventures! All you need is a pair of pliers and jump ring opening skills.

Check out our previous post about opening Jump Rings.

The star of these earrings are the faceted glass charms and links. They are sold in gorgeous pastel hues and easy to use.

FEB16_LinkEarrings_3

These pair of earrings uses link findings with Faceted Glass Charms attached with a small jump ring. What a simple idea, don’t you think? The first pair uses the combination of Faceted Glass Charms and Faceted Glass Links, while the second pair is so bubbly cute with Circles Connector and Faceted Glass Charms.

Golden Teardrop Earrings Components: A021765 (2), A021753 (2), A014109, Z007861

Bubble Drop Earrings Components: Z014013 (2), A021741 (2), A011517A014109

FEB16_LinkEarrings_2

This first stunning pair of earrings uses the Faceted Glass Links with cute heart charms! All you need is to open a jump ring to attach the charm to the faceted glass links.

Heart to Heart Earrings Component: A021758 (2), Z011847, A002413, Z001008

And we especially LOVE the star and moon combination. Talk about being trendy with asymmetrical earrings! Cut chain to 1/2″ and cut two pieces. Open a jump ring and attach star/moon charm to chain pieces. Open Earwire loop and slide on one end of the chain dangles and a faceted glass charm. Close loop. Repeat to make the second earring.

Midnight Shimmer Earrings Components: A021746 (2), Z008946, A008182, Z011924, Z011883, Z007856


Knotted Necklace with Video Tutorial

Knotted necklace are fun to make with or for friends. Once you get into a rhythm, you can whip one out in no time. Plus, we have a quick video tutorial on how to use the Easy Knotter Tool to help make knots between beads.

Make sure to check out our previous post on the Easy Knotter and How to Use Silk Cord for information on the tool and Griffin Silk Cord.

Knotted necklaces are super easy to make.  You will need Griffin Silk Cord and an assortment of your favorite beads like gemstones, Chinese crystals, metal beads, seed beads, etc. We love using Griffin Silk Cord because you get about 6 1/2 feet of twisted silk cord with a twisted needle. This will give you a 32″ necklace, give or take. In the examples below, we use size No.8 Griffin Cord.


Tutorial Video


Hazy Turquoise Necklace

GoodyBeads DIY tutorial Knotted Necklace with Chinese Crystals and Brass Beads

We used glossy rondelle Chinese crystals and triangle brass beads to create this necklace.

Items used: A022196, Z007027, A019209


Star-Crossed Gemstone Necklace

GoodyBeads DIY tutorial Knotted Necklace with Dakota Stones Star Cut Carnelian Gemstones

We love the texture of these Star Cut gemstones. We knotted this necklace with antique gold beads in an organic way without a pattern sequence, paired with black silk cord to pop out the Carnelian color.

Items used: CRN6RD-SC, A019202, Z001478


6 Multi-Wrap Memory Wire Bracelet Ideas – Video Tutorial

An easy DIY project we love to make are multi-wrap bracelets with memory wire. Check out this easy video tutorial and examples of multi-wrap bracelets!


Who doesn’t love stackable bracelets? Multi-wrap bracelets with Memory Wire are easy to make and design. This is the prefect project to use up those leftover beads, finally use that favorite strand or to buy more beads! We have tons of Glass beads, Swarovski® Crystals, Gemstones, TierraCast Beads®, Metal Beads, and Leather Cord with a tube or hallow core; the list goes on and on. Check out our previous blog post on How to Make a Leather and Memory Wire Bracelet for more additional information.


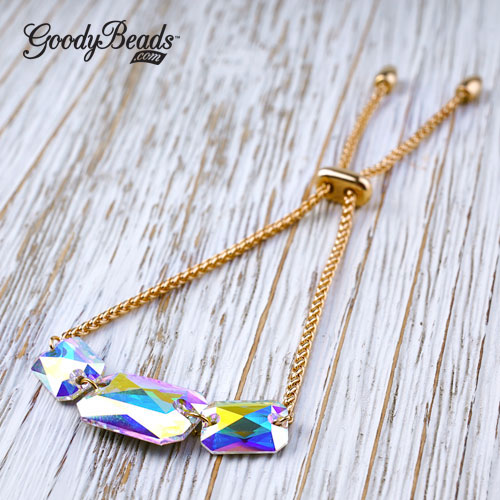
Charming Wrap Bracelet with Swarovski Crystals – Video Tutorial

For this bracelet, we used our GoodyBeads Master Mixes with Swarovski® bicone crystals and silver seed beads. The Master Mixes is an exclusive mix designed with 4-5 different 4mm bicone crystals. Alternate a crystal and seed bead in no particular order for a simple, sparkly bracelet!

Items used for bracelet: MX00035, SB00106, WR00127


Here are more examples of multi-wrap bracelet with instructions.

Mermaid Cove Bracelet

GoodyBeads | Multi-wrap memory wire bracelet Mermaid cove with Swarovski Crystals and Druzy gemstones.

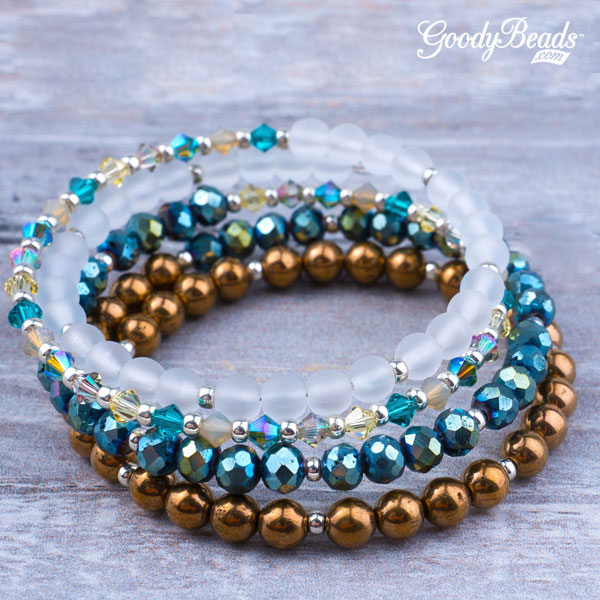
For this bracelet, we used a combination of Mermaid Dream Master Mix, Blue Green Druzy beads, Druk Czech Glass and seed beads. Items used for bracelet: GL-6RD-M0003GL-6RD-90215MX00009WR00127DAG6RD-BG-F-8SB00106

  1. Start with cutting at least 5 coils of memory wire with Memory Wire Cutter. Make a loop at one end with a Memory Wire Finishing Pliers.String on a seed bead and 4 Matte Crystal Druk. Repeat this sequence for a total of 8 sections.
  2. Add a seed bead and a bicone crystal from the Master Mix. Repeat by mixing up the colors from the Master Mix for a total of 33-35 Swarovski crystals.
  3. Add a seed bead and 4 Druzy beads. Repeat this sequence for a total of 9 sections.
  4. Add a seed bead and 4 Bronze Druk beads. Repeat this sequence for a total of 8 sections.
  5. Add one more seed bead and cut excess memory wire leaving a 3/4″ left and make a loop to finish off bracelet.


Boho Wood Wrap-Around Bracelet

GoodyBeads | DakotaStones wood beads, memory wire bracelet

Items used for bracelet: WD-GRW6RDWD-NGK10RDWD-BKG10RDWR00121

  1. Start with cutting at least 5-6 coils of memory wire with Memory Wire Cutter. Make a loop at one end with a Memory Wire Finishing Pliers.
  2. Slide on 20 Nangka Wood (yellow) beads.
  3. Slide on a 4mm Grey Wood bead and Nangka Wood. Repeat this sequence for a total of 12 sections.
  4. Slide on 33 Grey Wood bead.
  5. Slide on a Black Kamagong bead and a grey wood bead. Repeat this sequence for a total of 10 sections.
  6. Add one more Black Kamagong bead and cut excess memory wire leaving a 3/4″ left and make a loop to finish off bracelet.


Coastal Edge Bracelet

GoodyBeads | Multi Wrap Bracelet with Memory Wire, Wood beads, Matte seed beads and recycle beads.

From our Naturally Coastal Trend, this bracelet is layered with matte seed beads, recycle glass and wood beads. A fun beachside bracelet!  Items used for bracelet: WD-WHW8RD, Y001652, A002433, SB00561WR00121.

  1. Start with cutting at least 5-6 coils of memory wire with Memory Wire Cutter. Make a loop at one end with a Memory Wire Finishing Pliers.
  2. Slide on 5 wood rondelle and matte seed bead. Repeat this sequence for a total of 11 sections.
  3. Slide on round wood bead and wood rondelle. Repeat this sequence for a total of 17 sections.
  4. Slide on recycle bead and matter seed bead. Repeat this sequence for a total of 22 sections.
  5. Slide the rest of the bracelet with matte seed beads for a full coil round.
  6. Cut excess memory wire leaving a 3/4″ left and make a loop to finish off bracelet.


Cream Aqua Wrap Bracelet

GoodyBeads | Multi Wrap Bracelet with Memory Wire, silver beads, White African Opal, Aqua Impression Jasper and leather.

Mix up your bracelet with round leather and curved tube beads! Items used for bracelet: AQIM8RD-8WAF6RD-8CH00158 (7″), A007019, Z018411 (6), Z008251, A014097WR00121

  1. Start with cutting at least 5-6 coils of memory wire with Memory Wire Cutter. Make a loop at one end with a Memory Wire Finishing Pliers.
  2. Slide on silver bead, 5 wavy disc, 2 White Opal, 3 Aqua Jasper, 2 White Opal, 5 wavy disc and silver bead.
  3. Slide on silver tube bead.
  4. Repeat step 2.
  5. Slide on bead cap, leather, bead cap and silver tube bead.
  6. Repeat step 2.
  7. Slide on silver tube bead.
  8. Cut excess memory wire leaving a 3/4″ left and make a loop to finish off bracelet.


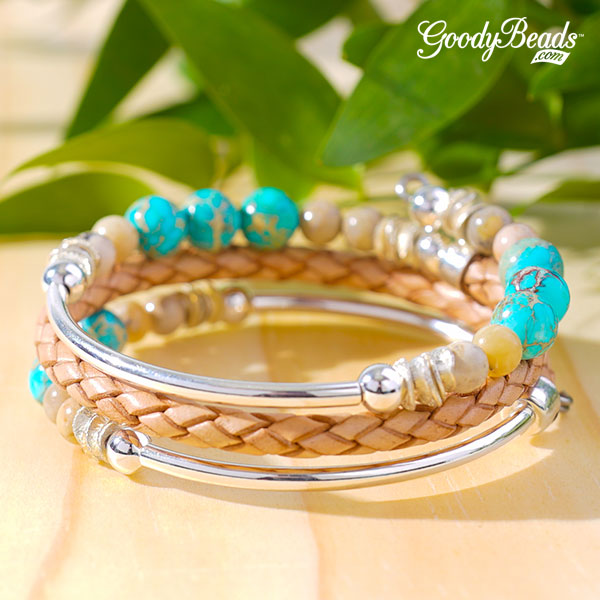
Amazonia Braided Bracelet

GoodyBeads | Multi Wrap Bracelet with Memory Wire, braid leather, Black Amazonite gemstones and TierraCast Charms.

Items used for bracelet: WR00121BGA6RD-M-8CH00227 (12″), Z011736TC02469 (2), A002413TC02439Z008252

  1. Cut 12″ leather in half.
  2. Start with cutting at least 4 coils of memory wire with Memory Wire Cutter. Make a loop at one end with a Memory Wire Finishing Pliers.
  3. Slide on bead cap, leather cord, bead cap, 5 Amazonite beads, silver TierraCast bead, 5 Amazonite beads and curve tube bead.
  4. Next slide 5 Amazonite beads, silver TierraCast bead, 5 Amazonite beads, bead cap, leather and bead cap.
  5. Cut excess memory wire leaving a 3/4″ left and make a loop to finish off bracelet.
  6. Open jump ring, slide on charm and through loop of curve tube bead. Close jump ring.


Amethyst Geode Earrings – Video Tutorial

From our Trends We Love: February Birthstone Amethyst, learn to make this cute hoop earrings wire-wrapped with Amethyst rondelles and Czech Fire-Polished beads.

Materials

  1. 26-Gauge Wire – WR00035
  2. 8mm Amethyst Rondelles – DTA8RL-F-8
  3. 4mm Amethyst Czech Fire-Polish – A003359
  4. 50mm Hoop Earrings – A014110

Video


Tutorial Steps

  1. Cut a 4 feet piece of 26-Gauge wire.
  2. Wrap the end of the wire to the hoop. Use pliers to make a tighter wrap. Push wrapped coils together.
  3. Pick up an Amethyst rondelle, loop wire towards middle of hoop and wrap two times. Make sure to push the wrapped coils together.
  4. Pick up a Czech bead and repeat.
  5. Repeat steps 3 and 4, going around the hoop earrings.
  6. Make your coils at the end and cut off excess wire. Use pliers to make tighter coil wraps.
  7. Repeat all steps for other earring.


Swarovski® Glue-in Settings – Video Tutorial

Candie Cooper stopped by to assist us in demonstrating how easy it is to mix epoxy glue and add Swarovski Crystal Fancy Stones to NEW Swarovski® settings and findings to make sparkling statement jewelry. Watch the video tutorial today!

Statement jewelry is about making your presence known. So why not create your own earrings or necklace with Swarovski crystal fancy stones? In minutes, you can create sparkling jewelry!

Swarovski Crystal and Settings

What you will need to create your pendant or dangle crystals  are the following:

When determining the right crystal stone for the right setting, read the description to determine the correct crystal style #. Take the style # and put that into the search bar to find crystals that will fit that setting.

setting2

Another key component to creating these crystal dangles is the two-part epoxy. CG 500 (A+B) is a high-performance gluing system for both foiled and unfoiled Swarovski crystals, exclusively distributed by Swarovski for professional use within the jewelry industry. CG 500 (A+B) absorbs impacts and withstands distortion. In addition, maximum elasticity protects the crystal foiling.

SWSetting-tutorial

Make sure to grab some Resin Cups and Sticks to mix your epoxy!

Video Tutorial

Swarovski Crystal Jewelry

swsetting01

Necklace Components: SW00449, SW01816, CH00722, Z004792

Earring #1: SW00446, SW01815, TCZ0078

Earring #2: SW01845, SW01820, TCZ0139

Earring #3: SW01883SW01829TCZ0139


Adjustable Bracelets with Swarovski® Crystals

We have an easy DIY project for you that makes creating bracelets even easier. With the Adjustable Bracelet Sliding Clasp, all you need to add is your favorite link! This project consists of sparkling Swarovski Crystals and two simple ways to incorporate them with the adjustable bracelet finding!


Adjustable Bracelet Sliding Clasp

The Adjustable Bracelet Sliding Clasp comes in two different chain types in gold, silver or rhodium finishes. These findings come in wheat or rollo chain, with a sliding clasp that easily moves to adjust to your wrist size and jump rings that make attaching links, beads, connectors and more a breeze.

braceletclasp-tutorial

You can get these clasps in:


Tutorials for Swarovski Crystal Bracelets

Link Swarovski Sew-On Stone Crystals with jump rings. We opened one of the jump rings on the chain and slid on one end of the crystal. Do the same to the other jump ring. Link a large sew-on crystal with 5mm oval jump rings. This bracelet is all set and ready to wear!

Items used for bracelet: Z012178, SW01804 (Qty 2), SW01805, A008801


We can’t get enough of the Swarovski Fine Rocks Tube Crystal! We used 22-Gauge wire, cut a 3″ piece and made a wrapped loop on one end. Slide on a silver disc spacer (Z002570), tube crystal and another spacer. Made another wrapped loop to finish off the link! We love the jump rings on the clasp because you can easily open the jump rings and attach your tube crystal!

Items used for bracelet: Z012151, SW01740, Z002570, AW00031


Sizzix Edition: Leatherette Earrings

Make trendy and fashionable leather earrings using the Sizzix Big Shot and the Teardrop Dies (SZ00025). Watch this video tutorial as Tory and Candie Cooper show you how easy it is to create some earring for yourself!

Check out our previous blog where you can learn how to Set Up your Sizzix Big Shot and even learn to make DIY Tassels. Theres a ton of ideas we can’t wait to show you!


GoodyBeads | Sizzix Leatherette Earrings

Today, Tory and Candie demonstrate how to make these Leatherette Earrings using the Teardrop Dies and Leather Punch Tool.


Here are leather and chain components that was used in this video tutorial: SZ00002, SZ00003, CH00659.

Hope you have fun making some earrings.  Add your choice of jump rings and earring findings to finish off your earrings. Or make them into a focal necklace pendant. So many possibilities!