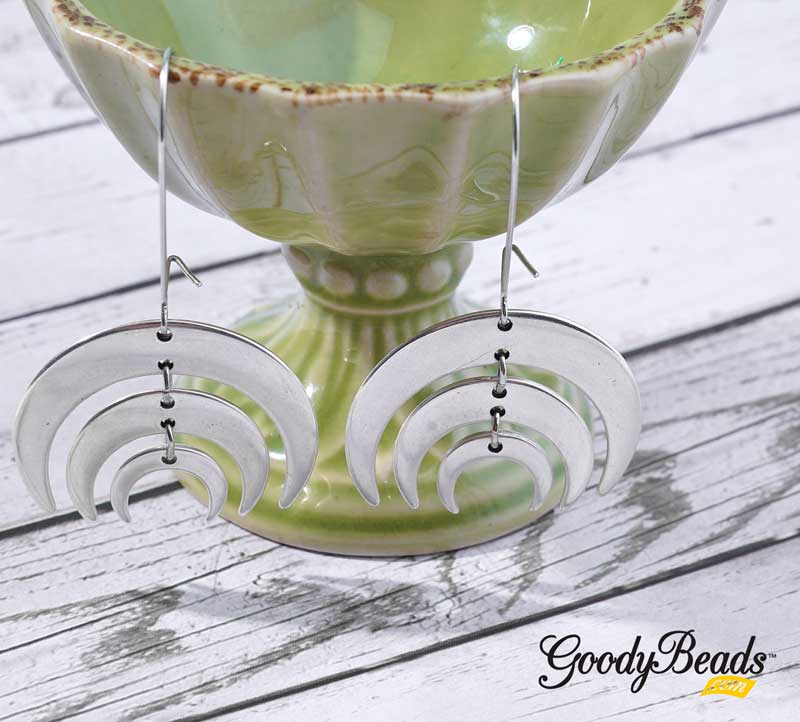
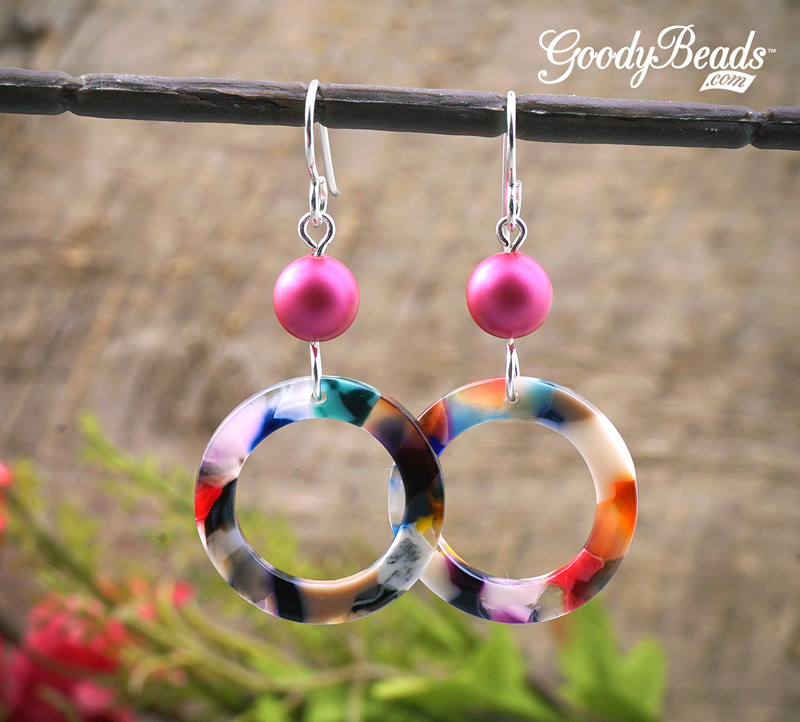
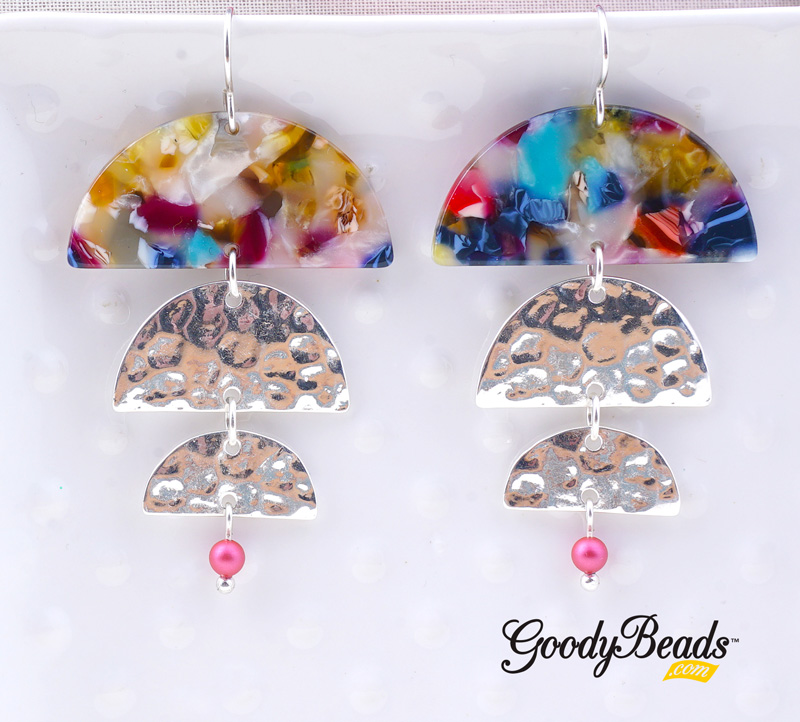
Tory’s Acetate & Silver Drop Earrings

Tory’s pair of earrings are bold and bright. They feature some of our newest products like acetate components, Textured Half Circle Connectors and Swarovski® pearls in a Mulberry color. We just LOVE the tiered look in these earrings and the vibrant colors from the Mulberry complementing the acetate half circle.

What you’ll need for earrings:

  • 37x18mm Multi with White Acetate Half Circle Pendant/Connector – Z012457
  • 27x15mm Silver Plated Textured Half Circle – Z014989 (2)
  • 20x10mm Silver Plated Textured Half Circle – Z016741 (2)
  • Sterling Silver Front Loop Earring Wire by Tierracast® – TC02297
  • 1 Inch Silver Plated 21 Gauge Headpins with Ball Top – A019691
  • Swarovski® 4mm Crystal Mulberry PinkPearl – SW02198 (2)
  • 6mm Round Jump Ring – A001529


GoodyBeads - Blog: Acetate and Silver drop Earrings with FREE Tutorial

Directions:

  1. On a headpin, slide on a pearl bead and make a simple loop.
  2. Open pearl dangle loop and slide on hole from the small half circle (flat side). Close loop.
  3. Open a jump ring, slide on other hole from small half circle and the hole from the larger half circle (flat side). Close jump ring.
  4. Open another jump ring, slid eon other hole from larger half circle and hole of acetate connecter (flat side). Close jump ring.
  5. Open earwire loop, slide on other hole of acetate connector and close loop.
  6. Repeat all steps for other earring.


Heidi’s Geometric Jewelry with Tutorials

Heidi’s jewelry style has a lot of geometric shapes and simplistic angles. Her use of connectors, dangles and findings are everything you’d love in minimalistic jewelry!


Tiered Crescent Earrings

GoodyBeads | Blog - Heidi's Holiday Jewelry with Geometric Shapes, Free Tutorials

Items used in earrings: A008799, Z016771 (2), Z016773 (2), Z016775 (2) & Z003942

Directions:

  1. Open jump ring, slide on small crescent charm and inner hole of medium crescent connector. Close jump ring.
  2. Open another jump ring, slide on other hole of medium crescent connector and through inner hole of large crescent connector. Close jump ring.
  3. Slide other hole of large crescent connector through kidney earrings to sit inside earring loop. Cinch the opening of the hole to close.
  4. Repeat all steps for other earring.


Black Diamond Earrings

GoodyBeads | Blog - Heidi's Holiday Jewelry with Geometric Shapes, Free Tutorials

Items used in earrings: Z010760, Z001829 & A008807

Directions:

  1. Open jump ring and slide on wood/resin charm and through hole of post earrings. Close jump ring.
  2. Repeat for other earring.


Double Diamond Bracelet

GoodyBeads | Blog - Heidi's Holiday Jewelry with Geometric Shapes, Free Tutorials

Items used in bracelet: SW02265 (2), Z011872 & A001529

Directions:

  1. Connect both Swarovski triangle sew-ons with two jump rings (A001529) at the bottom/base of the connector.
  2. Remove both jump rings on sliding clasp.
  3. Connect each end or points of the triangle to either ends of the sliding clasp with 6mm jump ring (A001529).


So Vang’s Teal Brown Impression Jasper Wrap Bracelet

The holidays are upon us and we’re starting off your DIY holiday gifts with So Vang’s wrap bracelet using her new favorite Teal Brown Impression Jasper beads. Wrap bracelets are easy to make and design with Beadalon Memory Wire and your favorite beads! Here’s what you need to design this Teal Brown Impression Jasper Wrap Bracelet:


GoodyBeads | Blog - Teal Brown Impression Jasper Wrap Bracelet with FREE Tutorial

Directions:

  1. Make a simple loop at one end of your memory wire with memory wire finishing pliers.
  2. Slide the following SECTIONS onto the memory wire:
    1. Seed bead, gemstone, seed bead, 3 gemstone, seed bead, gemstone, 3 seed bead, gemstone, seed bead, 3 gemstone, seed bead, gemstone, 3 seed bead, gemstone, seed bead, 3 gemstone, seed bead, gemstone, seed bead, and curved tube.
    2. Seed bead, gemstone, seed bead, 3 gemstone, seed bead, gemstone, 3 seed bead, gemstone, seed bead, 3 gemstone, seed bead, gemstone, seed bead and curved tube.
    3. Repeat SECTION 1.
    4. Repeat SECTION 2.
    5. Repeat SECTION 1.
    6. Repeat SECTION 2.
    7. Repeat SECTION 1.
    8. Seed bead, gemstone, seed bead, 3 gemstone, seed bead, gemstone, 3 seed bead, gemstone, seed bead, 3 gemstone, seed bead, gemstone and seed bead.
  3. Cut excess memory wire, leaving a 1/2″ end.
  4. Make a simple loop to memory wire end you just cut. (Option: Wrap simple loop into a coil to tighten your designs.)


DIY Lariat Necklace with Terra Agate Gemstone & Leather

We’re still seeing lariat necklaces everywhere and it certainly will trend for a while because of it’s organic look! You wear it long or short, depending on how you dress it. In our DIY project today, is a lariat necklace using 1mm leather cord, brass beads and some gorgeous Terra Agate gemstones!

What you’ll need for necklace:

GoodyBeads | Blog - Terra Agate and Leather Lariat Necklace with FREE Tutorial

Directions:

  1. Start with 2 meters of leather cord. Fold in half and at the loop, make a lark’s head knot through the Organic Hoop.
  2. On both leather cords, slide on a gold bead, Terra Agate bead and another gold bead.
  3. Make an overhand knot with both leather cords close to the last gold bead.
  4. Wrap your piece around your neck to determine where you would like the lariat gemstone dangle to hang from and the length of your necklace. Make an overhand knot there.
  5. Slide on both leather cords another gold bead, Terra Agate bead and gold bead. Make an overhand knot close to the last gold bead you added.
  6. On one leather cord end, slide on 3 gold beads and make an overhand knot about 2 inches below the Terra Agate bead. Cut off excess.
  7. On the other leather cord end, slide on 3 gold beads and make an overhand knot about 1.5 inches below the Terre Agate bead. Cut off excess.


Wood and Resin Pendant Necklace

New Wood and Resin Charms combines beautiful resin colors and natural wood for a show-stopping component to all your DIY jewelry. Here, we’ve taken this large focal pendant and made a simple necklace using pinch bails and our Adjustable Rollo Chain Necklace Double Slide Clasp.


What you’ll need:

  • Gold Adjustable Rollo Chain Necklace Double Slide Clasp – Z010757
  • Wood & Deep Red Resin Free Form Pendant – Z010703
  • Pinch Bail – TC02583
  • 9mm Gold Jump Ring – Z020041


ResinPendantNecklace_Main

Directions:

  1. Slide pinch bail over hole of wood/resin pendant and pinch it close.
  2. With two pliers, open jump ring, slide on bail and slide through both jump rings of adjustable rollo chain necklace. Close jump ring.
  3. You’re done!


DIY Satin Wrap Bracelet with Memory Wire

Talk about arm candy with this festive Satin Wrap Bracelet with memory wire, satin beads, miracle beads, Chinese crystals and gold split rings. Make it in time for the winter holidays because its got the fancy red, ivory and gold look!

Here is what you’ll need to make this wrap bracelet:

GoodyBeads | Blog - Red Satin Memory Wire Wrap Bracelet with FREE Tutorial

Directions:

  1. Create a simple loop at one end of the memory wire using the Memory Wire Finishing Pliers.
  2. Slide on the following sequence of beads onto the memory wire:
    1. 3 miracle bead, two split rings, three clear Chinese crystal and two split rings. Repeat two more times. Add three miracle beads, two split rings and three clear Chinese crystal.
    2. Three red satin beads and brass bead. Repeat 4 more times.
    3. Three red satin beads, two split rings, three clear Chinese crystal and two split ring. Repeat 4 more times. Omit last two split rings.
    4. Miracle bead, two split rings, miracle bead, two split rings, miracle bead, two split rings, red satin, two split rings, red satin, two split rings, red satin and two split rings. Repeat 2 more times.
    5. End with miracle bead, two split rings, miracle bead, two split rings, miracle bead.
  3. Trim memory wire with Memory Wire Cutter so there is a 3/8” to 1/2” tail. Create a simple loop using Memory Wire Finishing Pliers.


Black Gold Amazonite Tassel Necklace with Beading Chain

We’re designing today’s October project with Black Gold Amazonite double drilled gemstones from Dakota Stones and our popular beading chain. Here is what you’ll need to create your own!

GoodyBeads | Blog - Black Gold Amazonite Tassel Necklace with FREE Tutorial

Directions:

  1. Open jump ring and slide on tassel. Close jump ring.
  2. Slide chain through three gemstone beads, through jump ring in Step 1 and up through the second holes of the gemstone beads. Center everything.
  3. Slide end cap on beading chain end and crimp it. Repeat to other chain end.
  4. Open jump ring from sliding clasp and slide on end cap loop. Repeat to other end.


Beadable Threaded Earrings with Video Tutorial

Fiber and minimalist jewelry is a must-have trend that we’ve been seeing everywhere. Here, we take one of our newest product and show how easy it is to loop thread through the beadable pendant in our video tutorial.

What you’ll need for earrings:

Video Tutorial

You can also go to the Facebook Page to see this tutorial HERE.

BlackGoldThreadEarrings

Items used in gold/black earrings: Z011351 (2), A006589 and TCZ0140.

  • Get the all-in-one Buy All Project with BAP0012


GoodyBeads | Blog - Black and Gold Beadable Earrings with FREE Video Tutorial

Items used in Golden/Silver Earrings: Z011352 (2), A006597 and TCZ0077.


Colorful Straw Earrings

Complete your large statement earrings collection with these Woven Straw Earrings.


What you’ll need:


Marrakesh Straw Earrings

GoodyBeads | Blog - Colorful Straw Earrings with FREE Tutorial

Items using in earrings: Z016792, TC02714 (2),  TC02430, Z011500

Directions:

  1. Using the flat nose pliers, gently pry the crimp end wider so that the straw piece in between.
  2. Slide crimp end over the straw component.
  3. Using nylon pliers, crimp the crimp end over snug over the straw.
  4. Open jump ring and slide on crimp end loop and earring loop. Close jump ring.
  5. Repeat all steps for other earring.


Blues Straw Earrings

GoodyBeads | Blog - Colorful Straw Earrings with FREE Tutorial

Items using in earrings: Z016790, Z011158, Z002858, TC02360 (2)

Directions:

  1. Cut 4″ of leather.
  2. Make a lark’s head knot with the leather through the straw connector. (Make sure to keep ends flushed together when making the knot.)
  3. Slide crimp end over both ends of the leather and crimp it with nylon pliers.
  4. Open earwire loop and slide on crimp end loop. Close loop.
  5. Repeat all steps for other earring.


DIY Hoop Earrings with Round Leather and Agate Pendant

Mix up your jewelry materials by making a pair of earrings by looping 2mm round leather cord and dangle an agate pendant. What you’ll need for earrings:

GoodyBeads | Blog - Leather Hoop and Gem Earrings FREE Tutorial

Directions:

  1. Cut 4 inch piece of leather.
  2. Cut leather ends at an angle.
  3. Glue angled ends together to create a loop. Let it dry for a few minutes.
  4. Open earwire, slide on agate pendant and leather loop; right where the leather ends are glued together. Close earwire.
  5. Repeat all steps for other earring.


DIY Post Earrings with Enamel Charms and Chain

Turquoise and Make this fun pair of post earrings with enamel charm points hanging on a long piece of chain and you have a gorgeous new accessory you can wear everyday.

What you’ll need for earrings:

  • 2 – Turquoise Enamel Triangle Charms – Z015923
  • 2mm Gold Plated Rollo Chain – A008135
  • Gold Plated Post Earrings – Z001831
  • 3mm Gold Plated Jump Rings – Z007861
  • 4mm Gold Plated Jump Rings – A011517

GoodyBeads | Blog - Enamel Point Earrings with FREE TutorialDirections:

  1. Cut two pieces of rollo chain at 2 inches, make sure they have an ODD number of chains links.  (You can adjust the length to your preference.)
  2. Open 3mm jump ring and slide on point pendant and one chain link you cut in Step 1. Close jump ring.
  3. Open the 4mm jump ring, slide on other end of chain link and through post earring hole. Close jump ring.
  4. Repeat Steps 3 and 4 for other earring.


Golden Leaf Pendant Necklace

We’re still in a fall mood. The color of fallen leaves and the smell of autumn in the air really makes you want to just sit and take a hot chocolate break all the time. Our project today is dedicated to autumn leaves and how golden and magical it looks outside.


What you’ll need for DIY necklace:

  • Leaf Charm – Z019557
  • 2 feet of 2.5mm Satin Hamilton Gold Plated Ball & Twisted Curb Satellite Chain – CH00717 
  • Gold Plated Adjustable Rollo Chain Bracelet Sliding Clasp – Z012152
  • 3mm Gold Jump Rings – Z007861

GoodyBeads | Blog - Golden Leaf Pendant Necklace with FREE Tutorial

Directions:

  1. Slide chain through bail of leaf pendant.
  2. Open small jump ring, slide on on end of the chain and slide on a jump ring on the bracelet sliding clasp. Close jump ring.
  3. Repeat Step 2 to other end.


DIY Bracelet with Rhinestone Chain and Adjustable Sliding Clasp

Look your best with a DIY Rhinestone Chain Bracelet with an adjustable sliding clasp. Here are items you’ll need to make your own:

GoodyBeads | Blog - Rhinestone Chain DIY Bracelet with FREE Tutorial

Directions:

  1. Cut rhinestone chain to consist of 18 -20 rhinestones.
  2. Cup the last rhinestone with the end connector.
  3. Using flat nose pliers, nylon pliers or serrated pliers, gently push down the two prongs of the end connector to secure chain end.
  4. Repeat Step 3 to other chain end.
  5. Open both jump rings on the adjustable bracelet sliding clasp and set aside.
  6. Cut 2 inches off  both open ends of the sliding clasp chain. (This will shorten your bracelet sliding clasp.)
  7. Slide back on the jump ring onto the sliding clasp chain and through a loop of the end connector. Close jump ring.
  8. Repeat Step 7 to other sliding clasp chain end and end connector.


DIY Earrings with Swarovski Mulberry Pearl and Acetate

The new Swarovski pearl color, mulberry, is a bold and fall-suitable hue! We paired it with some colorful acetate components, to make a fun pair of earrings!

Items used in earrings: SW02201 (2), A019612, Z020493, TC02297

GoodyBeads | Blog - Mulberry Pearl and Acetate Earrings with FREE Tutorial

Directions:

  1. Open eyepin and slide on earwire loop. Close eyepin loop.
  2. On the eyepin, slide on pearl and make a simple loop. (Make a larger loop to fit round acetate.)
  3. Open loop and slide on acetate ring. Close loop.
  4. Repeat all steps for earring.


Chevron Chain Necklace

Chevron is one of those trendy shapes that probably won’t ever go out of style. And with our chevron chain, you can easily make this stunning silver chevron chain necklace.


What you’ll need for necklace:


Items used in necklace: A001528CH00800Z007856, Z010755TC00425 & TC02445.

GoodyBeads | Blog - Chevron Chain Necklace with FREE DIY Tutorial.

Directions:

  1. Cut chevron chain to 3 inches or 18 links. Cut 3 pieces.
  2. Open 3mm jump ring, slide on dagger charm, close jump ring.
  3. Open another 3mm jump ring, slide through jump ring in Step 2 and through pointed loop on one of your chevron chain. Close jump ring.
  4. Open 5mm jump ring, slide through other loop of your chain in Step 3 and through Hammer Ring. Close jump ring.
  5. Open another 5mm jump ring, slide through hammer ring and close jump ring.
  6. Open another 5mm jump ring, slide through jump ring step 5 and close jump ring.
  7. Open a 3mm jump ring, slide through pointed loop on your second chevron chain and close jump ring. Repeat for the third chain.
  8. Open a 5mm jump ring, side through a 3mm jump ring in step 7 and through 5mm jump ring in step 6. Close jump ring.
  9. Repeat Step 8 with third chain.
  10. Open jump ring loop on adjustable necklace chain and slide through other end of the second chevron chain. Close jump ring.
  11. Repeat Step 10 with other end of adjustable necklace chain and third chevron chain.