We are still in love with our Groovy Bead Frames and could not wait to share this easy tutorial with you. Shown in our January 2017 Color of the Year, are these easy-to-make seed bead teardrop earrings with the pewter drop groovy bead frames. Follow our easy illustrated instructions and a tutorial video.
You can pick up this pdf file tutorial with illustrated instructions. OR watch our tutorial video to see how simple it is to create.
A Quick Note: The holes of the Groovy Bead Frames might not have a clear opening. I suggest using a bead reamer (A002370) or something sharp and pointy to poke the holes first to ensure a clear opening before stitching.
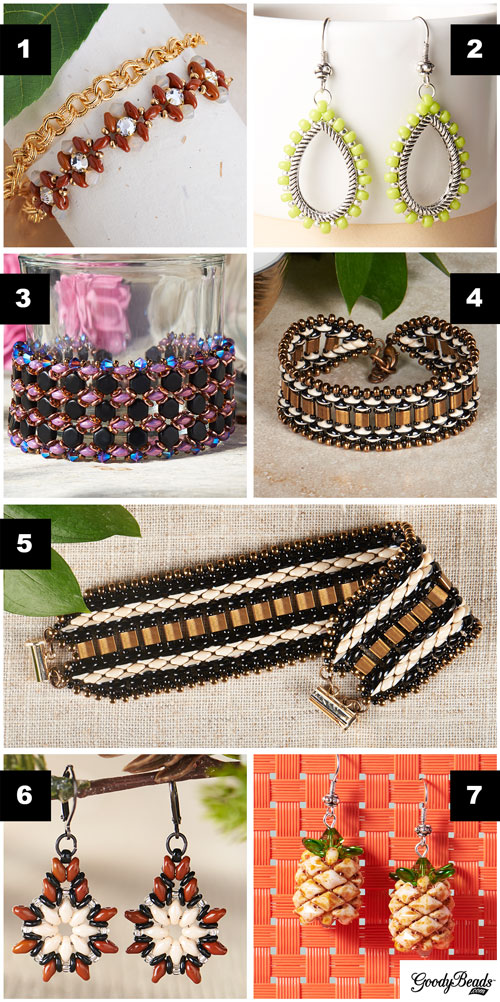
One of our October 2017 Trend is all about two-hole beads and we love the versatility it brings to bead stitching. Check out what we made with SuperDuos, DiamonDuos, Honeycomb beads, and Tango. Plus, two BRAND NEW patterns for you to try out, created from our designer So Vang.
SuperDuo Fan Earrings
SuperDuos are certainly a must-have when square stitching. These SuperDuo Fan Earrings takes minutes to make and think of all the different color combinations you can use. Get your downloadable Pattern Tutorial here.
Honeycomb Beaded Tube Necklace
You’ve seen So use Czech Honeycomb in many of her designs. Here is an easy downloadable pattern you can follow. Use this pattern to make a focal necklace piece, add this tube on a bead pen or make earring by sliding it on a headpin, sandwiched between bicone crystals. What will you make?
Honeycomb Jewel and DiamonDuo Bracelet
You’ve seen this popular bracelet before in our Czech Honeycomb Jewel Bead blog post. Check this blog post and learn how to make this bracelet with our other two-hole favorites: Honeycomb and DiamonDuo.
GoodyBeads Inspiration: Bead Weaving Ideas
Bead weaving and/or stitching can be a challenging, yet fun and fulfilling to create. Check out our selections of bead weaving ideas from hand-selected kits to easy and free beading tutorials.
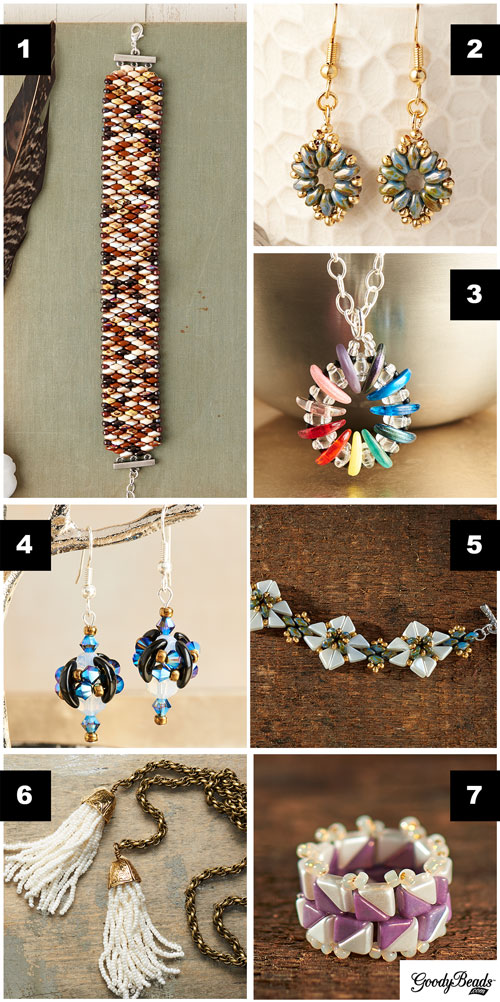
Czech Honeycomb Jewel Beads with Bracelet Tutorials
With the popularity of the Czech Honeycomb two-hole bead, comes the Honeycomb Jewel bead. Here are two projects where we used these beads to make a bead-stitched bracelet with DiamonDuos and as a wire cuff bracelet with bead wire.
What makes Czech Honeycomb Jewel beads different than other honeycomb beads? Honeycomb jewel beads are faceted on one side, to give depth and dimension, and flat on the other.
Honeycomb Jewel and DiamonDuo Bracelet with Tutorial
Designed by So Vang
We paired the Honeycomb Jewel shape with DiamonDuos, which plays off each others’ faceted look. We took the Chalk Lazure Jewel (Z018620) and gave this bracelet a pop with a bold hue of the Pastel Montana Blue DiamonDuo (SB03347).
From BeadSmith® comes a new wave of SuperDuos beads: Duets. SuperDuo Duets features a two-toned color that shimmers, and different hues on each side of the bead. These unique beads are perfect for defining lines and beading accent color around borders.
BeadSmith has an inspiring video featuring these new SuperDuo Duets.
Color Shifting Bracelet from BeadSmith w/ Tutorial
We love the simplicity of this bracelet pattern from BeadSmith. We used the Black/Red Luster SuperDuo Duets (SB03501) with Orange Luster on Chalk SuperDuo (SB02110).
Here, we took the same pattern from the Color Shifting Bracelet and redesigned it by substituting the middle SuperDuos with a size 11/0 Miyuki seed bead, a Miyuki Tila and another size 11/0 Miyuki seed bead. We used Black/White Beige Luster SuperDuo Duet (SB03491) and layered the black sides of the duet together on the edges for an interesting stripe effect.
We also used 8/0 Miyuki Dark Bronze seed bead for the outer edges instead of alternating between a size 11/0 and 8/0 seed bead. Plus, check out the image below on how we’ve sewn our ends. We had sewn in a size 8/0 seed beads at the end to loop in a jump ring and lobster clasp on one end and chain link on the other.
We amped up the pattern and adding more rows of SuperDuos and SuperDuo Duets to the previous bracelet. This bracelet pattern will create a band width just under 1.5” with a cream and black stripe effect and bronze border.
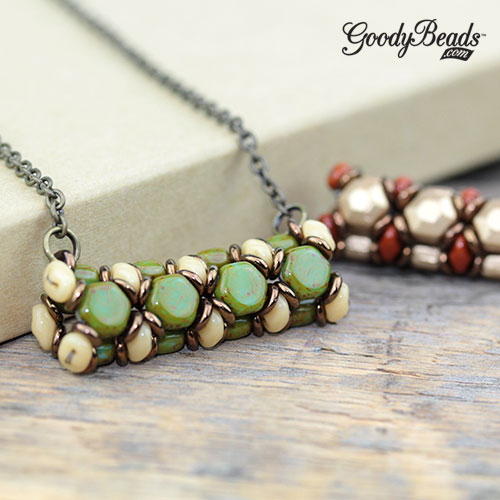
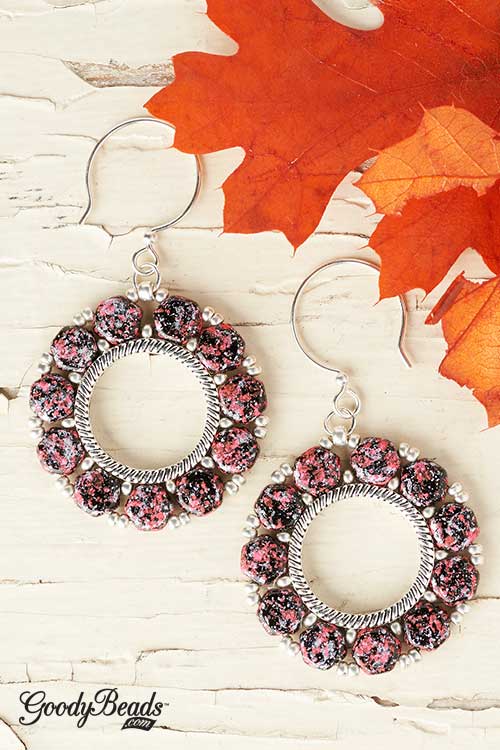
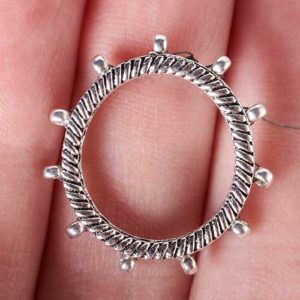
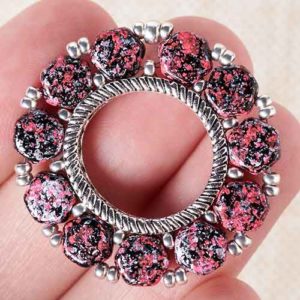
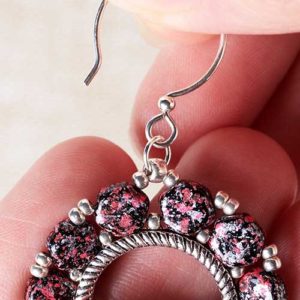
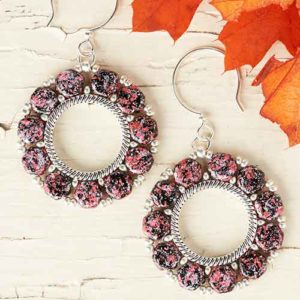
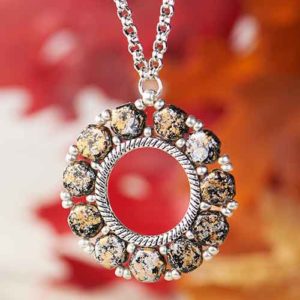
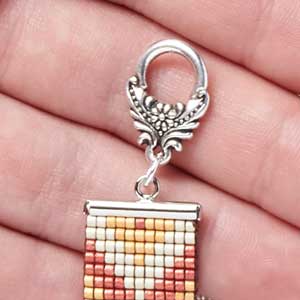
Czech Honeycomb Pendant with Groovy Bead Frame – FREE Tutorial
Here’s a unique way to use popular Czech Honeycomb beads. We have sewn them into a stunning pattern using a Groovy Bead Frame. Groovy Bead Frames are designed to string and decorate from different angles. This easy tutorial will create the perfect focal pendant on a necklace or dangled on a pair of earrings.
Honeycomb Necklace and Earrings
New to GoodyBeads are Tweedy Honeycomb beads that have a two-tone, splattered color finish.
Mia Mosaic Honeycomb Necklace – Golden
Designed by So Vang
Mia Mosaic Honeycomb Earrings – Fuchsia
Designed by So Vang
Czech Honeycomb Pendant with Groovy Bead Frame Tutorial
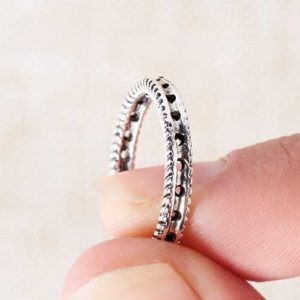
Step 1: Gather your materials. You will find that the Groovy Bead Frame is designed with 22 holes.
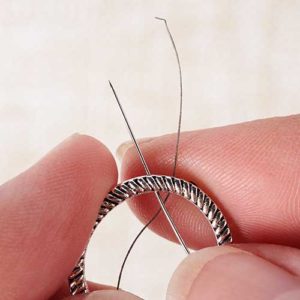
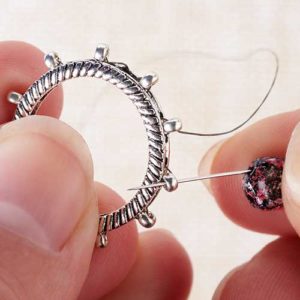
Step 2: Add 5’ of beading thread to your needle. Sew down one hole of the ring and up through the hole next to the first. Make a knot with the strands to anchor your thread.
Step 3: Sew up and down through the two holes to secure thread. Sew up and out of the ring. Pick up a size 11/0 seed bead and sew down through the next hole.
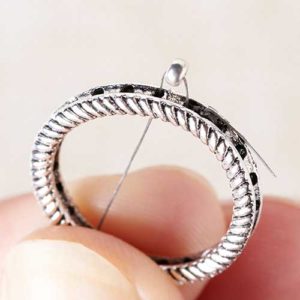
Step 4: Sew up through the hole, pick up a size 11/0 seed bead and down the next hole. Repeat until you’ve finished your way around the frame. You would have added 11 seed beads.
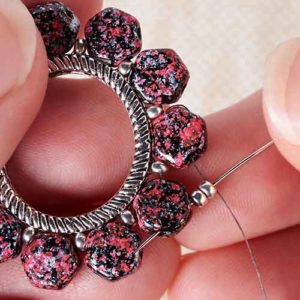
Step 5: Sew up and out one of the holes and through a seed bead. Pick up a honeycomb bead and sew through next seed bead.
Step 6: Repeat by adding a Honeycomb between each seed bead. You will have added 11 honeycomb beads. Tie an overhand knot to secure and tighten your beaded layers.
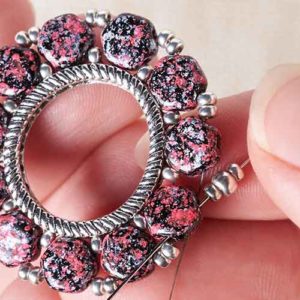
Step 7: Sew through a honeycomb bead and loop up to the outer hole of the honeycomb bead. Pick up two size 11/0 seed bead and sew through next honeycomb bead. Repeat nine more times. Make sure to keep your threads tight.
Step 8: In the last section, you will pick up one 11/0, one 8/0 and one 11/0 seed bead. Sew through last honeycomb bead.
Step 9: Tie off your thread ends and sew through a few beads before cutting excess thread.
Step 10: Open a size 4mm jump ring and slide through the size 8/0 seed bead and the loop of your ear wire. Close jump ring.
Step 11: Repeat all steps for other earring.
Step 12: For a necklace pendant; at step 10, slide the two ends off a 30” piece of chain link through jump ring. Close jump ring for a complete Czech Honeycomb ring pendant necklace.
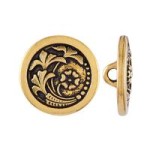
(1) TCZ0096 – Sterling Silver Hoop Earring Wires with Loop by Tierracast®
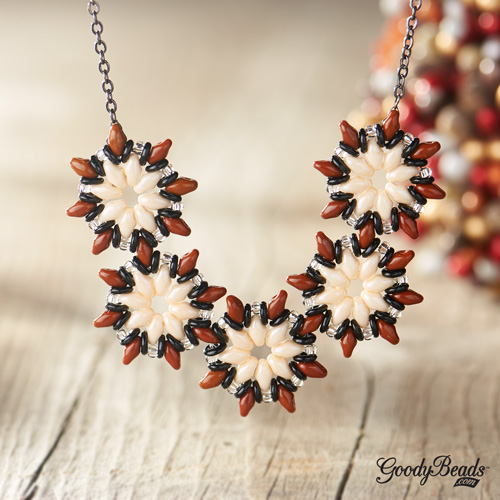
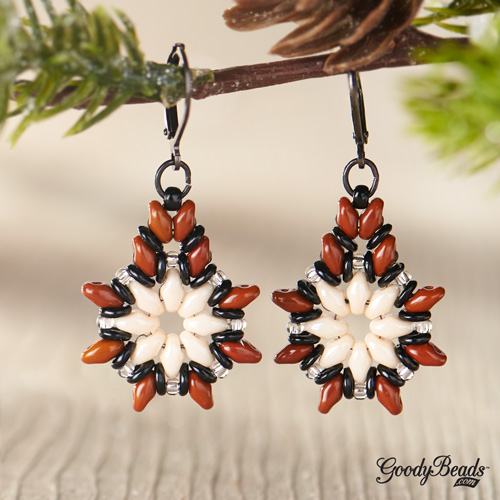
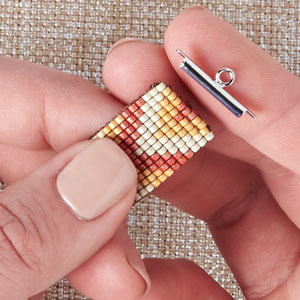
Czech SuperDuo Star Blooms Necklace and Earrings with FREE Tutorial
We have the perfect holiday jewelry set for the fun and stylish fashionista.. Try this free tutorial on how to make these star blooms necklace and earrings using SuperDuos, o-beads and size 10/0 round czech beads. Make it just in time for the holidays!
SuperDuo Star Blooms Poinsettia Necklace and Earrings
Designed by So Vang
Designed by So Vang
Tutorial and Components
Created by our in-house designer So Vang, you can make this holiday theme, star blooms necklace and earrings set with this FREE illustrated tutorial.
Necklace Extra Tip
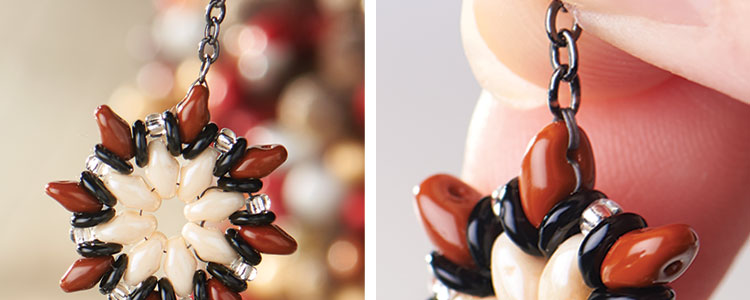
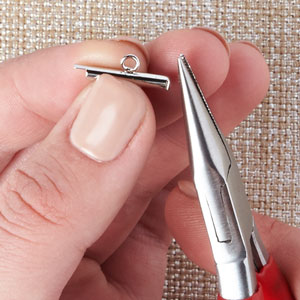
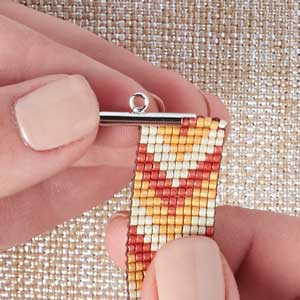
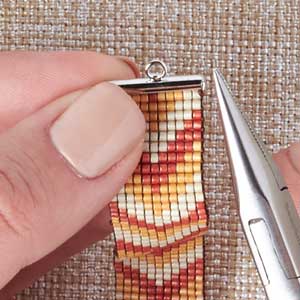
When you have finished stringing together your five components, we have two options on how to attach your 24” chain.
First, you can sew the chain at the end of the SuperDuo as shown in our photo below. Refer to the illustrated tutorial or image to see that you connect the chain end to the SuperDuo across from the connected SuperDuo of your side poinsettia component.
Or, secondly you can use a small gauge jump ring to slide through theSuperDuo like how we’ve shown here. However, not all SuperDuo holes are large enough for the jump ring to slide through. If it does not, going with the first option will be best to adding your chain.
SuperDuo Southwestern Star Bloom Style
Designed by So Vang
Don’t think you are limited to just a holiday-hued necklace. Try out different combinations of colors and make it your own. We’ve used turquoise and deep coral to create ours above.
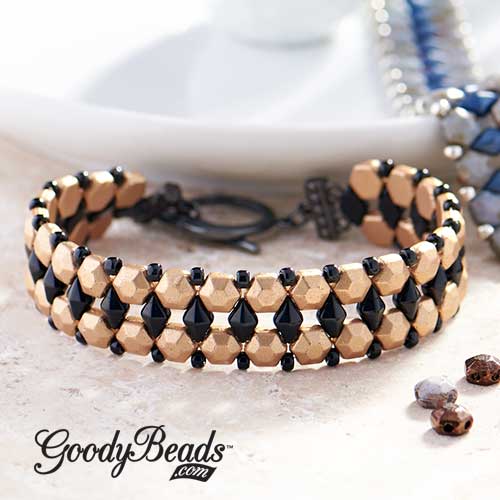
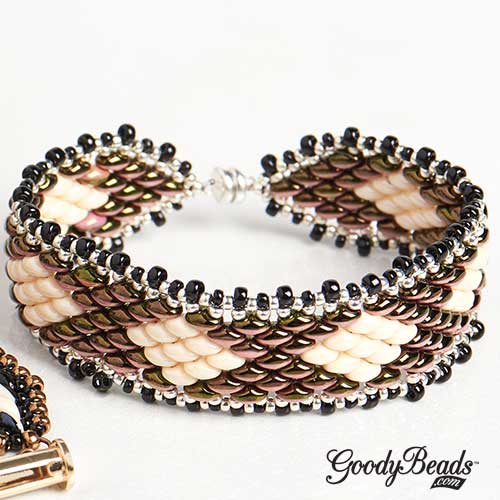
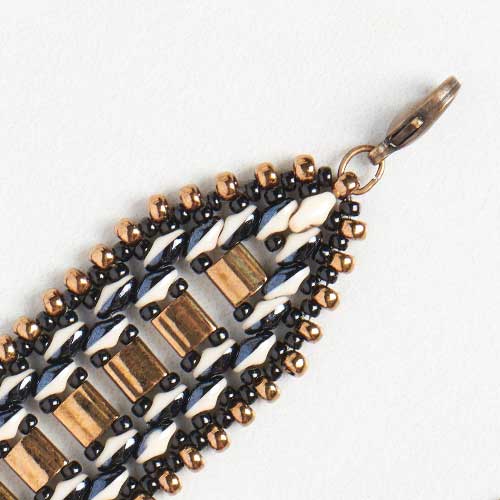
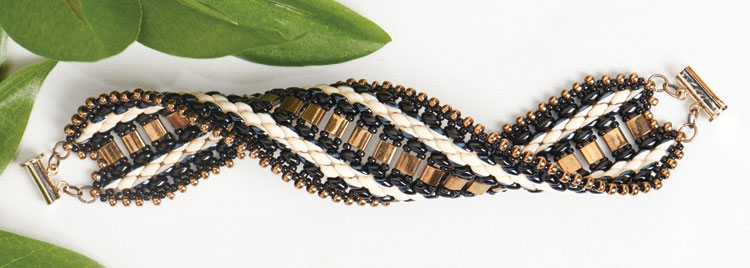
Beaded DiamonDuo Licorice Leather Bracelet with Tutorial
Featured in GoodyBeads July 2016 Trends, we are still loving the versatility of DiamonDuos especially when we pair them with licorice leather. Along with a FREE beaded loop tutorial, we will show you how to create DiamonDuo beaded loops and incorporate them in your licorice leather bracelets.
DiamonDuo Beaded Loop Tutorial
Download our DiamonDuo Beaded Loops pattern tutorial to get started. Create different color combinations with DiamonDuos, Czech O-beads and size 8/0 Miyuki round beads. Here are some examples of how we used these DiamonDuo Beaded Loops.
From our July 2016 trend, we featured this stunning bracelet with cork licorice leather. We made three loops with Matte Copper DiamonDuos and 2 with Matte Gold DiamonDuos. After cutting the cork licorice leather to your wrist size, slide on your beaded loops in alternating colors towards the center. We added a black rubber o-ring on both sides of the five loops to keep them in place. Glue on a clasp and let it dry for 24 hours before you wear. Crazy-neat, eh?
Using different colors can create a different look to your licorice leather. We created our DiamonDuo beaded loops using hues of metallic golds and white.
After we made five beaded loops, we cut our licorice leather to size. With some Super-lon Bead Cord (A012987), we wrapped the center section of our licorice leather with gold cord. Glue as needed on back side. Slide on a rubber ring, the 5 beaded loops and another rubber ring. ALL centered on the wrapped gold cord. Glue on a clasp and you have this flashy bracelet.
DiamonDuo™ Pineapple Paradise with FREE Pattern Tutorial
Nothing says summer like some sweet pineapple. Stitched with DiamonDuo, SuperDuo and Pip beads, these pineapples are the ultimate way to showcase how excited we are about summer! Check out our FREE tutorial on how to make these pineapple beads and use them as earring dangles or as the focal point on a tassel necklace.
We are loving this galactic red and white pineapple necklace. Donned with a red tassel and Swarovski® crystals, get ready to fall in love with summer all over again!
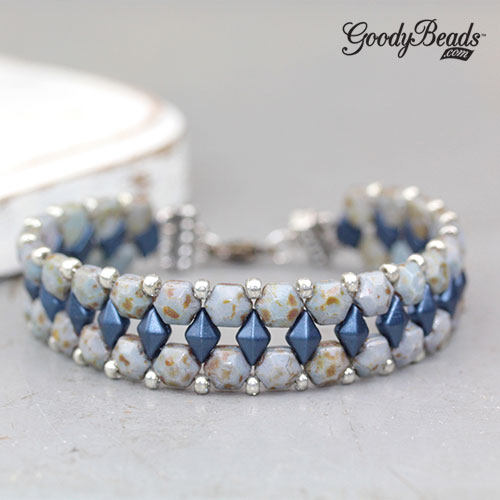
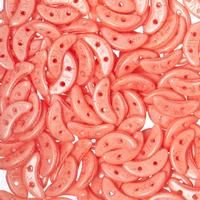
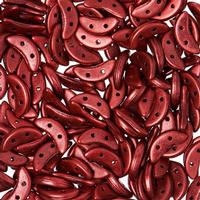
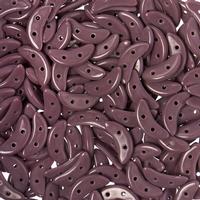
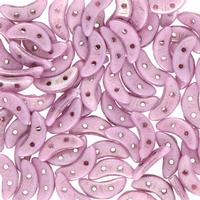
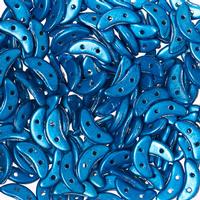
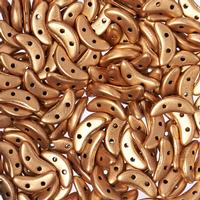
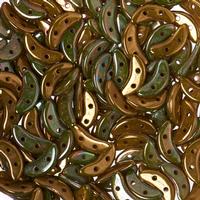
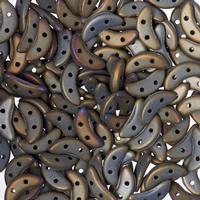
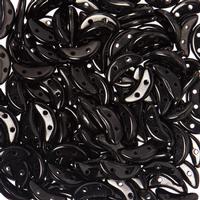
Czech Crescent Bracelet and Earrings with FREE Illustrated Tutorial
Czech Crescent beads are NEW at GoodyBeads. The Czech crescent beads are wedge-shaped beads with two holes. We have two easy and free tutorials using these Czech crescent beads.
Midnight Gold Czech Crescent Bracelet
Design by So Vang
For this bracelet, we used a combination of black and gold crescent beads with Swarovski® crystals in Graphite AB2X. The midnight glow of the AB2X is hauntingly beautiful in this piece.
We love this bracelet because it is simple to make. First, start by threading on 4 seed beads. Keep the ends of your thread untied. Then, you will thread on a top layer with a sequence of 3 Czech crescent, a seed bead and a 4mm bicone crystal. Repeat this sequence until you’ve reached your preferred bracelet length. End this top layer with 3 crescent beads and 4 seed beads. Now, bring the thread down to the bottom 3 crescent beads you’ve ended with. You will now be threading the bottom layer by adding a seed bead and bicone crystal in between each crescent bead grouping until you’ve reached the end. Tie both of your thread ends together. Feed your threads back through a few beads before you cut off excess thread. Add your clasp and chain link to the seed bead loop ends you’ve made with jump rings.
First thread on your top layer with, crescent bead, seed bead, bicone crystal (4 times). Tie both thread ends together to create a cylinder shape. Feed your thread through one crescent bead and loop down through the second hole of the crescent bead. Thread in reverse of your cylinder shape with adding a seed bead and bicone crystal inbetween the crescent bead. Once you’ve reached the end. Tie off thread ends and thread through a few beads before cutting off excess and you’ve completed your crescent bead design.
Slide these beads onto the headpin and make a simple loop:
Seed bead, bicone crystal, 8mm round crystal, 6mm round crystal, crescent bead design, bicone crystal and seed bead.
Open your Ear-wire loop and slide on your crescent bead design headpin loop. Repeat for other earring.
Czech Honeycomb beads are popular! We have two easy and free tutorials on how to use these popular honeycomb beads to make a bangle and cuff bracelet.
Honeycomb Bangle by Apollinariya Koprivnik
We followed BeadSmith’s Inspiration Squad Member, Apollinariya Koprivnik’s tutorial to make this stunning honeycomb bangle. We love its mesmerizing, 3D design. We dressed the bangle with the matte jet honeycomb and accented it with gold and silver seed beads and SuperDuos.
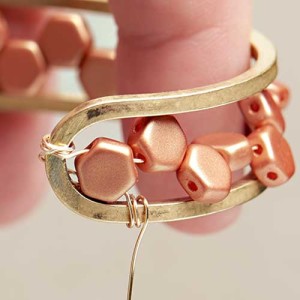
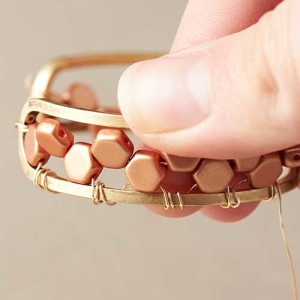
To create this wire-wrap cuff, we drew inspiration from Julie Romero’s honeycomb bangle bracelet. Follow our directions below to create this easy wire wrapped honeycomb cuff.
* Note: It is easier and quicker to work with shorter pieces of 26-gauge wire.
Step One: Start with 2 feet of 26-gauge wire. Wrap the end of the wire three times in the middle section of the cuff shown above.
Step Two: String on 26 honeycomb beads and secure it around to the other end of the cuff by making a few wraps.
Step Three: Bring the wire back behind the cuff and thread it through the first honeycomb hole. Bring wire over the bottom cuff frame and make three coiled wraps.
Step Four: Repeat step 3 for every other honeycomb bead on the bottom row.
Step Five: When you have finished the bottom row, coil wraps around the frame to wire wrap the top row of the cuff. See finished cuff above.
How to Use Ricks Bead Loom, PLUS Two Ways to Clasp Loom Bracelets
From traditional Native American Indian-loomed wampum belts to popular and modern Julie Rofman wrap bracelets, bead looming has transcended through changes in time, culture and fashion. A bead loom can help you make elaborate, beautiful necklaces to simplistic bracelets.
If you are new to using the bead loom or have been wanting to use a bead loom, believe us when we say that using the Ricks Bead Loom is super easy and simple. Here are some tips and tricks to using Ricks Bead Loom, as well as some inspirational loom bracelets to get you started. We also provide two different ways to clasp loom bracelets.
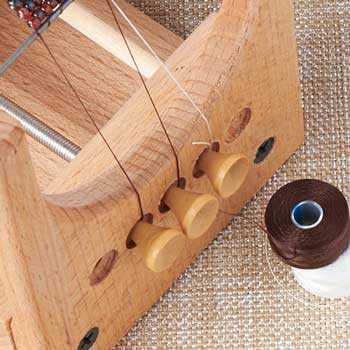
Ricks Bead Loom
When you purchase a Ricks Bead Loom, you receive the bead loom and its components, as well as a detailed, visual instructions of how to set up and use the bead loom. You can also check out Ricks video tutorial on his webpage on how to use his bead loom.
The basic method of bead looming is weaving a thread back and forth through rows of seed beads that are sandwiched in between vertical strands or “warp strands”. The difference between a traditional bead loom and Ricks Bead Loom is the amount of warp strands you are using. A traditional loom will have multiple warp strands going up and down along the loom, while a Ricks Bead Loom will have only one strand that wraps back and forth, up and around between the two rods. This continuous wrapping of the strands between rods will leave you with two threads at the end.
Like the instructions you will receive, first you insert your metals rods. These rods are where your vertical warp strands will lay. Adjust the wood piece/tailstock to your preferred bracelet length and start making your warp strands. The amount of warps you have is according to the amount of beads you have in a row, PLUS ONE. If you see the image below, you will see that we have eight seed beads per row and thus we need nine warp strands.
Next, lay your card separator in between the warp strands. It is optional to use the card separator. You can use the warp separator card that comes with the kit. Here, we cut a ½ inch piece of cardstock paper to get us started.
Hook your thread end to your peg and insert it into one of the holes in the front.
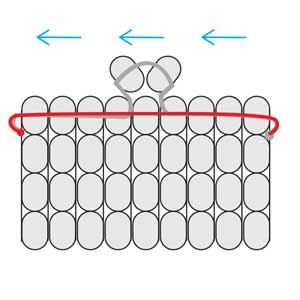
You are ready to start your rows. The basic motion of weaving each row is by weaving behind the warp strands with your beads and string. You will then weave back into the same row of beads, but when you feed your needle through, you are gracing the top side of the warp strands.
TIP: When bringing your needle back, use the backside of your needle. Using the backside of the needle will give you a smoother glide through the beads. Be careful not to prick yourself with the sharp end when using this method. Makes you wish you had a thimble on hand, huh? I did.
The first two rows will be tricky but after that you get those two on, it will be easier.
After your two rows are done, slide off the separator and pull your two rows down so it is flushed against the metal rod. Twist the peg that attaches to your thread to keep loose thread tight.
And you are ready to continue with your rows until you’ve reached the end.
TIP: When bringing your needle back through the row of beads, press up on the beads so that they protrude upward. Then, when you sew back through the beads, you will go over the vertical warp strands.
When you have finished your piece, unhook your threads from the pegs and sew the end threads through the rows and knot them. Cut excess thread. Slide your loomed piece off the metal bars and spread out your bead rows evenly outwards towards the ends to hide the loops of the warp strands. Then you are ready to add your clasp ends. Here are two types of loomed bracelets with instructions for adding a Miyuki Tube Finding and sewing on a bead loop to add your clasp.
For this bracelet, we used Miyuki Tube Findings, which are used particularly with Miyuki Delica Size 11 seed beads. GoodyBeads has four available sizes at 15mm, 20mm, 35mm, and 60mm, which will accommodate a certain amount of seed bead per row.
You can make a design like our Delica seed bead bracelet or you can use a Miyuki seed bead mix like our bracelet here. For our clasp for this bracelet, we made a loop using seed beads.
Step 1: Tie your thread end and insert your needle halfway through your row of beads.
Step 2: Add two seed beads. Skip one seed bead in your row and insert needle through the rest of your row. Make a knot.
3. After you make a knot, go back through the seed beads you threaded through. Make a knot on the other end.
Step 4: Then, feed your needle and run through your entire bead row and make a knot. Cut excess thread.
Step 5: Your end result.
Step 6: Insert jump ring in the loop you’ve made and add your choice of clasp. You are finished.
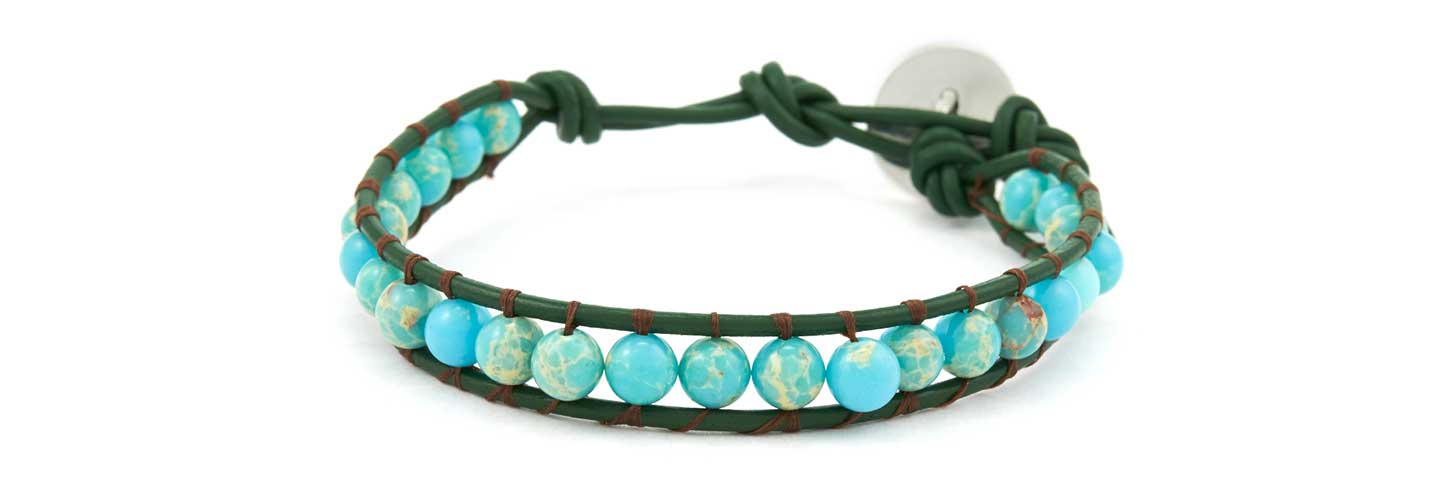
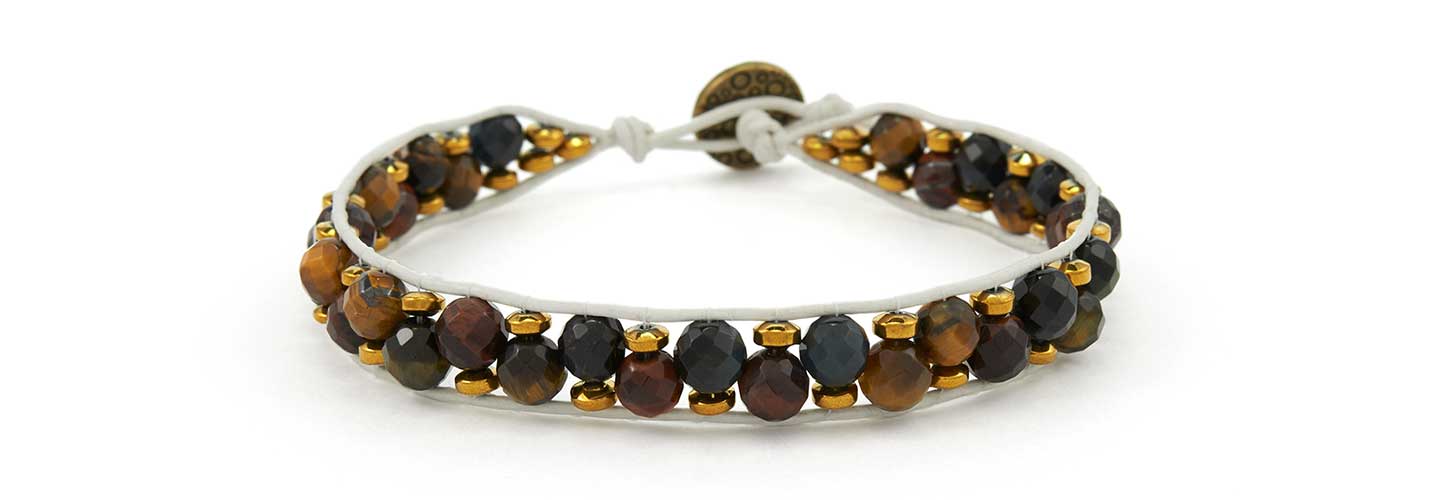
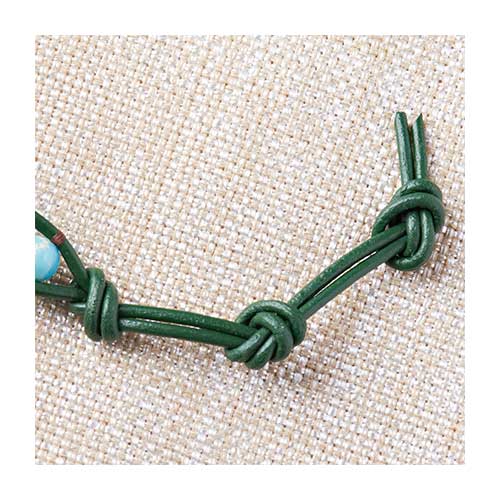
How to Make Leather Wrap Bracelets with Illustrated Tutorial
Leather wrap bracelets is a trending favorite to spice up a boho outfit or rock out to a head-banging concert or add to a casual outing with your girlfriends. Wrap bracelets are a must-have for 2016. We will show you how to make wrap bracelets with illustrated tutorial that you can download.
They may look difficult to make, but after a few attempts, they are honestly easy to make. We will show you a tutorial on how to make these bracelets using one-hole beads and super duo beads, as well as a few tips and tricks to help you make these wrap bracelets.
The basic components you need for these bracelets are:
Button findings: which will act as your clasp. Button Ends will work well, also.
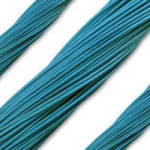
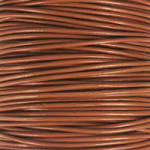
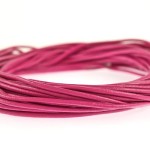
Leather or cotton round cord: these could range from 1mm to 2mm or larger, depending your preference and on the size of beads you are going to use. The length of cord needed for your bracelet will be determined below.
Thread: you can match the thread to your leather cord to hide the look or to add color. Check out some Beading Thread options but keep in mind that you will need a thin enough thread to go through the hole of your beads twice.
Beading Needle: size will be according to your thread and bead’s hole size.
Adhesive: Hypo-Cement with precision tip, is a good choice to glue thread ends or any fast-drying glue will do.
Beads: use your preference of beads or seed beads. Have enough if you plan to have a multi-wrap bracelet.
Determine leather length needed for a wrap bracelet
Use this method to determine the leather cord length you may need for a multi-wrap bracelet.
Take your wrist length and double the length. Multiply that by the number of wraps you want and then add 12”. That will give you an approximate cord length you will need to start your bracelet. (The extra 12” factors in the button knot, end knot(s) and bead size.)
Example:
2 wraps for an 8.5” bracelet: (8.5” x2) x 2 wraps = 34 + 12 = 46” needed.
Or
4 wraps for a 7.5” bracelet: (7.5” x2) x 4 wraps = 60 + 12 = 72” needed.
Keep in mind, these total numbers are approximate. You will want to test the wrap length while you’re making your bracelet. Having extra length is better than being short on your wrapped length goal.
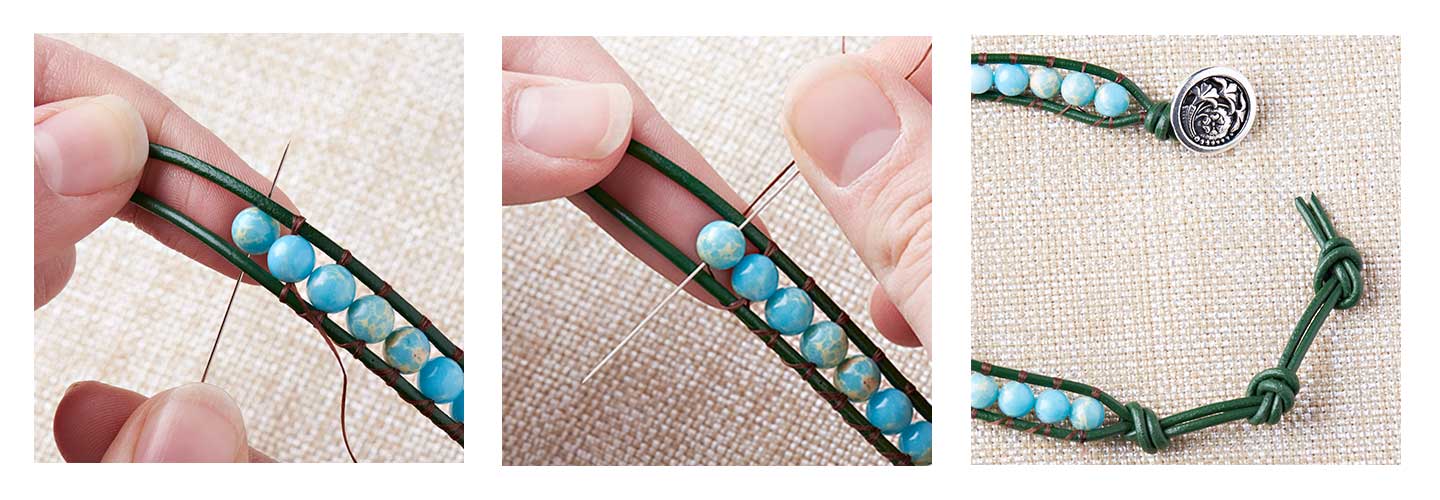
Basic Leather Wrap Bracelet Tutorial
The basic weaving of the thread will be going under the leather cords and then coming over leather cords.
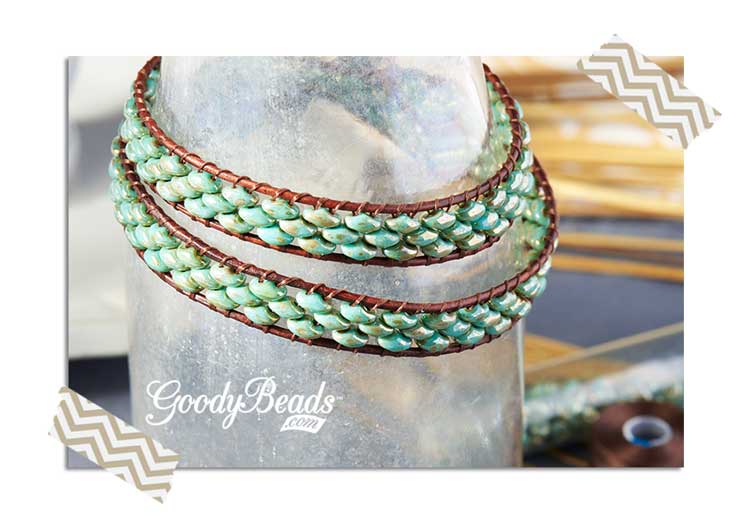
With Czech SuperDuo seed beads, you will be layering the bead holes to create a layer sequence. Below is a tutorial on how to make this SuperDuo wrap around bracelet.
This is a simple one-wrap bracelet. Think about using a different thread color than your leather cord color for a mix of colors.
Use more than one bead on each layer for more embellishment options.
Make a bracelet with multiple combinations of beads to create a fun layered look.
These SuperDuo beads look like tiny stone pebbles, don’t you think? Try a SuperDuo mix set for a colorful bracelet or create a zigzag pattern. What will you try?
Other Tips
How to add on additional thread: Tie thread to closest leather cord and glue with Hypo Cement or fast-drying glue. Cut off excess. Tie new thread to leather cord, glue knot and continue.
How to hold leather strands: An alternative to holding the leather strands, for stability when adding beads, is to clamp the button to a clipboard.
How to straighten leather cords: While you are stringing on beads, adjust previous beads with fingers to straighten out leather cords. Or when you have reached your desired bracelet length, lay the bracelet down and run your hand across your bracelet. This will help to smoothen and straighten your leather cords.
How to tighten threads/bead layers: If you find that your thread does not keep your bead(s) sandwiched in place or the bead sits loosely, sew up and under the cords and through the bead again. Over and down through the bead. Sewing through the bead twice on the leather cords will give your beads a tighter hold.
Tighten leather knots: If your leather cord knots are loosening, add a small dab of fast-drying glue or Hypo-Cement to knot(s) for tighter holds.
How to make an adjustable bracelet: Make additional knotted ends for an adjustable bracelet.
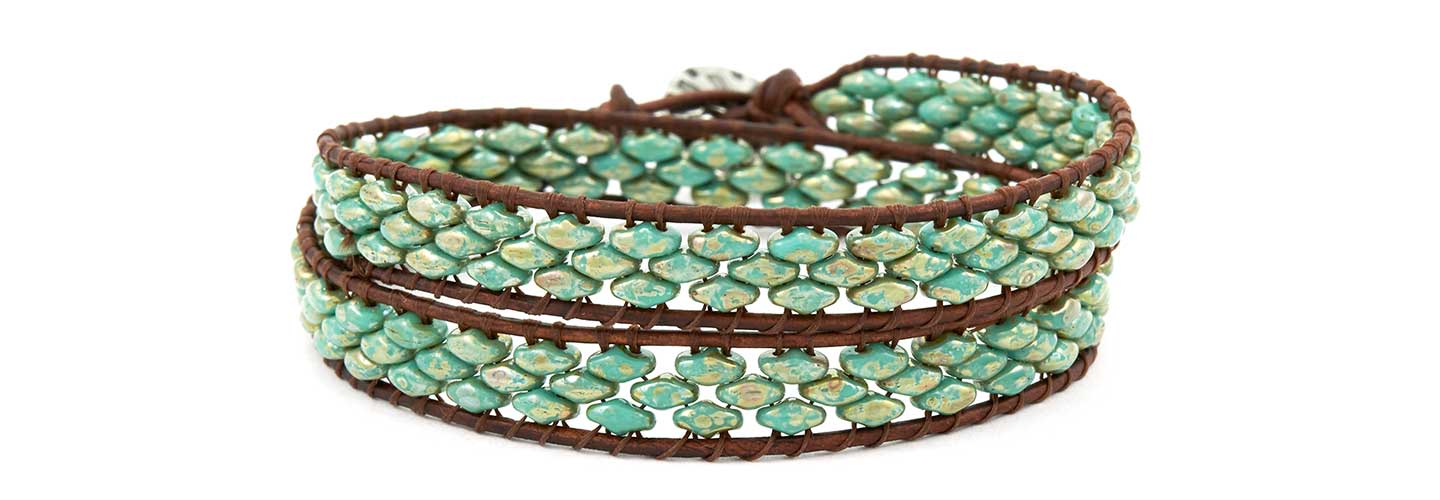
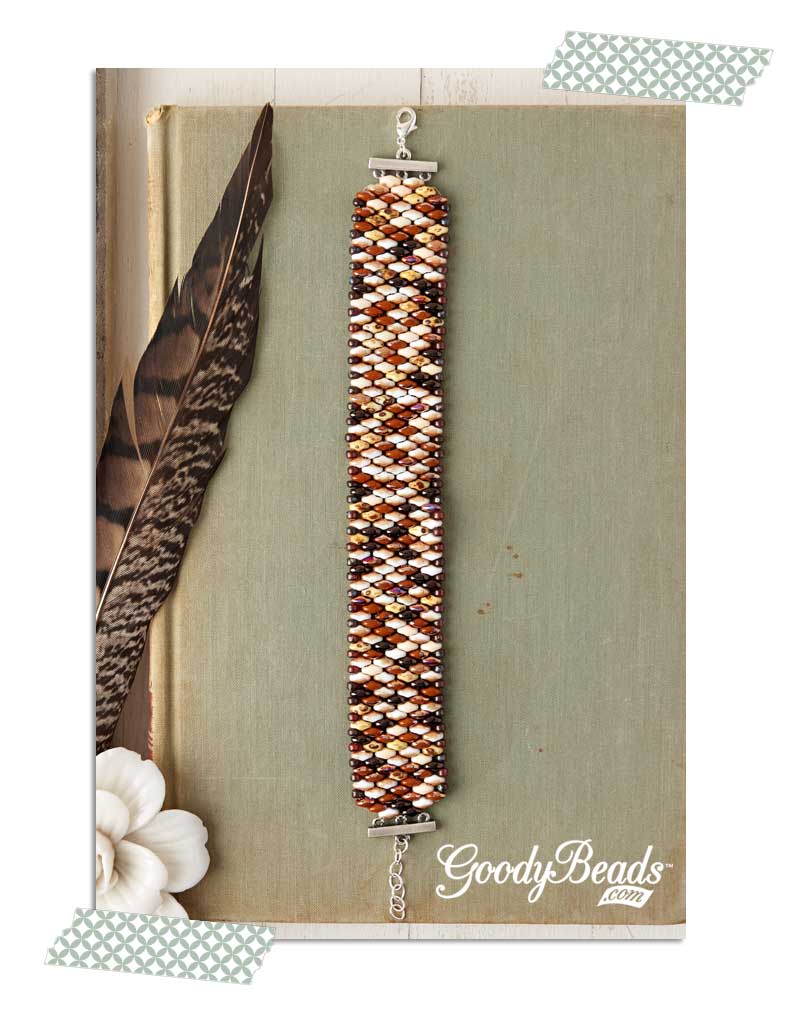
SuperDuo is a Czech-made glass seed bead with a diamond shape and two 0.8mm holes. They are great for dimensional bead weaving designs, from your basic flat stitching to more intricate 3D lace seed bead designs. We have two fun jewelry pieces using these versatile Czech SuperDuo seed beads; accompanied with pattern tutorials.
Ocean Pebble Bracelet
Design and tutorial illustration by So Vang
We love the different mixes that SuperDuo offers. The assorted SuperDuo colors make it easy to bead freely and not worry about color sequence. Our bracelet is weaved with a simple straight stitch and because Super Duo has two holes, they are easy to intertwine.
Below is our bracelet pdf pattern tutorial. With a tube of 300+ beads, we were able to make this bracelet project, with extra beads to spare. For our 7” bracelet, we started with 83 beads for the first row. You can add more or less for your wrist preference, but make sure to have an odd bead count before coming back around. When you reach the end of the pattern, tie the remaining string with the string closest to it and thread through a few more beads before snipping the string. As an option, you can glue the knot for a secure hold. Add your choice of lobster clasp to one end with a jump ring and on the other end, attach ¾” of chain with another jump ring. Or you can certainly choose a toggle or tube clasp to finish off your bracelet.
We love our dainty spiral SuperDuo earrings. They glisten with an edging of gold seed beads and findings. These earrings are simple to make and a great project for the beginning bead stitcher.