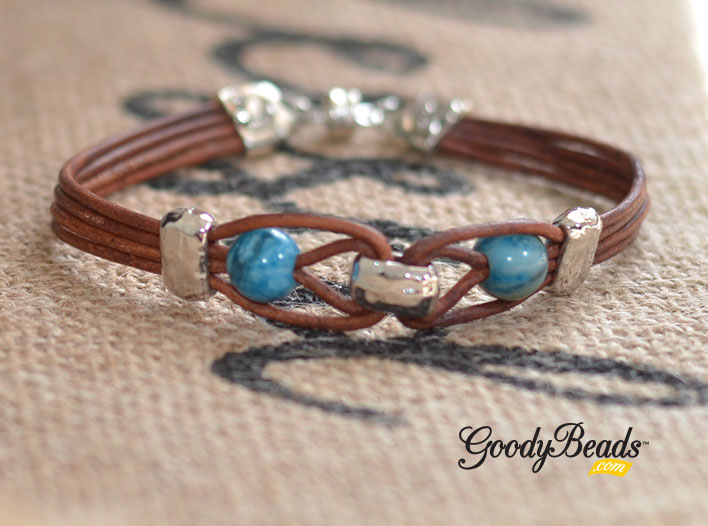
DIY Leather Band Bracelet with Large-Hole Gemstones
Let’s welcome fall with a this fun DIY using LeatherCord USA 1.5mm leather, Blue Crazy Lace large-hole gemstones from Dakota Stones and the perfect findings from TierraCast to pull it all together.
What you’ll need:
- BCL8RDLH-8 – 8mm Blue Crazy Lace Large-Hole Gemstones
- Z019126 – 1.5mm Leather Cord
- TC01913 (3) – 6mm Hammered Barrel Bead
- TC02800 (2) – Crimp End Cap
- Z001256 – 6mm Magnetic Clasp
- Z011500 – Jump Rings

Directions:
- Cut 4 pieces of leather at 9″.
- Slide all 4 pieces of leather through a barrel bead and center the bead in the middle of the leather pieces.
- Divide 2 leather pieces to each side of the barrel bead.
- On one side, fold the inner leather in half and slide a gemstone bead onto both leather ends.
- Fold the outer leather strands in half, laying them on either side of the gemstone you added in Step 4 and slide all 4 ends through a barrel bead. Adjust leather strands to lay flat, and slide barrel up close to the gemstone you previously added.
- Using nylon pliers or a flat nose pliers, gently crimp down on the barrel bead to keep the middle leather and gemstone in place.
- Repeat steps 4 through 6 to other side of the bracelet.
- Trim to wrist size and minus about ½ inch; making sure your barrel/gemstone design is centered and you’re making a straight flush cut.
- Add an end cap to one end of your leather design, making sure all 4 leather strands fit inside and crimp down on your end cap using a flat nose or nylon pliers. Repeat on the other end of the bracelet.
- Open 1 jump ring and slide on your end cap loop and clasp loop. Repeat on the other end cap loop and magnet end.