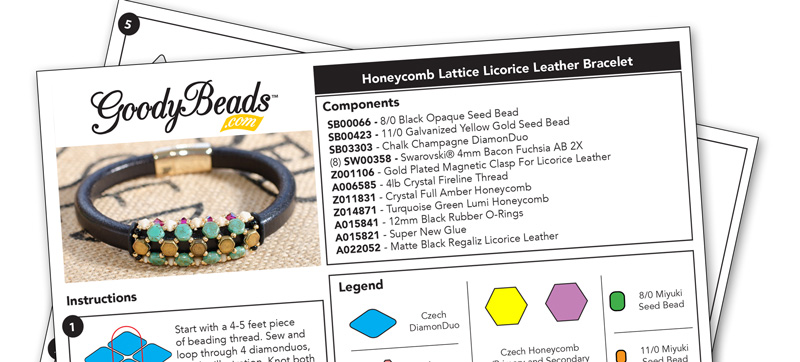
DIY Ombre Stretch Bracelet with Czech Chevron Two-Hole Beads

We love a good stretch bracelet. They are easy to make and easy to wear. Our design today uses two-hole Czech Chevron beads with Beadalon Elasticity.

What you’ll need for this bracelet:

GoodyBeads Blog | DIY Chevron Ombre Stretch Bracelet FREE Tutorial

GoodyBeads Blog | DIY Chevron Ombre Stretch Bracelet FREE Tutorial

Directions:

  1. Cut a piece of elastic at 2 feet. Stretch elastic to loosen the elasticity.
  2. Slide on elastic two beads of each chevron color. Repeat this sequence until you’ve reached a good amount to fit your wrist. Our sample bracelet consists of 6 sequences or 36 chevron beads.
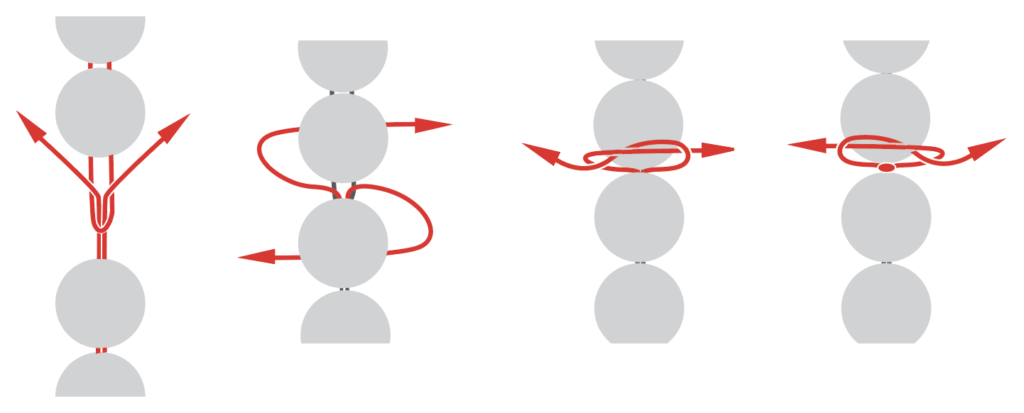
  3. Loop through to the second holes of the chevron beads that you added in Step 2. Make sure to leave an elastic loop.
  4. Take both elastic ends and slide through metal bead.
  5. Now you’re going to make a Tricky Ricky knot with the elastic loop you made in step 3 and the two elastic ends. Follow illustration to make knot and cut excess elastic leaving a small stub. This will tuck inside the silver bead.

Video Tutorial

Catch the video tutorial Tory did on our previous Facebook Live episode HERE.


DIY Paperclip Punk Earrings

Being trendy might not be what you’re aspiring for, but this Paperclip Punk Earrings says it all about your wild style!

What you’ll need:

  • 10.9mm Paper Clip Cable Chain – CH01172
  • Sterling Silver Earrings – Z001008

GoodyBeads Blog | DIY Paperclip Punk Earrings FREE Tutorial

GoodyBeads Blog | DIY Paperclip Punk Earrings FREE Tutorial

Directions:

  1. Cut chain to consist of 8 links. Cut two pieces. (Note: if you would like a long chain earring, cut a long piece)
  2. Open earwire loop and slide on chain piece you cut in Step 1. Close loop.
  3. Repeat all steps for other earring.


DIY White Enamel Teardrop Earrings

Make and wear this COOL White Enamel Teardrop Earrings with enamel components and silver findings.

What you’ll need for earrings:

  • White Enamel Drop – Y008739 (2)
  • Silver Teardrop – Z017165
  • 5mm Jump Ring – Z011515
  • TierraCast Earwire – TCZ0078

Get all the components for this project here

GoodyBeads Blog | DIY White Enamel Teardrop Earrings FREE Tutorial

Directions:

  1. Open jump ring, slide on enamel drop and through inner loop on teardrop hoop. Close jump ring.
  2. Open earwire loop and slide on top loop of teardrop hoop. Close loop. Make sure white enamel is faced outwards.
  3. Repeat all steps for other earring.


DIY Men’s Bracelet Set with Leather and Silver Findings

Today’s tutorial features this men’s bracelet set. Ladies can even love them too! These three bracelets consists of leather, metal beads and even hematite beads.

GoodyBeads Blog | DIY Men's Leather Bracelet Set FREE Tutorial

Hematite Stretch Bracelet

GoodyBeads Blog | DIY Men's Leather Bracelet Set FREE Tutorial - Hematite Stretch Bracelet

Items used in bracelet: HEM6RD-F-8, A021474 & A021633.

Directions:

  1. Cut elastic to twice your wrist length or about 15 inches. Pull and pre-stretch your elastic to loosen the elasticity.
  2. Cut the tip of your needle. Fold your elastic in half and loop the needle at the mid point.
  3. Slide on the elastic the following beads: 4 hematite beads and silver tube. Repeat 4 more times.
  4. Wrap around your wrist to see if it enough to wrap around your wrist. If it is too much, remove a hematite bead. If it’s too tight, add another hematite bead.
  5. Follow illustrations below to make the Tricky Rick knot, to tie off your ends. Glue the knot if you would like. Cut excess elastic, leaving about a 1/4″ stub.

Rustic Round Leather Bracelet

GoodyBeads Blog | DIY Men's Leather Bracelet Set FREE Tutorial - Rustic Round Leather Bracelet

Items used in bracelet: CH00156 (7″), Z003438 (2), A015821, Z003436 & Z009583. NOTE: if 7″ is too short, order an inch or two more.

Directions:

  1. Glue the end of the leather cord and clasp end with super new glue. Let it dry for a minute.
  2. Slide on the leather the Stitch Bead, Plain Tube Bead and Stitch Bead. Slide to situate and centered on the leather.
  3. Glue the other leather end with other clasp end. Unclasp the clasp and let bracelet dry for a few minutes or hours.

Wide Leather Cross Bracelet

GoodyBeads Blog | DIY Men's Leather Bracelet Set FREE Tutorial - Wide Leather Cross Bracelet

Items used in bracelet: CH00040 (8), CH00769 (8), CH00861 (8), A015691 & A015821.

Directions:

  1. Cut all leather cord to 7.5″ or to your desired length.
  2. Glue all three leather cord ends to end clasp with super new glue, situating the 10mm to the bottom. (Make sure to face the fronts of your leather pieces to one side of the clasp.) Let glue dry for a few minutes.
  3. Cross the two 5mm leather and glue the other leather ends to the other side of the clasp. Hold leather in place for a minute or two to let the components bond. Let piece sit and dry for another few moments before wearing.

Check out other Leather Bracelet DIYs to inspired some fun men’s bracelets.


DIY Large Hoop Ring Earrings with Pinch Bail

Summer jewelry is about being big and making a statement. These pair of pinch bail earrings are the one you’ll need!

What you’ll need for pinch bail earrings:

  • (2) Z008275 – 50mm Bright Fine Silver Plated Flat Grande Hoop
  • Z016191 – 12x6mm Silver Plated Diamond Cut Open Charm/Connector
  • (2) TC02582 – 9mm Smooth Pinch Bail
  • Z012031 – Silver French Earwire Earrings

GoodyBeads Blog | DIY Large Hoop Ring Earrings with Pinch Bail - FREE Tutorial

GoodyBeads Blog | DIY Large Hoop Ring Earrings with Pinch Bail - FREE Tutorial

Directions:

  1. Slide large hoop and diamond cut connector through bail and pinch the bail to close.
  2. Open ear wire loop and slide on diamond cut connector. Close loop.
  3. Repeat all steps for other earring.


Honeycomb Lattice Licorice Leather Bracelet – FREE Pattern Tutorial

Today’s tutorial digs into the love of licorice leather bracelets and how casual it plays with any fashion style. Embellish it with a bead tube and you have a fun piece of jewelry for a dazzling summer!

GoodyBeads Blog | Honeycomb Lattice Licorice Leather Bracelet - FREE Pattern Tutorial

Items used in bracelet:

  • SB00066 – 8/0 Black Opaque Seed Bead
  • SB00423 – 11/0 Galvanized Yellow Gold Seed Bead
  • SB03303 – Chalk Champagne DiamonDuo
  • (8) SW00358 – Swarovski® 4mm Bacon Fuchsia AB 2X
  • Z001106 – Gold Plated Magnetic Clasp For Licorice Leather
  • A006585/A006587 – Crystal Fireline Thread
  • Z011831 – Crystal Full Amber Honeycomb
  • Z014871 – Turquoise Green Lumi Honeycomb
  • (2) A015841 – 12mm Black Rubber O-Rings
  • A015821 – Super New Glue
  • A022052 – Matte Black Regaliz Licorice Leather

Pattern Tutorial

GoodyBeads Blog | Honeycomb Lattice Licorice Leather Bracelet - FREE Pattern Tutorial

Get FULL and FREE pattern tutorial HERE.


DIY Chrysocolla & Hematite Collar Necklace

Variations of choker and collar necklaces are making a comeback. Here is our version with Chrysocolla gemstones with 2mm Hematite beads. It sits on your collarbone and creates a different and unique kind of statement.

What you’ll need:

GoodyBeads Blog | FREE Tutorial - DIY Chrysocolla & Hematite Collar Necklace

GoodyBeads Blog | FREE Tutorial - DIY Chrysocolla & Hematite Collar Necklace

Directions:

  1. Cut beading wire to 24 inches.
  2. Slide a crimp tube and split ring onto the beading wire and loop beading wire back down to create a small loop. Make a crimp with crimping pliers. Cut the small excess wire leaving a 1/4 inch tail.
  3. Slide on the following bead sequence: 5 gemstone and 1 hematite bead. Repeat this sequence 31 times. Then ending with 5 more gemstones. (Note, you can make a long necklace by using a longer piece of beading wire or shorten the sequence for a closer fit necklace/choker.)
  4. Slide on a crimp tube and split ring. Slide beading wire back through crimp tube and a bead or two. Pull wire to keep all your bead in place and crimp your crimp tube. Cut off excess wire.
  5. Open split ring and slide lobster clasp loop through.


DIY Sandy Wave Earrings

Sink your feet into this fun DIY. It consists of straw beads and connectors.

What you’ll need for earrings:

  • Rattan Straw Round Bead – Z017902
  • Rattan Straw Off Center Hoop Pendant – Z017897
  • 2 Inch Eyepin – A019599
  • TierraCast® Silver Bead Aligner – TC00356 (4)
  • 5mm Jump Ring – A001528
  • TierraCast® Earring Wire – TC02297

GoodyBeads Blog | DIY Rattan Straw Sandy Wave Earrings - FREE tutorial

Directions:

  1. Using a Bead Reamer, round nose pliers or awl, poke a hole at the top of the off center straw pendant, between the first and second outer ring.
  2. Open jump ring, slide through hole you make in Step 1, and through an eyepin loop. Close jump ring.
  3. Slide on the following on the eyepin and make a wrapped loop: bead aligner, rattan round bead and bead aligner.
  4. Open earwire loop, slide on dangle and close loop.
  5. Repeat all steps for other earring.


DIY Hexagon Rattan Straw Necklace with Gold Findings

Need a fun necklace to complement your summer? Why not try this DIY necklace with Hexagon Straw/Rattan component and thread bead!

Things you’ll need for necklace:

  • Hexagon Rattan Straw Component – Z017901
  • 3 Inch Gold Plated Headpin – A019680
  • Brown Thread Wrap Oval Bead – Z017910
  • 6mm Bead Aligner – TC00971 (2)
  • Shiny Gold Hammered Disc Connector Charm – Y008224
  • 8mm Gold Plated Jump Ring – A011523
  • 6mm Gold Plated Jump Ring – Z011522
  • Gold Plated Adjustable Rollo Chain Necklace Double Slide Clasp – Z010757

GoodyBeads Blog | DIY Hexagon Rattan Straw Necklace with Thread Wrap Oval Bead.

Directions:

  1. Slide on a headpin a bead aligner, thread bead and another bead aligner. Make a simple loop, but make it large to slide on straw connector. About 8-10mm around.
  2. Taking a Bead Reamer, one side of your round nose pliers or an awl, poke a hole on your rattan at one tip between the first and second outer layer. Repeat to opposite end of your rattan.
  3. Open bead thread dangle loop and slide through one hole you made in Step 2. Close loop.
  4. Open 8mm jump ring, slide on other hole on rattan connector and through one hole of disc connector. Close jump ring.
  5. Open 6mm jump ring, slide through other hole of disc connector and through both rings on adjustable necklace clasp. Close jump ring.


DIY Bubbly Earrings with Thread Beads and Gold Findings

Embrace summer boho jewelry with handmade thread beads. Today’s DIY would pair perfectly with a beachside cocktail!

What you’ll need for earrings:

  • Ivory Thread Beads – Z017904
  • 2 Inch Headpin with Ball – A019696
  • Matte Gold Circles Connectors – Z014013 (2)
  • TierraCast® Gold Earring Wire – TCZ0139
  • 4mm Bicone Crystal Luminous Green – SW00574 (4)

GoodyBeads Blog | DIY Thread Bead and Bubbly Earrings - FREE tutorial

Directions:

  1. Slide the following onto a headpin: bicone crystal, thread bead and bicone crystal.
  2. Make a wrapped loop, making sure to attach to a connector hole before completing wrapped loop. (You can also make a simple loop and attach to connector).
  3. Open earwire loop, slide through other connector hole and close loop.
  4. Repeat all steps for other earring.


DIY Jewelry with Swarovski® Around the World: India

This month’s trip is India. Find out how culturally rich and vibrant this country is from its colorful clothing to its exotic cuisine. Plus, bathe in the hues Swarovski suggests to inspire your India trip along with a DIY jewelry project for you to try.

India

One of the oldest civilizations in the world, India is a mosaic of multicultural experiences and rich heritage. Extending from the snow-covered Himalayan mountains to the tropical rain forests of the south, it is impossible to ignore India’s mesmeric conflation of the old and the new. Walking through the bustling city streets you are greeted by a diverse variety of cuisines, arts, crafts, faiths, and nature. Experiencing different textures, sounds and smells triggered the emotion that prompted these designs.

India – Swarovski Colors

  • Indicolite
  • Light Topaz (Note, we are using Light Colorado Topaz in DIY jewelry)
  • Fuchsia

India Inspired DIY Jewelry

GoodyBeads Blog | DIY Jewelry with Swarovski crystals. India Inspired DIY Jewelry.

GoodyBeads Blog | DIY Jewelry with Swarovski crystals. India Inspired DIY Jewelry.

What you’ll need for earrings:

  • 65mm Gold Plated Round Connector With Dot N Dash Tassel – Z017930
  • 9mm Light Colorado Topaz Pear Cut Pendant – SW02491 (2)
  • 8mm Indicolite Round Beads – SW02538 (2)
  • 4mm Bicone Crystal Fuchsia – SW00126 (2)
  • 11/0 Gold Seed Bead – SB00423
  • 2 Inch Gold Eyepin – A019611
  • Oval Jump Ring – A008801

Directions:

  1. Open jump ring, slide on crystal pendant and through inner loop of connector. Close jump ring.
  2. Open eyepin loop, slide through top loop of connector and close loop.
  3. Slide on the eyepin a seed bead, 8mm round crystal, seed bead, 4mm bicone crystal and seed bead.
  4. Open loop you made step 3, slide through earwire loop and close loop.
  5. Repeat all steps for other earring.


DIY Pearly Posh Earrings with Swarovski Pearls

Let’s continue our love of summertime jewelry with these cute Pearly Posh Earrings. With only 4 components, you can whip these up in no time!

What you’ll need:

GoodyBeads Blog |

Directions:

  1. Slide a pearl onto a headpin and make a simple loop.
  2. Open up pearl dangle loop and slide through inner loop of connector. Close loop.
  3. Open earwire loop and slide on top loop of connector. Close loop.
  4. Repeat all steps for other earring.


DIY Large Ring Earrings with White Enamel Link

You know it’s summer when jewelry gets bigger and bigger. These pair of earrings consists of large 50mm rings from Nunn Design and accented with white enamel connectors. It’s going to be a grand Summer with these earrings.

What you’ll need for earrings:

  • 50mm Grand Hoop from Nunn Design – Z008275 (2)
  • 12mm White Enamel Round Connector – Z008744 (2)
  • 5mm Oval Jump Rings – A008799
  • TierraCast Earwire – TCZ0078

Directions:

  1. Open jump ring, slide on ring and a loop on enamel connector. Close jump ring.
  2. Open another jump ring, slide on other hole of enamel connector and earwire loop. Close jump ring.
  3. Repeat all steps for other earring.


DIY Swarovski® Amethyst & Pearl Hoop Earrings

A fun new and old favorite, are these pair of summer-loving hoop earrings with Swarovski crystals and pearls.

What you’ll need:

  • 6mm Round White Swarovski Pearl – SW00665 (4)
  • 4mm Bicone Crystals, Light Amethyst – SW00195 (6)
  • 6mm Bicone Crystals, Light Amethyst – SW00196 (2)
  • 11/0 Silver Lined Amethyst Seed Bead – SB00339
  • 3mm Gold Round Beads – Z001310
  • Gold Plated Hoop – A013205
  • Earwires – TCZ0148
  • Gold Headpin – A019651
    Note: Directions are for making wrapped loops. If you prefer to make simple loops, we suggest using a harder gauge wire like A019658.

Directions:

  1. Slide on a headpin; 4mm bicone and seed bead. Make a simple or wrapped loop. Make a total of 4 dangles.
  2. Slide on a headpin; seed bead, 3mm round bead, pearl and seed bead. Make a simple or wrapped loop. Make a total of 4 dangles.
  3. Slide on a headpin; seed bead, 3mm round bead, 6mm bicone, 3mm round, seed bead, 3mm round, 4mm bicone and seed bead. Make a simple or wrapped loop. Make a total of 2 dangles.
  4. Cut the tab part of a hoop finding off.
  5. Make a simple loop to one end of your hoop perpendicular to the loop of the hoop. Refer to previous Memory Wire Hoop Tutorial blog post.
  6. Slide on the following to the hoop: 3mm round, step 1 dangle, 3mm round, step 2 dangle, 3mm round, step 3 dangle, 3mm round, step 2 dangle, 3mm round, step 1 dangle and 3mm round.
  7. Slide other hoop end through loop you make in step 5 and roll back a simple loop. (Again, refer to the Memory Wire Hoop Tutorial blog post.)
  8. Open ear wire loop and slide on hoop dangle. Close loop.
  9. Repeat Steps 4-8 for other earring.


DIY Follow Your Heart Metal Stamped Necklace

Have you tried metal stamping lately? It is a great time to start a new jewelry making adventure with metal stamping. Let’s start something easy with a heart blank and an adjustable chain necklace.

Items used in necklace:

GoodyBeads Blog | DIY Follow Your Heart Metal Stamped Necklace

Directions:

  1. Stamp your message on heart blank. Optional: Use bracelet guides to help center your message.
  2. Mark in your stamps with a sharpie and wipe excess with a paper towel.
  3. Determine the length of your necklace. wrap chain around the back of your neck and determine where you would want to situate your heart pendant. Cut length with cutters. And then cut chain piece in half.
  4. Connect one chain piece with a jump ring to one side of your heart blank. Repeat to other chain and heart blank hole.
  5. Add a jump ring to the left chain and close jump ring.
  6. Add a jump ring to the right chain, while attaching the lobster clasp. Close jump ring.
  7. Optional: you can also use an adjustable necklace sliding clasp instead of steps 3-6.