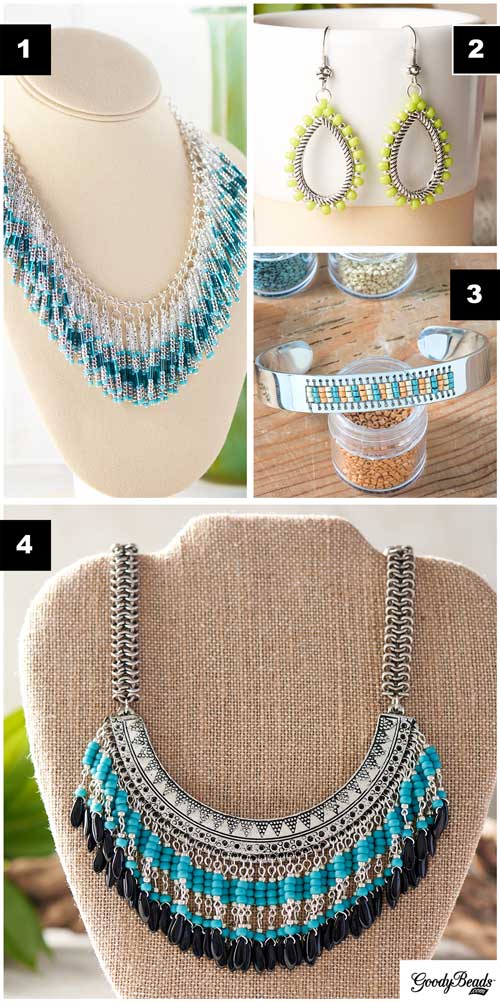
Spring is here and we have some lovely seed bead ideas. If you have a stash of random seed beads, these are great ideas to combine and create with seed beads.
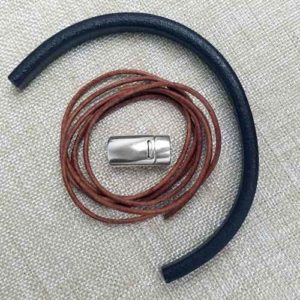
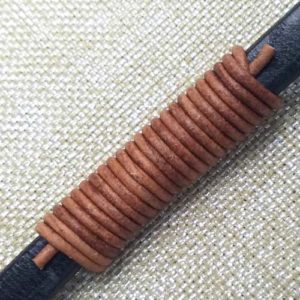
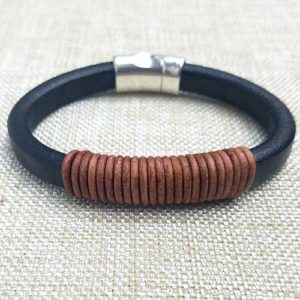
We love leather and GoodyBeads has a large selection of leather and leather findings to choose from. Our inspiration for today’s tutorial is creating a casual leather bracelet for anyone to wear. We love its masculine, simplicity, and rawness of the licorice leather with leather cord coils. Check out this tutorial and make one today!
Components
The components you will need for this bracelet are simple:
Licorice Leather
2mm Leather Cord
Licorice Clasp
Super New Glue
Tool: Flat-Nose Pliers
Tutorial
Step One: Gather your items.
Step Two: Cut a meter or 3.5’ length of 2mm leather cord. Make a 4” loop at one end and lay it on the back side of your licorice leather, centered.
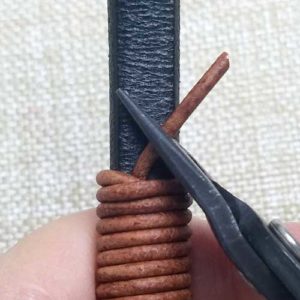
Step Three: Take your leather cord and wrap around the licorice leather and coil downwards. Coil down for a length of 2 inches.
Step Four: Slip that leather end through the loop you’ve made in step two.
Step Five: Holding your coils, take your pliers and pull on the beginning thread end on the other side. As you pull, the loop is shorten and pull the thread end from step four under your coil.
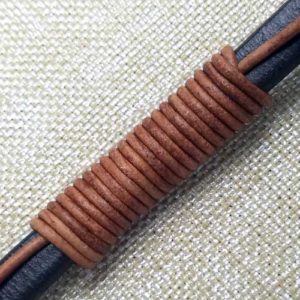
Step Six: Pull the cord until the loop is situated in the middle of your coils.
Step Seven: Cut your cord ends close enough to the coils.
Step Eight: Cut your licorice leather to your preferred wrist length, making sure to situate your coils in the center. Glue on your clasp and you are ready to wear it after the glue dries for at least an hour.
Featured from the trend 2018 Pantone Color of the Year: Ultra Violet, these silk ribbon tassel earrings are fun and flirty to wear. Learn to make these pair of earrings with a video tutorial.
Vergata ribbon is typically used for Kumihimo braiding, but we are using them as tassels because they create lovely thick tassels that are great for earrings or even a necklace tassel. Below is a video tutorial making tassels with vergata ribbon as well as other examples of using this technique.
Video Tutorial
Start by cutting a 5 feet long vergata ribbon. Tie the two ends together to create a loop. Using your four fingers, start wrapping the ribbon loop loosely around them, creating a width of 3″ of ribbon. Watch and follow as we use a 6″ piece of wire to make the tassel and adding a cap and beads to finish the earring dangle.
In our Ribbon Tassel Earrings trend, these tassels are smaller and dainty. Use 3 feet of vergata ribbon and after you’ve tied the two ends together, wrap the ribbon loops around two fingers loosely. Follow the rest of the video to add a cap and beads.
Miracle beads with a teardrop shape is the perfect bead to use for easy DIY earrings. Here are five examples of earrings using the teardrop miracle bead with various spacers and small accent beads.
Starting from the top and moving left to right here are different ways to embellish the bottoms of your teardrop earrings:
What is your favorite? What will you create with these lovely Miracle Beads? We would love to see what you create!
Ombré Earrings with Chinese Crystals
An assortment of Chinese crystal colors has arrived. We love the opaque and milky hues so we made some stunning earrings with Nunn Design® earwires. Check out these earrings and tutorial.
Wrapping wire can be a fun technique used to add beads to frame a hoop or link finding. Here, we used four Chinese crystal colors to wrap around these oval hoop earrings (A014374 & Z014371), creating an ombré look.
Coil 2-3 times around the top part of the earring hoop. (Use nylon pliers or non-serrated pliers to smooth the coil around the earring.) Pinch coil together to keep wires close.
Pick up a Chinese crystal bead and hold it perpendicular to the earring hoop. Wrap the wire the same direction as you’ve done in step two. Wrap around two time.
Repeat 11 more times. Note: If you want to create an ombré coloration, use four gradation of Chinese crystal colors. Wrap three beads of the same color individually then add the next color three more times, etc.
Make sure at the end you wrap your wire around the earring hoop three time. Cut excess wire. Use pliers to smooth the coil around the earring hoop.
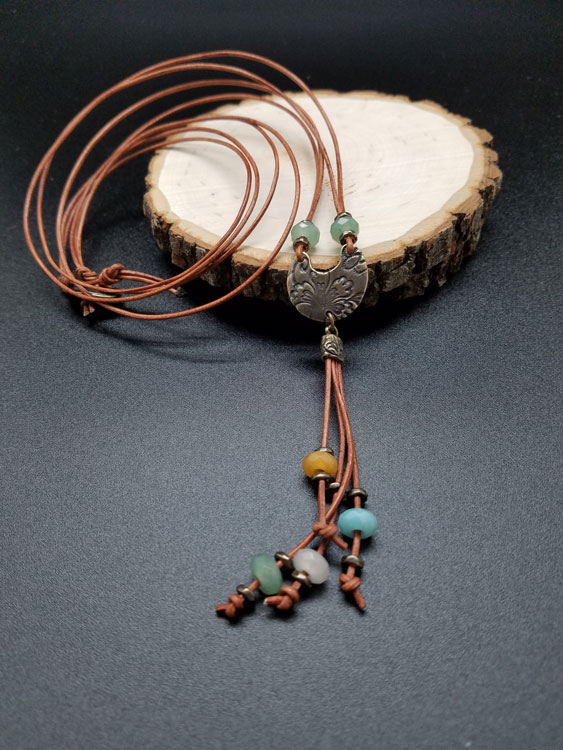
Tory’s Make and Take class was a HIT at the Twin Cities Bead Bazaar! It consists of Dakota Stones® faceted large-hole gemstones and TierraCast® new collection: Vida Más Dulce. We are happy to share with you this necklace and a tutorial you can make!
Start by cutting the leather for your tassel. For a long tassel cut 4 pcs of leather at 5”, 4.5”, 4” and 3.5”. For a short Tassel start with 3.5” and cut the others at 3.25”, 3 and 2.75”.
Put the 4 ends of your cut leather into the cord end and crimp the cord end on both sides with a non-serrated or nylon Pliers. Make sure to squeeze both sides or you may loose a piece of leather on either end.
Add a spacer bead, gemstone and spacer bead to each piece of leather cord in your tassel and tie a overhand knot at the end. Pull tight so they do not come undone. Make any adjusts you need to the tassel length at this time.
Measure how long you want your necklace to be around your neck. Take this length and double it and cut. Then cut a second piece the same length.
String your leather thru the top holes of the TierraCast connector piece. Then trim the ends of your leather to a point, to make it easier to slide on your beads. On each side string both pieces of leather thru the spacer bead, gemstone bead and another spacer bead.
Pick one side to add your button to and put one piece of leather cord from that side thru each of your button holes and do an overhand knot with both cords. Then do a second over hand knot under the button and pull it up so it is flush with the button.
On the other side do an overhand knot at the top and then about a half an inch down, add a second overhand knot and this will become your button hole to act as a clasp for your necklace.
Open your jump ring and add your tassel and the bottom hole of the TierraCast Connector. Close your jump ring.
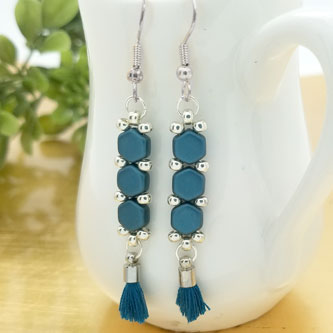
Honeycomb Tassel Drop Earrings Tutorial
Were you able to make it to the Twin Cities Bead Bazaar this past weekend? We had so much fun! We’re sharing this fun tutorial that So Vang taught as a Make & Take class. Made with honeycomb beads, 8/0 Miyuki seed beads and silver findings, this easy pair of earrings are easy to wear and to make for your girlfriends!
These are items you will need to make these lovely pair of earrings: