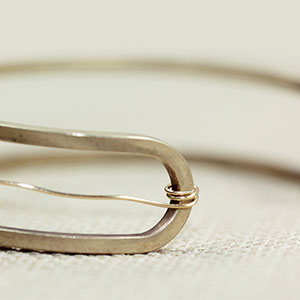
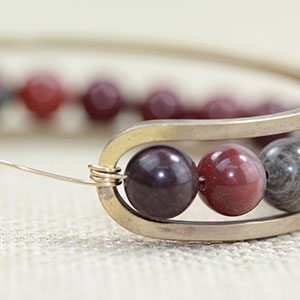
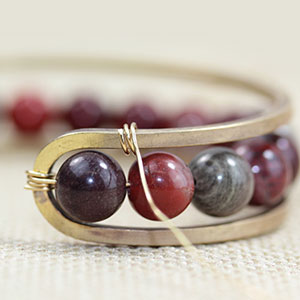
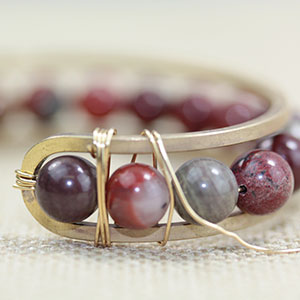
Vendor Video: Artistic Wire 3D Jig Expandable Bangle Bracelets

Wyatt White, from Beadalon, demonstrates how easy it is to make an expandable bangle using the Artistic Wire 3D Jig! Check out this video and learn to customize one for yourself!


Tools and Materials


Video Tutorial


Beaded Teardrop Earrings with Video Tutorial

We are still in love with our Groovy Bead Frames and could not wait to share this easy tutorial with you. Shown in our January 2017 Color of the Year, are these easy-to-make seed bead teardrop earrings with the pewter drop groovy bead frames. Follow our easy illustrated instructions and a tutorial video.

Materials

Tutorial

You can pick up this pdf file tutorial with illustrated instructions. OR watch our tutorial video to see how simple it is to create.

A Quick Note: The holes of the Groovy Bead Frames might not have a clear opening. I suggest using a bead reamer (A002370) or something sharp and pointy to poke the holes first to ensure a clear opening before stitching.

Components in video: Z019397, SB00332, SB00076,A002413TCZ0078.


Gemstone Cuff Bracelet with Tutorial

We are loving gemstones and especially making them into bracelets. We have this super simple bracelet tutorial that uses 8mm round gemstones, cuff bracelet and 24-Gauge Artistic Wire.


We have chosen these glossy 8mm Apple Jasper (APL8RD-8) to lay inside our favorite open cuff bracelets (Z002579) and wrapped with 24-Gauge Artistic Wire (AW00049). We love this tutorial because you can use any 8mm gemstones and different hues of artistic wire to create your own.


Tutorial


Apple Jasper Bracelet Components:
APL8RD-8, Z002579, AW00049

Matte Howlite Bracelet Components:
WHT8RD-8Z002579AW00049


Printer-Friendly Tutorial


Criss Cross Leather Bracelet by Dakota Stones

We have this Criss Cross Leather Bracelet tutorial from our friends at Dakota Stones, whom provides high-quality gemstones since 2001. We love this bracelet because it uses leather cord, fairy ribbon and large-hole gemstones.

Materials

Tutorial

  1. Thread the button on the leather and find the center. Tie the cords together in an overhand knot. Before you tighten the knot all the way, insert the end of the Fairy ribbon and tighten.
  2. Start by threading the large hole beads onto both ends of the leather and securing each end with a bead stopper or a loosely tied knot.
  3. Weave the ribbon in a figure 8 (fishtail weave) around the left outside leather and in between the two leather cords. Repeat on the right- around the cord and through the middle.
  4. Slide a bead up on your left strand of leather and repeat the figure 8 with the suede on the left side, below the bead. Repeat with the right, slide a bead up and figure 8 with the ribbon on the right.
  5. Continue with Step 4 to use about 32 beads total, or until you reach your desired length. Taper the end by weaving the cord 3-4 times in between the leather without the beads.
  6. Finish by tying an overhand knot to join the ribbon and two leather cords. Tie an additional overhand knot with just the leather cords, leaving enough space in between the two knots for your button or bead to fit tightly. Glue the knots and cut excess. You can always leave the ribbon tails or add beads to the ends of the leather for accents.


EZDIY Leather and Curved Tube Bracelet

Learn to create this popular DIY bracelet with 2mm leather and curved tube beads. This easy-to-make, double-wrap leather and curved tube bracelet made with simple overhand knots is a versatile tutorial for a single-wrap, double-wrap, triple-wrap or more.

As seen in our Trends we Love: Leather and Tube Beads, create a longer length to double as a necklace or bracelet. Or simply be inspired to add spacers and metal beads.

What you will need:

1.3mm or 2mm Leather Cord

50mm Curved Tube Beads (A014097). If you love gold, try Gold Curved Tube Beads (A014101)

33mm Large Round Swivel Lobster Clasp (Z008325)

Tutorial

GoodyBeads | Blog: Tutorial on how to make a leather and curved tube bracelet.